Mike Jordan
-
Posts
538 -
Joined
-
Last visited
Content Type
Profiles
Forums
Events
Gallery
Blogs
Store
Everything posted by Mike Jordan
-
The prisms are good for letting in the light but are a menace for creating condensation if you don't double glaze the bottom face. (Referring to the rectangular pattern) Mike.
-
One more vote for a double glazed dog box, don't even think about Houdini hatches. There are photos of a six port pigeon box and a double glazed dog box in my gallery. If you go for the brass or stainless bars on top of your box, do consider the hinging system shown, it makes cleaning the glass and bars much easier.
-
I haven't seen the inside of all the fleet but the ones I have seen were a very poor quality fit out, they might suit someone who enjoys a challenge. Mike.
-
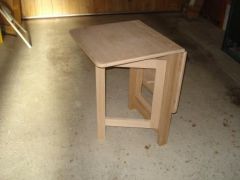
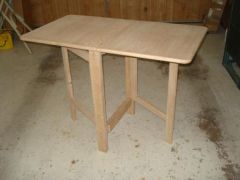
From the album: Deck Lights
The table can be used for two or four persons as required. -
From the album: Deck Lights
The table folds down to approx 100mm thick for storage. -
They may be firm and easy to fit, but like the desmo legs they only fit in one place and you have no flexibility at all, the table can't be set up on the bank, deck area, or anywhere else. You have two sockets to trip over and several bits to store when the table is out of use. There are a number of designs for folding tables which are much more usefull. Mike.
-
It might be worth trying a call to Crockers Tents at Chellaston Derby 01332 700699. Mike.
-
A couple of flue fitting questions
Mike Jordan replied to rupertbear's topic in Boat Building & Maintenance
It also used to say in the fitting instructions for some stoves that the minimum flue length should be something in the region of 20 feet to make it work properly. I wouldn't be to concerned about the weight of a narrow boat flue but one twenty feet long would be a different matter. -
Everybody has their own opinion on this, mine is that working on the hard with the shell levelled up, and as close to home or workshop as possible, is much better in terms of cost and speed of completion. The cost of a years mooring fees, licence, transport and fuel etc, will normally easily equal the extra crane and transport fees. A shell with sloping sides will normally swim better than a dead square box and is not really much more difficult to fit out, if you can deal with the curve of the roof and the tumblehome on the superstructure then sloping bottom sides are no problem. ( listen for the howls from the owners of square sided shells, and yes you do get a little more internal space with a square shell but only at floor level) In the above circumstances a spirit level will be useful for level and plumb lines, If fitting out afloat you will have no use for it other than as a straight edge. A large plywood triangle at 90 degrees will do nicely to plumb thinks up. I have never tried to fit out a lined shell but have seen the attempts of others. My opinion is that these are very hard work and not a short cut as often suggested. just think of trying to wire it up or cut a bulkhead to fit! The usual sequence of applying the timber linings for me is - grounds or clenchings fastened to the steelwork -partial ballast and floor completed - insulation installed - internal bulkheads - front an back bulkhead linings - side linings - roof lining. I'm sure that others may vary this method with good results but I think its a good system. A look at my profile may provide the odd short cut or idea. Best of luck with the project. Mike
-
Hi Vince If you care to send me an email address by PM I will be happy to send you some info on prices, measuring, and fitting methods which should be useful no matter where you chose to go for your board. Mike.
-
Its not unusual for pressure reducing valves to make a noise as the diaphragm vibrates when the gas moves through. It certainly happens in high pressure units and in normal garage compressors. A propane reducer sometimes emits a slight noise in use but I have never heard it from inside the boat. I would not regard it as a definite fault but its always better from the peace of mind angle to replace it if in any doubt.
-
Help required with tradesman please
Mike Jordan replied to H.C.Astell & Co's topic in General Boating
Cratch cover - Tim Garland 07790 642205 No he didn't make the one in the attached pic. Mike -
Tool Station do a reinforced clear plastic tarpaulin sheet 3metres by 4 metres for £17.50 inc VAT I have one for covering my small trailer and they seem to be decent quality. There are eyelets at 1 metre intervals round the edges. -Leno Clear tarpaulin -Code 97981
-
Laminated glass is the best answer, all of the plastics materials deteriorate in some way or other. Toughened glass has an order time since it needs to be cut to size and then heat treated. toughened also has the drawback that it shatters into small pieces if broken in use, laminated will normally break but stay in place in the frame.
-
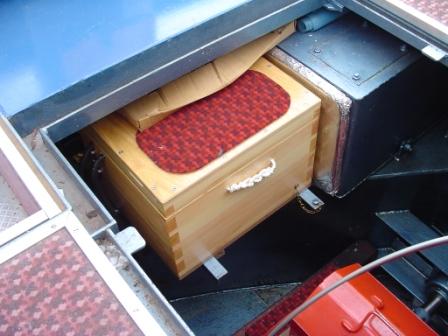
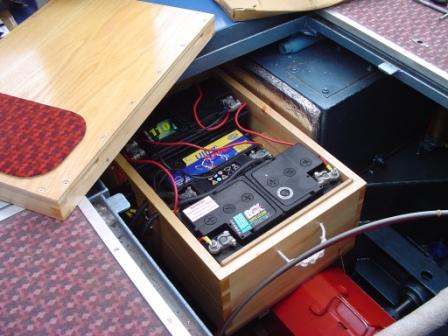
Battery box on rails
Mike Jordan replied to Don't tell him Pike!'s topic in Boat Building & Maintenance
I have done something similar on a number of cruiser stern steel boats. The batteries fit into a box which is mounted on two pieces of steel angle welded to the uxter plate and allow the box to be withdrawn for battery servicing. Hardwood runners fit round the steel angle and a pin is used to secure the box in place. The cables are welding type multi strand of adequate size and the system has passed inspection many times. Although you cant weld anything to a Dawncraft, it should be possible to use a similar arrangement perhaps using extending drawer runners of the right weight capacity. I can't see the sliding seat runners you mention being able to move the batteries very far.
-
Roof prisms - do they drip from condensation?
Mike Jordan replied to magnetman's topic in General Boating
There is no doubt that they get very cold and drip, that bottom edge is ideal to help the drips form. There is an answer to the problem! I have found a solution that's simple in principle but a little tricky to do. I made small wooden frames that fitted up tight to the bottom face of the brass surround, these had an inner face splayed at 20 degrees to allow maximum light to enter and then sealed the bottom of the frame with a separate screwed on glazed frame. this made a complete air tight box and effectively double glazed the prism. The live aboard owners later reported that they worked well. The frames need to be made to suit the thickness of the roof lining for a neat finish. I don't have any photos but will try and knock up a sketch if you need one. Mike. -
Just had another look at the OP and note that you are fastening direct to the joists, all the flooring normally sold is intended for use on top of existing flooring. All the above remarks are still true but if you are using the solid hardwood flooring sold in packs of random lengths you will not be able to match the length to the joist centres. that would mean that the shorter boards are, as you say, just hanging on the tongues. Please don't even think about it.
-
If you are using solid wood flooring as your post seems to imply you must make allowance for the timber to expand with increased atmospheric moisture. The length of the boards remains the same for all practical purposes but the width will increase with the take up of moisture. The natural inclination is to butt the boards tight up to one another and avoid gaps. If you do this and screw the boards down you will not stop the expansion! The pressure involved is enormous, it can move bulkheads and furnishings and cause all manner of problems. If screwing the boards down it's recommended that you temporarily insert coins or washers to ensure a gap of about 2mm between each board, in addition a gap of at least 12mm must be left at the sides of the floor (normally covered by the skirting board) Suppliers of solid wood flooring tend to sell an adhesive which sets like soft rubber and allows you to get away with butting the boards and allowing the adhesive to move under pressure. The adhesive is expensive but it works, it should be ideal for use where the maximum width of flooring is about 2 metres and a gap is left at the sides. The engineered flooring based on 4mm of hardwood bonded to a plywood base material is much more stable but costs more than the solid material. I have seen instructions attached to packs of flooring which advises you to leave the materials in the area where they are to be used for a period of 48 hours to "condition" this is supposed to solve the problem. Its nonsense but it probably sells flooring. Best of luck with the project. Mike.
-
How to fill holes in the metal structure
Mike Jordan replied to rubblequeen's topic in Boat Equipment
I can't argue that the metal putty won't serve as well to fill the holes, I have no experience of using it but assume that is uses a resin based setting method. I have experience of using welding or drill and tap methods of doing this sort of job and I have every confidence it would work so suggested it as a method. Mike. -
How to fill holes in the metal structure
Mike Jordan replied to rubblequeen's topic in Boat Equipment
I suggest you tap the holes and run in a little bolt with a setting sealant on the threads. leave the bolts well proud and cut off after the sealant has set, grind level with the steel and paint over. If the steel is thick enough, countersinking the hole and using a countersunk screw tightened below the surface and filling over the head may be possible. -
Its the front panel of an alde gas boiler used to heat water for a radiator circuit. Lots of them are installed in caravans and boats. Later versions have a balanced flue system. I have used several of these in the past and found them very reliable, space saving, and efficient. Some people are keen to say that they are inefficient and use lots of gas, a look at the temperature of the roof level exhaust should prove that this is not true and that they are in truth quite efficient.
-
This post cannot be displayed because it is in a forum which requires at least 10 posts to view.
-
I can only report on the results of using these heaters with BMC 1.5 and 1.8 engines. The hot supply was taken from the heater outlet pipe on the cylinder head and the return to an unequal tee in the swim tank return pipe.I never experienced any over cooling. The calorifier seemed to reach full temperature in about 45 minutes of cruising with or without the heater in use at the same time. I can't recall using the engine to generate power for the batteries without cruising at the same time, I don't think its good practice, and wouldn't expect to get the engine warmed up quickly enough to generate waste heat to warm the cabin. A very popular modification in the eyes of management was a modest length of 100mm lightweight hose to provide a hair drier. Probably not worthwhile today since everyone seems to have an inverter onboard.
-
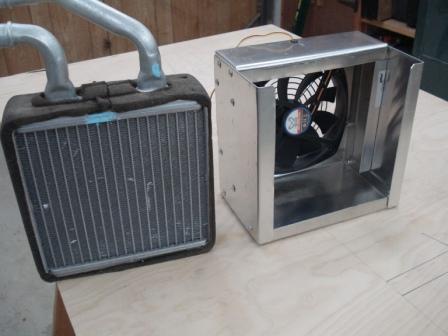
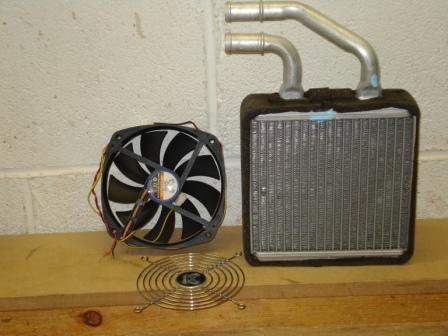
See if this helps- The photos are of a home made housing using pop rivets and ally sheet, a single 125mm computor fan and and the matrix from a ford galaxy ( there are two heaters in a galaxy. This matrix is from the passenger compartment) Computor fans are not as good as those taken from a vehicle but are nice and quiet. The matrix is surrounded with foam to stop it rattling and can be slid into the housing with the pipes facing in either direction. I have always sited the heater in the base of a cupboard and frequently put a fan in the roof of the cupboard to vent through the roof of the boat. this means that the heater will work in reverse when the fan in the unit is switched off and make the cupboard into a drying space. A 100mm fan normally uses about point one of an amp and can be left on overnight. Mike.
-
Been there and got the Tee shirt! there was an article showing how to do it complete with pipe diagram etc in the December 2011 edition of Waterways World. You can still download it from the WW website for a few pounds. I have made a number of the units down the years using car parts. Its a very effective heating method, the heat losses from a car at 70mph must be huge, a well insulated boat at 4mph is a different matter. Strangely enough plenty of people are keen to heat water with a calorifier to make a saving but don't seem to think of space heating. Go for it! Mike.