Giant
-
Posts
667 -
Joined
-
Last visited
Content Type
Profiles
Forums
Events
Gallery
Blogs
Store
Everything posted by Giant
-
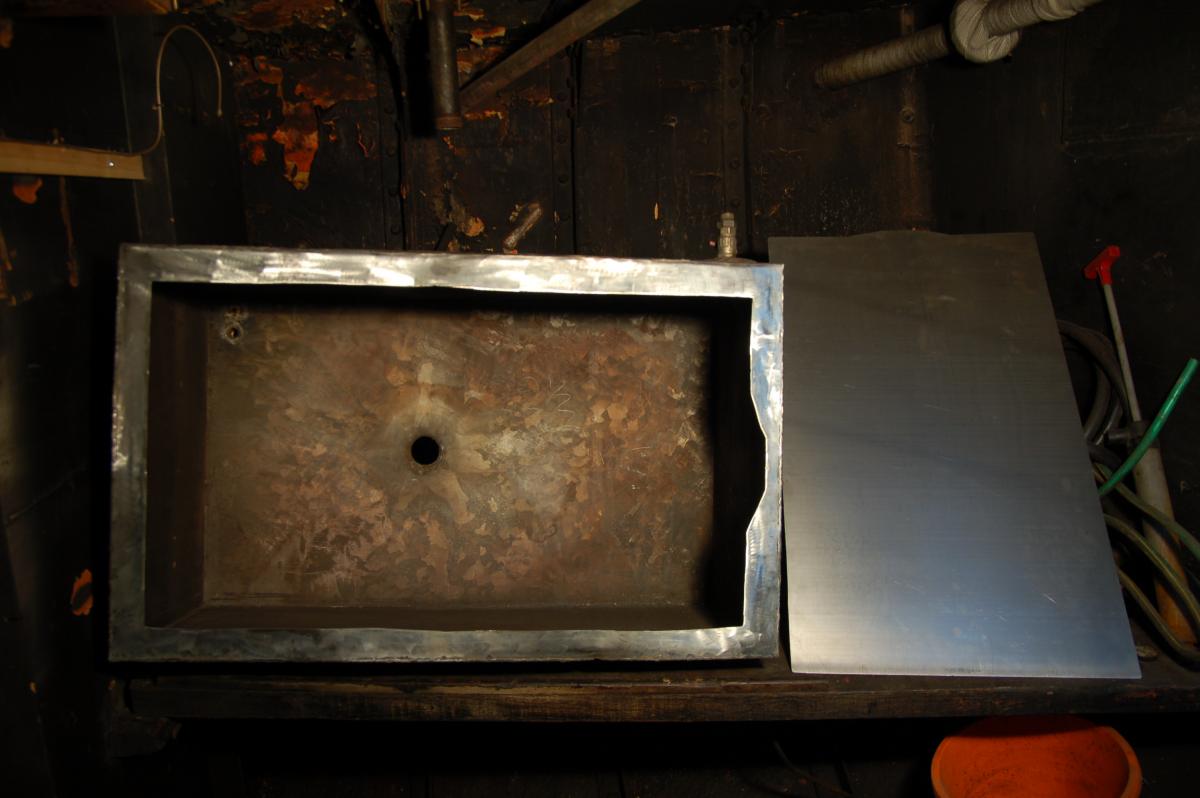
All done now. We cut out the bottom of the tank leaving a 2" border round the edge, ground the border back to bare steel, and cut a new bottom from 2mm sheet, overlapping the old by an inch all round. We had a mobile welder over, managed to hoist his big MIG machine down through the hatch and put that on the workbench, with the gas bottle up on deck and the tank on the floor where it could be leaned over to work on. It was a bit fiddly but we got the job done. I wanted to make sure that water couldn't end up collecting in the overlap area between the old and new plates, so after we were done I sealed the gap all the way round with a diesel resistant metal epoxy putty. Here's the finished job from the inside.

-
Thanks. I owe my splicing and whipping to time on a tall ship - one of the first things I was taught in fact, before being put to work on eye splicing both ends of about 25 lengths of hempex rope to build a bowsprit net, each requiring an accurate finished length... No just more practice.
-
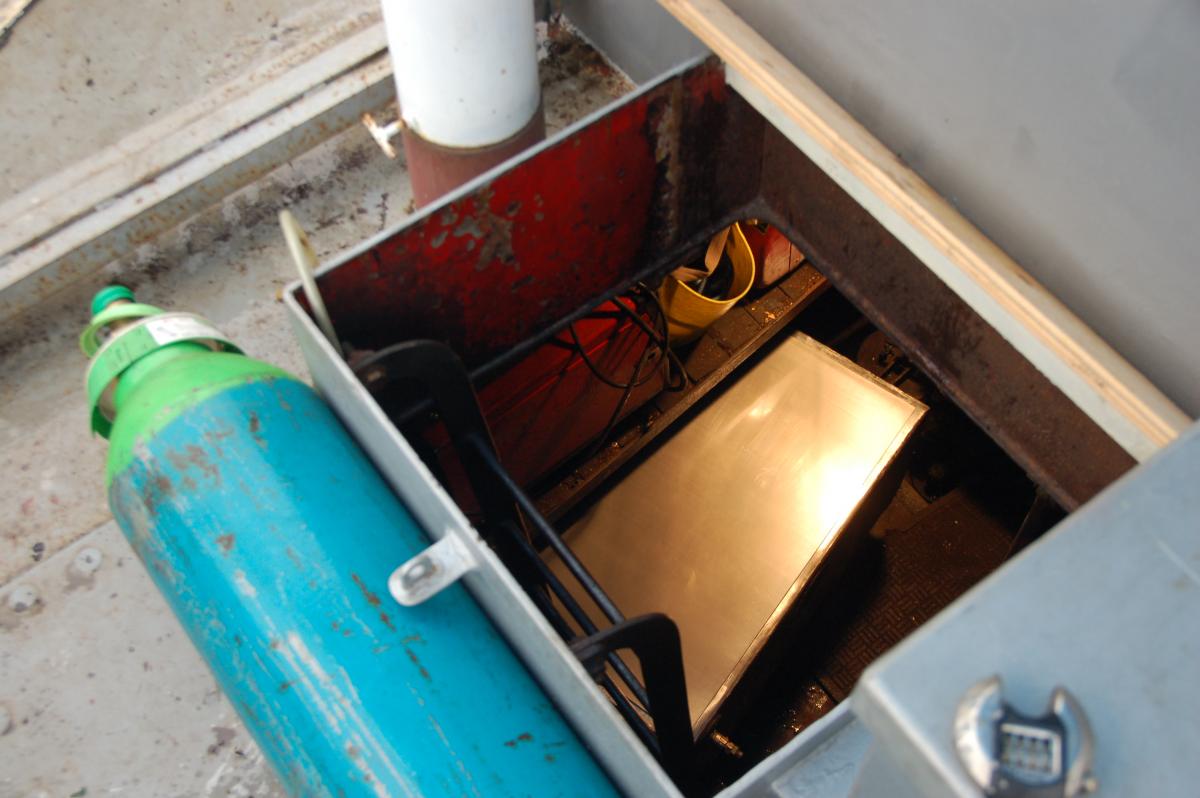
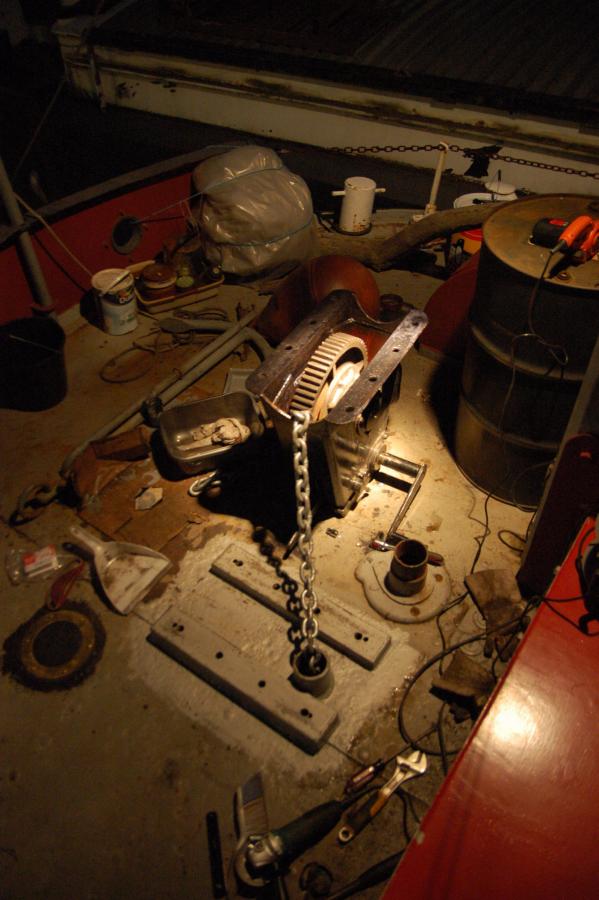
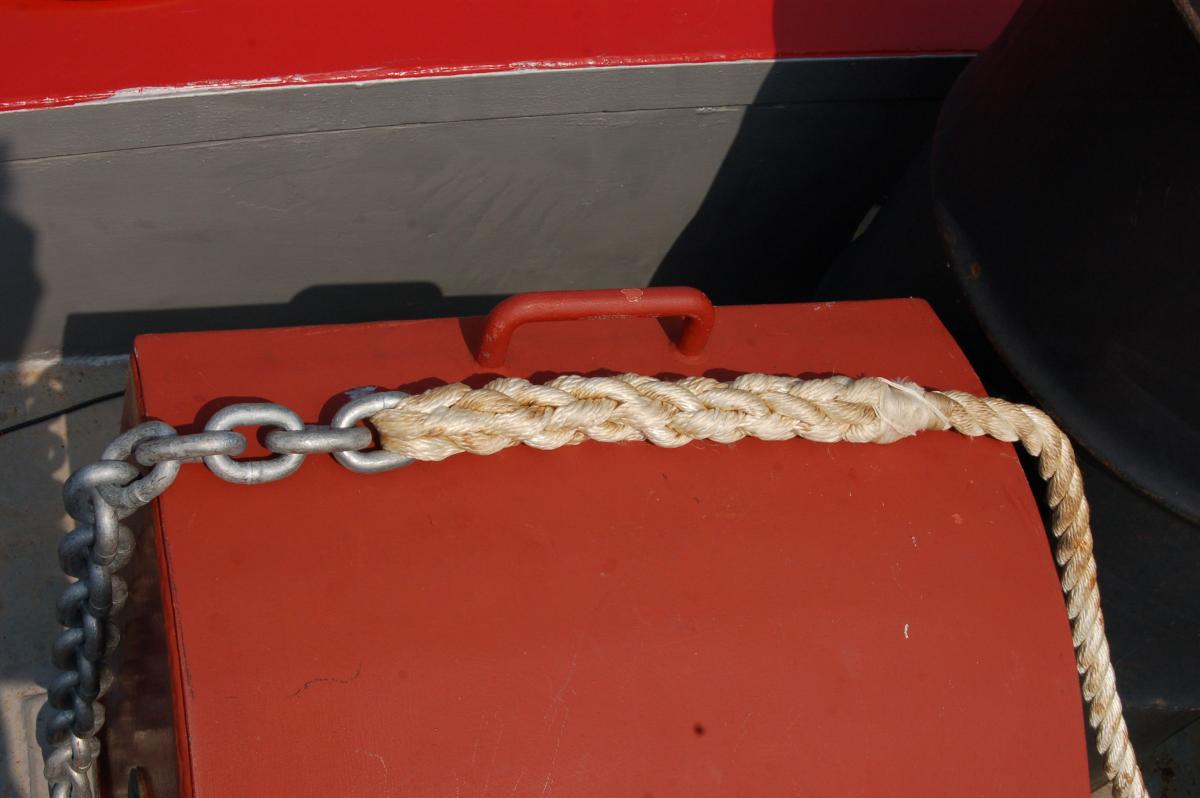
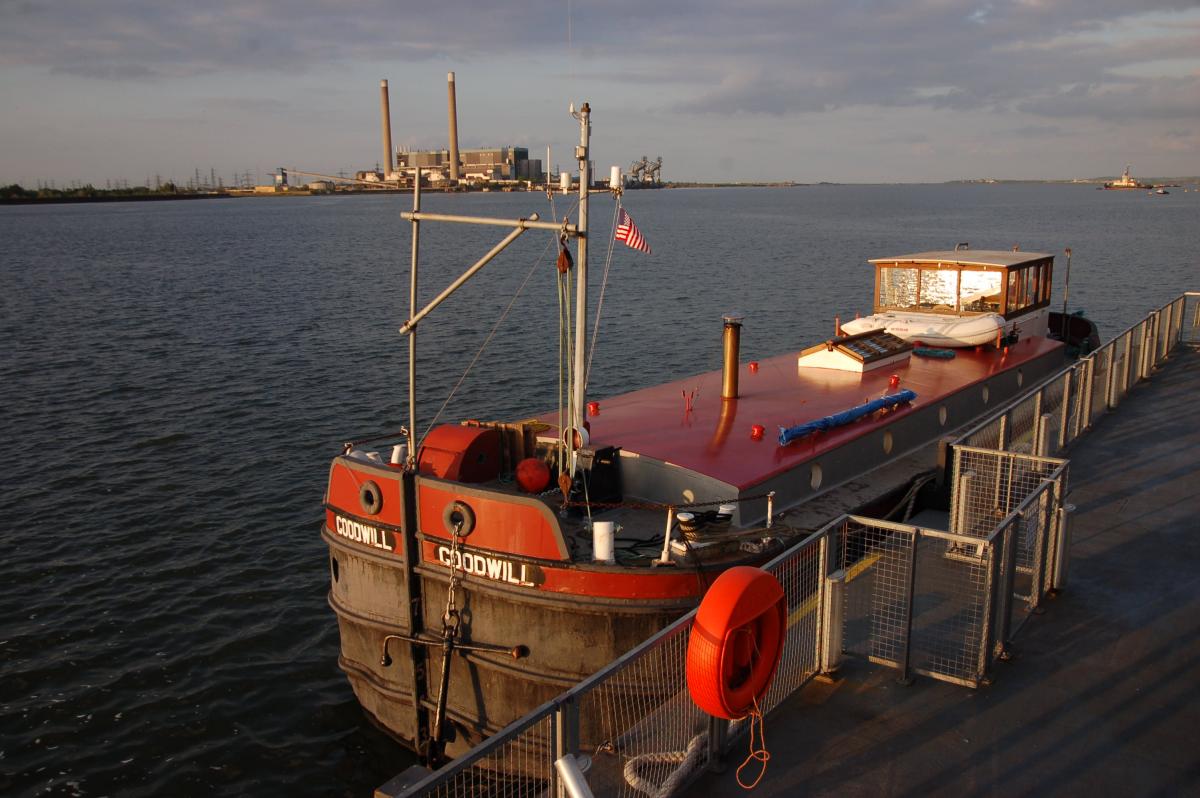
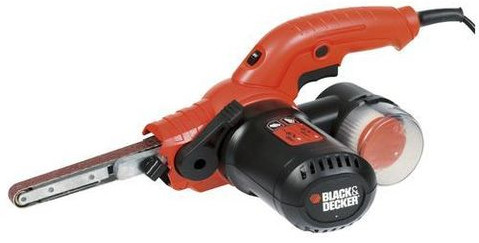
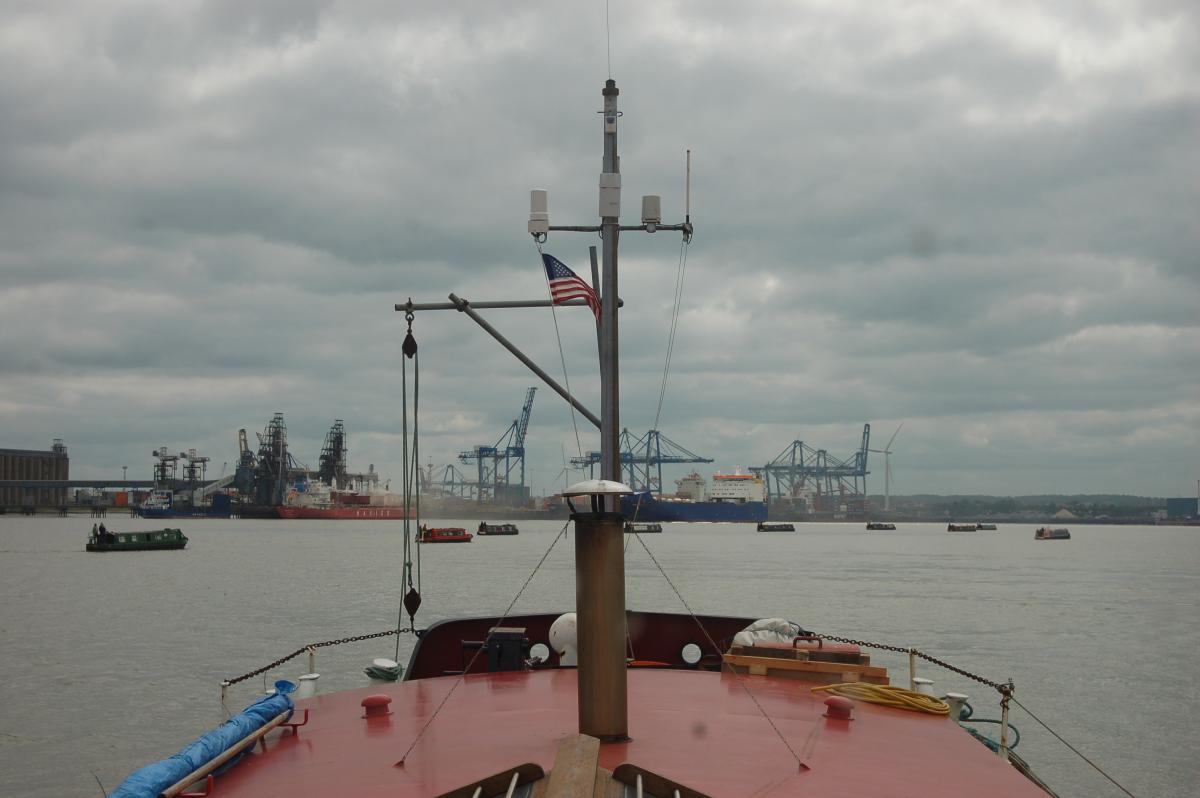
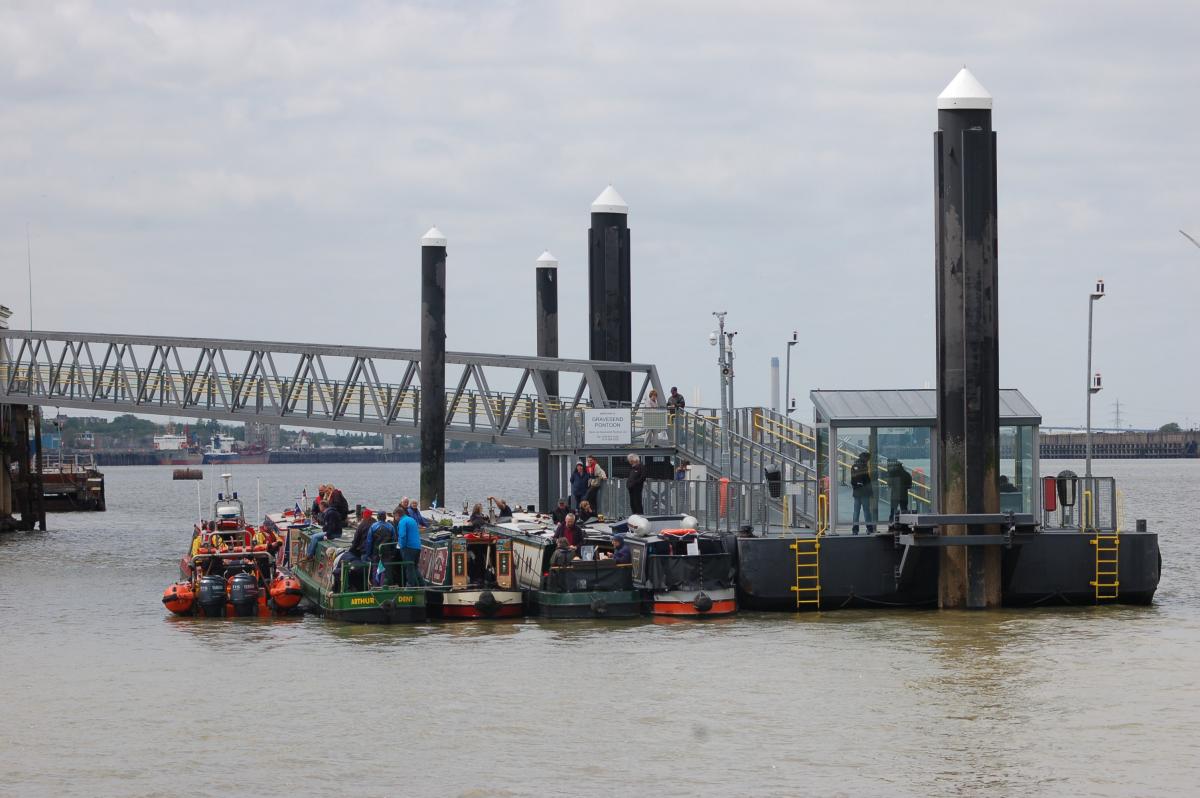
Thought I'd come back and update this thread with the eventual conclusion of this saga. I got hold of and tried a couple of different samples of chain, none of which were a good fit for the gypsy, but narrowed the search to a chain of around 40mm pitch. I was hoping that 14x42mm would fit, but couldn't get a small sample of that easily. Eventually we decided to get the winch off the deck and bring it to EYE Marine in Ipswich, who we'd had recommended both in this thread and elsewhere, and who had various sizes in stock to try. It took us some days, lots of WD40 and Plusgas, the destruction of one socket driver and the purchase of a 4ft breaker bar to get the eight M20 mounting bolts out, which had rusted into the welded nuts in the hollow steel mounting blocks the winch sits on. Once it was off we recruited two neighbours to help shimmy it down the side deck, lift it up onto the shore and get it onto a trailer. Once at EYE we held it in place on the ground with their forklift truck while trying every available size of chain. 14x42mm turned out to be still too long. The best fit was a 13x39mm, a rarer variant to the usual 36mm pitch for 13mm metric chain. Still looked like it might be a midge under original pitch but ran through OK, and held under load. Unfortunately EYE only had this size in lifting grades and it turned out Maggi have stopped producing it in the marine grades. So we were stuck again. I was increasingly sure though that the gypsy was originally for a 1/2" chain which works out to 12.7x40.4mm. A bit of further research discovered that Maggi have recently started producing Imperial equivalent sizes and now have a 13.5x40.5mm half-inch equivalent size in their catalog. Don't know why they increased the wire size. There was no way for us to test it would fit, but by this point it seemed almost certain, so eventually we decided to just bite the bullet and order the full 60m length we wanted. With that on the way, the next job was to improve the winch mounting arrangements and get the rust under control. The deck area and bottom of the winch both got taken back to bare metal with a wire brush wheel on the angle grinder, Vactan applied to them, and a few coats of primer. We got new bolts, and an M20 tap to clean up the threads on the deck side. Above is the scene on deck in the midst of this. The winch is sitting upside down and the hollow mounting blocks are visible in front of it, with chain running down the pipe into the locker. In order to avoid future rust, we got the hollow mounting boxes dried out and filled them with oil, but panic ensued when a few hours later the level had fallen in one of them. Fortunately the leak turned out to be dripping into the chain locker rather than the back side of the insulation & lining in the forecabin. After pumping all the oil back out, we got the hole cleaned up and sealed with metal epoxy putty. Now the mounting blocks are successfully oil filled, with gasket compound around the bolt holes and washers to help keep water from creeping in around them. We were half way through all this when the new chain arrived - all 250kg of it. Knowing we would have to bring it aboard from a pallet sitting on shore, EYE had helpfully flaked it down into a crate with the outsize link for attaching the anchor at the bottom. We brought enough down the ramp to get the inboard end on deck and I got to work splicing it to the 24mm nylon rope that makes up the rest of the rode. Here's that splice completed and whipped: With the splice complete, we could start loading the rest of the chain through the winch and into the locker. It quickly became evident though that the opening on the front of the winch, through which the chain runs, had been a tight fit on the previous size chain and the new size jammed on the round bar trim around the opening. Out came the angle grinder and the problem was quickly resolved with a couple of millimetres off each side of the trim. Now we could get the chain aboard, but were getting occasional jams on the winch. Some closer investigation revealed that the pitch was bang on, but the chain, being 13.5mm rather than the presumed original spec of 12.7mm, was occasionally jamming widthwise in the gypsy recesses. If only we could take just a little material off the sides of the gypsy recesses - but we couldn't get an angle grinder in there. We couldn't even get the gypsy out of the winch, because the axle it sits on wouldn't budge. The solution, after careful measurement, was a trip down to Machine Mart to buy a new toy: With this, we were able to take a little material off the inside sides of the gypsy recesses, doing a little at a time and then running the chain through to check if it still jammed anywhere. Finally it all ran through smoothly, and we were able to attach the anchor and mouse up the shackle. All this was ready just in time for us to join SPCC for a cruise down to Gravesend, as part of their outbound trip to the Medway. Here we are sitting on the pontoon at Gravesend with the big Fisherman's ready to go on the bow. To hoist the anchor overboard we used a block & tackle on a DIY davit made from scaffolding parts - you can see this still in place at the bow. It's been a lot of work but we are very happy to now have an anchoring solution that we have confidence in, and that we expect should see us through everything we are ever likely to do with this boat.
-
Any distress flare pack will include two or more rocket launched parachute flares. These go up to around 1000ft, take nearly a minute to come down, and are still burning at over 1000°C when they reach the surface. They will set light to almost anything they land on. Setting them off on land like fireworks is the most stupid suggestion imaginable.
-
Because the manufacturer cannot guarantee they will perform as well as they should do, or last for years without deteriorating, if they are wet?
-
Many pyrotechnics will happily ignite and burn when fully immersed in water, as they include their own oxidants. It would hardly surprise me for marine distress flares to have this property. Cutting them up would not seem like a smart thing to do, wet or not.
-
The Humber MRCC is in Bridlington. Phone number is 01262 672 317. I think they should be able to take them from you.
-
Yes it appears Onward is staying at Limehouse the time being. Wren saw her there and spoke to the new owner briefly the other day.
-
And we got some good ones from behind you! Here's a small selection of the better ones.
-
That would be them, yes. We went with them as far as Gravesend. Photos to come.
-
Ooh that is clever. Here's the text, lest someone find this thread in the future when it's disappeared from the internet: Ray, Here is the method I use to weigh boats on a trailer without hauling the boat to a commercial scale, which requires two trips for boat and trailer. It's simple, accurate and will cause bystanders to marvel at your engineering whiz. The boat stays on the trailer the entire time. Put the scale under the tongue near the end. You can even put a block on the scale to lift the tongue so you can see the dial. Record the weight. Now, slide the boat aft on the trailer 12" to 18". You must measure exactly how many inches you moved it, and record that. With the scale in the same location under the tongue, record the new scale reading. Finally, measure the distance in inches between the trailer axle (wheel centerline) and the point on the tongue where it touches the scale. You have then four measurements: W1 = first (heavier) scale reading in lbs, W2 = second scale reading in lbs, X = the distance you shifted the boat in inches, C = distance between trailer axle and scale point in inches. The formula is Boat Weight = C (W1-W2)/X A couple of notes. The result, like any measurement, is sensitive to the accuracy of the input data. In this case, the most critical is the distance you slide the boat. One inch error out of 12 inches will really make a difference in the result. Slide the boat as far as you can and still have a readable load on the scales. Notice, too, that by subtracting the two scale readings, any constant error in the scale is canceled out. Note to techies: The formula was derived by taking the sum of the moments around the trailer axle for each case and (since the sum of moments about a stationary object is zero) set the two equations equal to each other and solve for the trailer weight. Things that you don't know, like the trailer's weight and the location of the boat's center of gravity cancel out, leaving just the variables that you can measure, and the boat weight. I also use another version of this formula for weighing a boat while it is under construction so I don't get a bad surprise when it's finished. You can use two bridged scales and/or a trailer extension to increase the range of weights you can measure. I usually shoot for measurements of about 30-40lbs for a low end and 250lbs or so for the high end. In your case I would reverse the order of moving the boat and do it when you next go to the launch ramp so you can move the boat in a partial launch. Tom Lathrop
-
Very interesting method, but that would need the boat to be in the water and running, which W+T's isn't yet. I know a method used to weigh gliders, which sit on three points - the main wheel, the tail wheel or skid, and one wingtip. You just put the scale under each point in turn, and then add the results. It's not perfect, because lifting any of these points by the height of the scale changes the weight distribution, but only very slightly, because the points are far apart and the centre of gravity is low. Might be more of an issue with weighing a boat. W+T, I suspect the method you have been told is something similar. You would need to get the weight of the boat spread over enough points that each one is within the capability of your scale. I suspect the "balancing" part of the instructions you have lost is an attempt to reduce the number of measurements you need to take, by balancing the boat so the measurements should be similar and can just be multiplied. Balancing will also help ensure there is not too much weight at any one point.
-

How about this little beauty - "ideal for all uk canal systems"!
Giant replied to PaulG's topic in General Boating
There is one moored just above Bow Locks painted lime green! -
Question on my boat fit for sea use. cruiser not NB.
Giant replied to W+T's topic in General Boating
You can do the course online from your own computer. You still need to go and take the exam in person once you've finished the course, but that may be easier to arrange than the whole course. -
We will be at the Cavalcade (on foot) tomorrow, I will look for your boat as it would be interesting to chat with you about your experiences with your JP2. We have a JP3M and probably some of the same work ahead of us.
-
That will be an interesting project. If it is indeed in good running order already then that will help a lot. The JK engines are related to the more common JP series but have a lot of specific parts which are a lot harder to come by these days than the JP ones. We have a JP3M in our Sheffield size barge. In fact we now own two of them... You might want to start a separate topic in the Lister section. One of the owners of the Lincoln size keel Misterton is on this forum as "flatplane8" and is currently restoring a JK4, he may have some thoughts. I expect Geoff and Martyn at Marine Power Services might also weigh in. Don't know of anyone local to you though.
-
Mike, If you're on Facebook, search for a group called "BARGES small river Tugs and Workboats on Humber". You'll need to ask to join but if you ask on there you should get some photos. I've seen a couple of her taken in the 70s. I believe she was owned by Woods of York. She'd been up for sale on Alan's site for a long time. What are your plans for her?
-
No, Mainmast.
-
Interesting, I had assumed all these things were just biocides, it hadn't occured to me that they could actually be emulsifying the fuel/water mixture. What do you mean by Marine 16 "driving water out of the fuel" though? Do you mean it acts as a de-emulsifier? Would that even be necessary if the fuel were not already treated with the likes of Fuelset? I thought that diesel and water normally separated pretty readily.
-
I was thinking of that more as a dispute of law rather than a dispute of fact - the question being about the interpretation of the term "main navigable channel", rather than e.g. a dispute over how many metres the boat extended into the river.
-
Tony, I hope that you are contacting the court this morning to inform them of the late service. I expect it will be an uphill battle to complain the service was late once the proceedings are further along. Perhaps the Bar Standards Board might also be interested if this is a repeated pattern of behaviour. I think they might be correct about the case not involving a substantial dispute of fact. As I understand it, there is a distinction between disputes of fact and disputes of law. Whether your boat has been moored where they say it is would be a dispute of fact. Whether it is legal for it to be there would be a dispute of law.
-
If anyone is about to sit down and figure out a good way to do this, consider that there may be an immersion heater built into the calorifier too. So you need to be able to isolate both boiler water circuits, not just one or the other or neither, so that the immersion heater doesn't end up heating a boiler that is off.
-
We have tried to figure out how this thing is supposed to work too and it just gave us both a headache. As far as I can tell, you need to set up various electrically operated valves and sensors around the system as well as this magic box. Mike, I had actually hoped you might be able to enlighten us!
-
I can't imagine a better way to waste fuel in the winter than to make hot water and pump it through a ton of frigid cast iron connected to the hull. It will not be hot any more when it comes out of the other side!
-
Vactan and Fertan are the same idea - tannic acid in a water soluble vinyl carrier.