blackrose
-
Posts
28,536 -
Joined
-
Last visited
-
Days Won
19
Content Type
Profiles
Forums
Events
Gallery
Blogs
Store
Everything posted by blackrose
-
Looking for a solar installer near Gloucester
blackrose replied to Martin Harris's topic in Boat Equipment
Also most professional installers will be rushing to get the job done because time is money and they're on the clock, so if you take your time you're bound to do a better job yourself. Nobody loves your boat like you do. -
That's what I was thinking, especially if the panels are connected in series. If they're connected in parallel then voltage drop over the extended cable length may be an issue of course - which is another disadvantage of parallel panel connections.
-
This post cannot be displayed because it is in a forum which requires at least 10 posts to view.
-
Looking for a solar installer near Gloucester
blackrose replied to Martin Harris's topic in Boat Equipment
I think you're probably right. It would be very difficult to over-spec a system especially as a liveaboard. I did a power audit but I think it was more of an academic exercise. Like most people I ended up looking at the available space on my roof, while avoiding encroaching on too much roof space as I use the roof a lot when going through locks. Another factor is what one is willing to spend on a MPPT controller as the prices rise dramatically as panel wattage increases. I ended up going for a Epever 60A controller for about £220 as I think the Victron unit was over £500. In total I spent about £1000 on the whole system, installing it myself. -
Looking for a solar installer near Gloucester
blackrose replied to Martin Harris's topic in Boat Equipment
Yes you obviously didn't see my comment above. Thanks, I knew there was a good reason, just couldn't remember. Anyway as long as I gave the correct info to the OP that's fine. -
Looking for a solar installer near Gloucester
blackrose replied to Martin Harris's topic in Boat Equipment
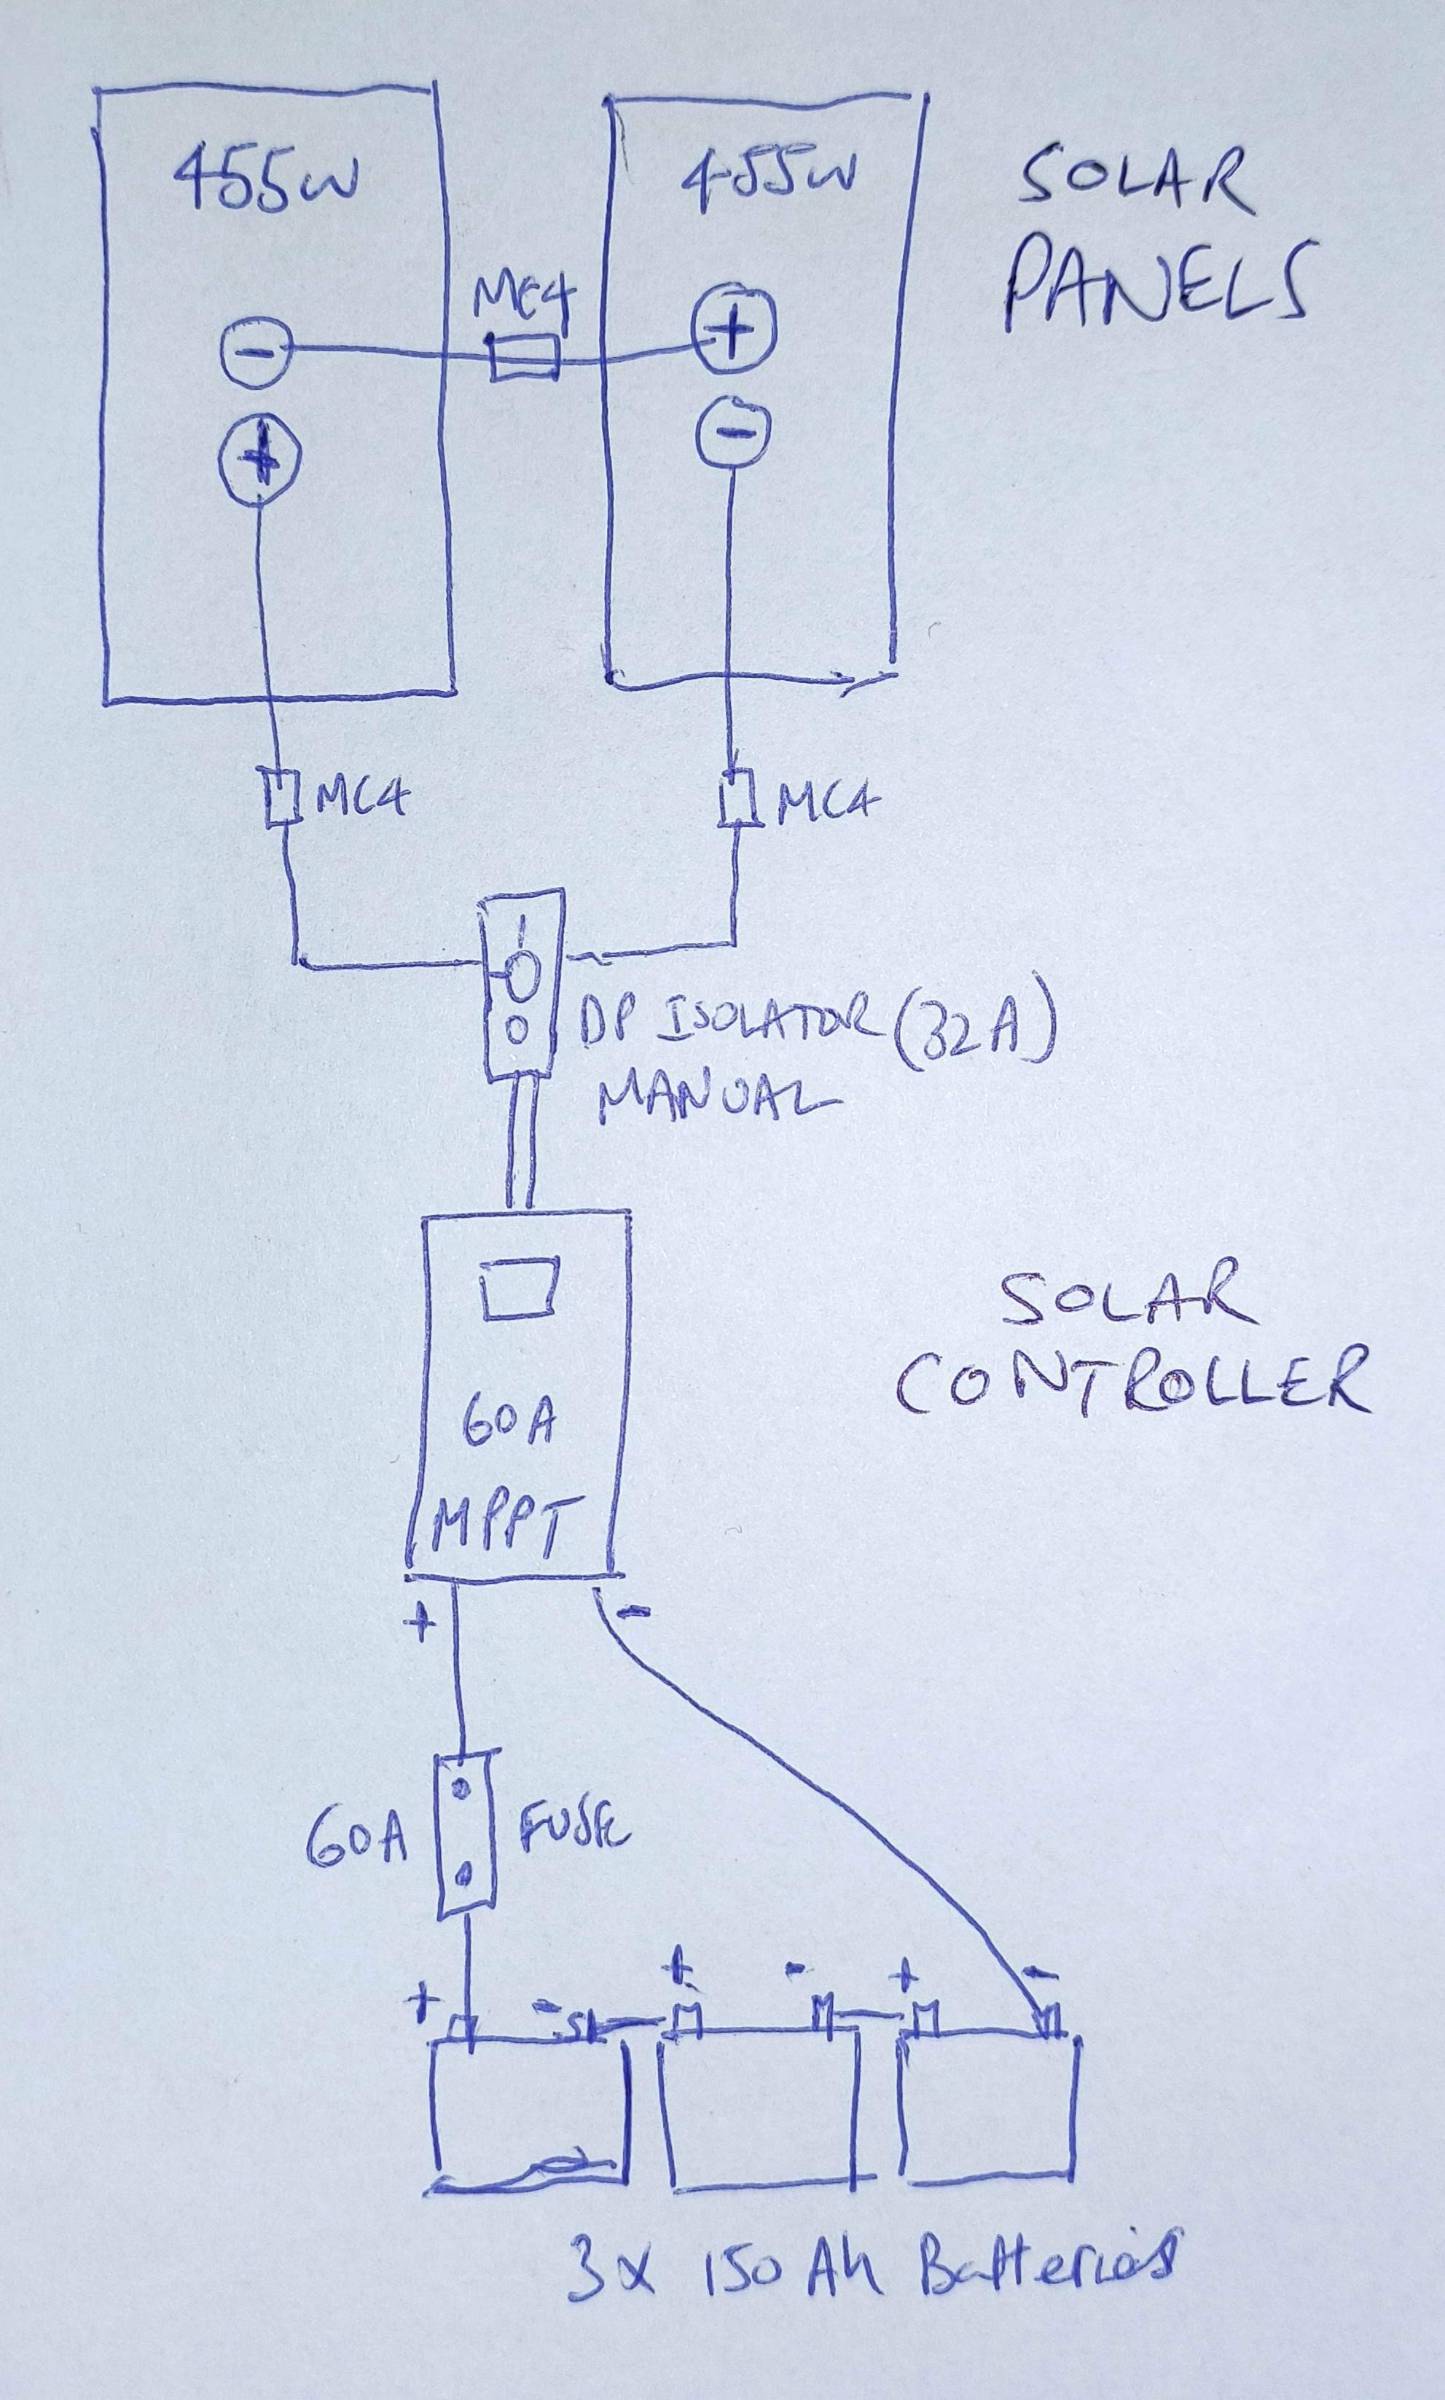
Yes it is confusing, but like many things in life that's only true when you don't know much about the subject. I installed my own solar system about 18 months ago and until that point I was also confused about it all. I started looking at panels on the Bimble website and reading threads on here and learning about solar. Now I'm virtually off grid. I think the point is that if you can't be bothered to learn about it and just tell someone you want solar panels fitted you'll probably end up with a system that may not be what you ideally need and which may not even work very well. On the other hand if you do decide to start trying to understand it, then you'll probably decide you may as well install it yourself. I just did it slowly and methodically. Don't rush. Start by looking at the space you have available on your roof and where you want the panels, think about where they're not going to get in the way, etc. Measure that space and start looking at panels that would fit. In general you'll get a better solar harvest if the panels are rigid, over 40v open circuit voltage (Voc) and you connect them in series, doubling the voltage. That last part might raise some eyebrows amongst those with panels connected in parallel but I stand by it. Then look for an appropriate MPPT solar controller. The panels may be allowed to slightly exceed the amp rating of the controller if necessary as that will just clip the current, but they cannot exceed the controller's rated voltage as that will fry it. Once you've chosen your panels and controller the rest is just cables (of the right cross sectional area), correctly rated fuses, plus how to actually mount the panels on the roof. Mounting the panels is its own separate subject but there are plenty of threads on here that you can read Draw yourself a simple diagram of your proposed installation and post it on here for comments and advice. That's what I did (and I got laughed at for my battery connections!) Nevertheless, it's a very useful exercise and people here will help you with cable sizes and fuse ratings, etc. If it's a large system like mine with panels in series then I recommend a properly rated isolation switch between panels and controller because of the high voltages involved. Draw the diagram of your proposed installation whether you intend to fit it yourself or not and then at least you'll understand it and be able to show an installer exactly what you want. I've posted mine below as an example to help you. I ended up putting a fuse between the panel isolator and the controller too, although I'm not sure that was strictly necessary. I think the controller has to be connected to the batteries first, before you connect the panels to each other and to the controller. I'm not exactly sure why but that was the advice I was given. I guess all that power needs somewhere to go. Cover the panels while you're making those final connections too. Those MC4 connectors aren't rated for make & break connections at high voltages. I'm not an electrical expert so if anything in this paragraph is wrong someone can correct me. Lastly, I've seen some very untidy installations done by so called professionals with cables snaking all over the roof, so think about how you're going to route your cables too and make sure they're properly protected from chafing, especially where they go through the roof, bulkheads, etc. I agree that installing it yourself isn't that difficult. But talking to Bimble... not so easy!
-
This post cannot be displayed because it is in a forum which requires at least 10 posts to view.
-
Wickes Creocote - don't bother!
blackrose replied to noddyboater's topic in Boat Building & Maintenance
Fine for fence panels but not for fenders made from plastic rope. Since the vast majority of rope and fenders aren't made from hemp I wonder if some people are making the mistake of soaking synthetic rope fenders in creasote? Exposing polymers to chemicals won't enhance their properties and may actually cause embrittlement and depolymerisation. -
Yes, perhaps I'm due a new pair.
-
Victron products are very good while they work, but they should be treated as consumables. 🤣
-
Agreed, they should do, but unfortunately mine don't. There are no settings on my ratchet crimpers? Not sure if that's what you meant?
-
I've got a proper ratchet type crimping tool bought from vehicle wiring products years ago, but to be honest I end up having to finish the job with a cheapo flat crimper because the ratchet crimper just doesn't seem to crimp tightly enough.
-
Going back to the same places from a marina?
blackrose replied to Kane Brennan's topic in Moorings & Marinas
Only what if I want to bother going to court? I don't understand what you're saying? Asking for an explanation means going to court. That's nonsense. If CRT seriously suggests that people with home moorings can't come back to an area l then people with boats in marinas who work for a living and who are quite limited in terms of how far they can go on weekends are then effectively forced to stay at their moorings. That doesn't seem very reasonable given the licence fees they pay. First you say we all have to follow the same cruising rules and then you seem to contradict yourself by saying that CCers actually have additional cruising/mooring rights compared to home moorers. -
Going back to the same places from a marina?
blackrose replied to Kane Brennan's topic in Moorings & Marinas
Surely if you have a home mooring and you're not a continuous cruiser then you're not expected to satisfy the rules of continuous cruising? To me that's just common sense. If you ask CRT you'll probably get some Herbert lacking in that department who will misinterpret the rules and tell you that once you've spent 14 days in a certain area you can't come back that year, etc. Simply put, if you're not a CCer then assume the rules for CCing don't apply to you unless someone in authority tells you otherwise, in which case you'll have to get them to explain how someone with a home mooring in the area is subject to those CCing rules. -
What is best sealer when refitting windows ?
blackrose replied to Troyboy's topic in Boat Building & Maintenance
My apertures are also roughly cut and too big for the portholes so I'm left with about 6mm sealing width all around. They were originally sealed with neoprene tape which had started leaking, so sor that reason I'm not using tape again and have gone for Bostik Simson MSR Marine adhesive. I'm hoping they're never going to need to come out again.
-
Calorifier leaks when pump off/ no pressure.
blackrose replied to Doodlebug's topic in Boat Equipment
Where is the calorifier exactly and in what orientation? Also is the calorifier being heated when you're on the boat? If so the leak may be nothing to do with the pump. It may be that the heat is expanding something and sealing the leak. Maybe the immersion heater or PRV threads or one of the hot pipe connections? Anyway just an idea. -
testing for gas leaks using a bubble tester
blackrose replied to paul wilderness's topic in Boat Equipment
How did it get to 2 mins? I thought the recommended OEM test time was originally 15 seconds. I once found a leak after about 40 secs so I test for a full minute now. I think 2 mins might be a bit over the top. -
I've haven't had a problem with paper clogging because cured epoxy tends to powder rather than melt as it's abraded, but the paper can become dulled by the hardness of the paint which is why you need a coarse grit paper as I mentioned, and of course change the paper as required.
-
The item is from Amazon? I thought they should send it wherever you want it sent? I must be missing something? When I order from Amazon they ask me if I want the parcel sent to my usual address and they also suggest some local pick up points, shops, lockers, etc. Clearly I don't understand what your issue is exactly.
-
Solar Panel solely for charging batteries off grid.
blackrose replied to SLC's topic in Boat Equipment
This cool sunny weather is great for charging. I thought I may as well put the 1kW mains immersion heater on for an hour. Got about 25A coming from the batteries. My 2 panels are 41.3v each connected in series, so am I right in thinking they're working at about 95% efficiency?
-
Ok fair enough. But I'm sure to give a uniform key a sander is easier and quicker, and there's less chance of going through the paint.
-
I think a wire wheel on an angle grinder is a bit aggressive if you're just trying to give the surface of the existing epoxy a key. You'll end up going through to the steel. Plus it will take you forever to go around the whole boat with an angle grinder. If after pressure washing the existing epoxy looks sound then all it needs is a key with a sander and a coarse grit paper, plus go over any rust patches with the wire wheel. If it's not sound it's all got to come off and that means blasting. If you're still talking about the hull sides below rubbing strakes by all means feather the edges of any patches that have gone back to bare metal but don't bother trying to build up coats to the same level unless you have lots of time or are particularly precious about how the hull sides look. You must refer to the the technical data sheet for any epoxy you're using. Particularly important are the mixing ratios (easier by weight than volume with kitchen scales if the relative weights are given), mixing thoroughly and only then adding the correct thinners if required (10% max or according to TDS), minimum overcoating times and minimum time for service (back in the water).
-
This has been happening for many years so isn't really new news. Wages are one of the biggest costs of any organisation so it's no surprise they cut staff when they're under funding pressure.
-
Solar Panel solely for charging batteries off grid.
blackrose replied to SLC's topic in Boat Equipment
Yes all I've done is remove the brass mushroom vent. The hole is still there so the panel acts as the cover instead. I probably confused you by mentioning sealant. I just put a thick bead of PU sealant around the perimeter of the hole to act as a lip or rim, but it's probably unnecessary. -
This post cannot be displayed because it is in a forum which requires at least 10 posts to view.