davidb
-
Posts
246 -
Joined
-
Last visited
Content Type
Profiles
Forums
Events
Gallery
Blogs
Store
Everything posted by davidb
-
loop if (boiler too cold, nothing to do with reset button) if (last reset outside permitted interval, ie 20minute delay) set alarm end if if (reset button pressed) cancel alarm set time since last reset to now end if else cancel alarm (ie boiler temp OK) end if end loop yes, the above is correct, thanks, I'll try the auto formatting tonight, cheers, David
-
Yes, as above when the boiler needs stoking and the button isn't pressed
-
//millis23Mar int myPin = A2; // INPUT Analogue Sensor int stoke = 2; // INPUT Stoking Temp Sensor (Bottom of store) int houseUFH = 3; // OUTPUT UFH Relay int runPin = 4; // INPUT Heat Available Temp Sensor (Top of store) int alarm = 7; // OUTPUT Alarm Light Relay int veryHot = 9; // INPUT Boiler too hot int logStoreUFH = 10; // OUTPUT Log Store UFH Relay int butt = 12; // INTPUT from Cancel Button int buttonPressed = 0; int ledPin = 13; // OUTPUT Indicator LED unsigned long previousMillis = 0; // will store last time LED was updated const long interval = 40000; // interval at which to blink (milliseconds) int dt = 100; // Delay of 500 milisecs void setup() { Serial.begin(9600); pinMode(myPin,INPUT); // pin A2 pinMode(stoke,INPUT); // stat acts 70deg pin 2 pinMode(houseUFH, OUTPUT); // Yellow Relay Wire pin 3 pinMode(runPin, INPUT); // stat acts at 56deg pin 4 pinMode(alarm, OUTPUT); // Blue Relay Wire pin 7 pinMode(veryHot, INPUT); // stat acts at 85deg pin 9 pinMode(logStoreUFH, OUTPUT); // Green Relay Wire pin 10 pinMode(butt,INPUT_PULLUP); // cancel button pin12 pinMode(ledPin, OUTPUT); // Indicator LED pin13 } void loop() { delay (dt*5); unsigned long currentMillis = millis(); int analog = analogRead(myPin); // Reads data from myPin (A2) pin and puts in analog Int int readRun = digitalRead(runPin); // Reads data from runPin (4) and puts it in readRun Int int readStoke = digitalRead(stoke); // Reads data from stoke (2) and puts in readStoke Int int readAlarm = digitalRead(alarm); // Reads data from alarm (7) and puts in readAlarm Int int readHot = digitalRead(veryHot); // Reads data from veryHot (9) and puts it in readHot Int int readButt = digitalRead(butt); // Reads data from butt (12) and puts it in readButt Int Serial.print(" Stoke = "); Serial.println(readStoke); Serial.print(" button pressed = "); Serial.println(readButt); Serial.print(" Millis = "); Serial.println(millis()); if ((readStoke == 0) && (readButt == 1)){ Serial.println("Boiler Requires Stoking"); digitalWrite(ledPin,HIGH); // starts indicator LED flashing delay (dt); digitalWrite(ledPin,LOW); delay (dt); // ends indicator LED flashing digitalWrite(alarm,HIGH); } // lights alarm light pin 7 if (readButt == HIGH) { buttonPressed = 0; digitalWrite(alarm,LOW); if(currentMillis - previousMillis >= interval) { // save the last time digitalWrite(alarm,LOW);} else{ digitalWrite(ledPin,LOW); digitalWrite(alarm,LOW); } } } So that is the current sketch, plenty of delays so I can read that the button press now gives 0 and other stuff in the serial monitor. I am not bothered at present about the ledPin, its just the alarm I would like to sort. Currently, when readStoke=0 the led is flashing about twice a second and the alarm led is not working at all While the button is held down, the only effect is that it stops the ledPin flashing I'm sure all my problems are in the last 20 lines. thanks for looking, D
-
yes, you were correct, I just fiddled about adding and removing curlys till it worked. Its very odd at times, but incredibally clever overall. Thanks
-
I'm getting an error on this line, but I am blowed if I can deduce what needs to be done:

-
Yes, that's the plan - to cancel it for 20 minutes because after stoking it takes at least that long to take effect. I need to save up and buy a colour computer. Black and white ones are a bit dated now?
-
Do you use external pull up, or pull down resistors at all?" Yes they all have pull down external resistors "Is the button press going to give you a HIGH, or LOW signal?" it is currently giving HIGH on pressed "if(readButt ==LOW){ is used to turn off the alarm and LED." I shall change it over to that tonight, thanks The relays are already wired to operate when LOW - I could't understand why they were like that when I bought them, but I do now. "Near the top you are defining currentMillis as an integer (INT) and setting it to zero, then in the loop, you redefine it as a an unsigned long and set it to millis()." "This will do colour highlighting that make it easier for others to read and interpret what you've done. " The colouring didn't seem to work? Must try harder! Lots to do now, thanks a lot, D
-
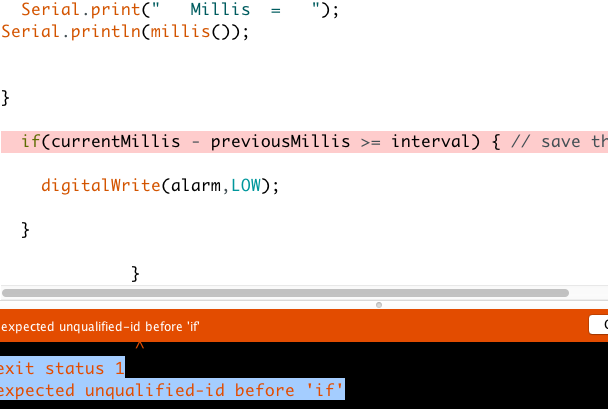
// file name: millis23Mar int myPin = A2; // INPUT Analogue Sensor int stoke = 2; // INPUT Stoking Temp Sensor (Bottom of store) int houseUFH = 3; // OUTPUT UFH Relay int runPin = 4; // INPUT Heat Available Temp Sensor (Top of store) int alarm = 7; // OUTPUT Alarm Light Relay int veryHot = 9; // INPUT Boiler too hot int logStoreUFH = 10; // OUTPUT Log Store UFH Relay int butt = 12; // INTPUT from Cancel Button int ledPin = 13; // OUTPUT Indicator LED int currentMillis = (0); unsigned long previousMillis = 0; // will store last time LED was updated const long interval = 40000; // interval at which to operate (milliseconds) int dt = 500; // Delay of 500 milisecs void setup() { Serial.begin(9600); pinMode(myPin,INPUT); // pin A2 pinMode(stoke,INPUT); // stat acts 70deg pin 2 pinMode(houseUFH, OUTPUT); // Yellow Relay Wire pin 3 pinMode(runPin, INPUT); // stat acts at 56deg pin 4 pinMode(alarm, OUTPUT); // Blue Relay Wire pin 7 pinMode(veryHot, INPUT); // stat acts at 85deg pin 9 pinMode(logStoreUFH, OUTPUT); // Green Relay Wire pin 10 pinMode(butt,INPUT); // cancel button pin12 pinMode(ledPin, OUTPUT); // Indicator LED pin13 } void loop() { delay (dt); unsigned long currentMillis = millis(); int analog = analogRead(myPin); // Reads data from myPin (A2) pin and puts in analog Int int readRun = digitalRead(runPin); // Reads data from runPin (4) and puts it in readRun Int int readStoke = digitalRead(stoke); // Reads data from stoke (2) and puts in readStoke Int int readAlarm = digitalRead(alarm); // Reads data from alarm (7) and puts in readAlarm Int int readHot = digitalRead(veryHot); // Reads data from veryHot (9) and puts it in readHot Int int readButt = digitalRead(butt); // Reads data from butt (12) and puts it in readButt Int if (readStoke == 0){ Serial.println("Boiler Requires Stoking"); digitalWrite(ledPin,HIGH); // starts indicator LED flashing delay (dt); digitalWrite(ledPin,LOW); delay (dt); // ends indicator LED flashing digitalWrite(alarm,HIGH); } // lights alarm led on pin 7 else{ digitalWrite(ledPin,LOW); digitalWrite(alarm,LOW); } Serial.print(" Millis = "); Serial.println(millis()); if (readButt == HIGH) { digitalWrite(ledPin,LOW); digitalWrite(alarm,LOW); } if (currentMillis - previousMillis >= interval) { // save the last time you blinked the LED digitalWrite(alarm,LOW); } } I hope that code shows properly, it has compiled OK, but pressing the button only extinguishes the LEDs for one loop
-
thanks for those, I will make a clone of the sketch and simplify it down to the bit that is causing the problem, compile it and get it all happy, test it, then report back with all the code. cheers, David
-
Sharpness to Bristol Insurance Requirements
davidb replied to Iceni_exporer's topic in General Boating
That sounds terrifying! -
I have hat some great advice on this thread but I'm still not getting it right. Seeing that thread was getting so big, I thought I would start a fresh one sorry about that. I thought I would try and get the project behind me before we get boating again this summer, hopefully. We are booked to cross on the Ribble Link down to Tarleton on the 16th of April, then on towards Skipton, looking forward to that, fingers crossed. I have run the millis sketch as a trial and now have a reasonable idea of how it works, and the issues when it comes to rollover won't be a problem anyway because the controller powers down when the boiler goes out , and that will happen at least once a fortnight, so millis will reset. The problem I have is how to get the timer working after a button press to cancel an alarm LED? I have been trialling some code to make the response after the button is relaeased so the Pin is going from 1 to 0 in order to avoid bounce. I somehow need to get another " if" statement within these two lines : if (ledState == LOW) ledState = HIGH; I think, and then the loop can keep going round again to check whether the alarm LED should still be lit? if(currentMillis - previousMillis > interval) { if((currentMillis - previousMillis > interval) || (currentMillis < previousMillis)) { // save the last time you blinked the LED previousMillis = currentMillis; // if the LED is off turn it on and vice-versa: if (ledState == LOW) ledState = HIGH; else ledState = LOW; // set the LED with the ledState of the variable: digitalWrite(ledPin, ledState); } I have got rid of all the delay(dts) from the original and it is looping very fast. I am not brave enough to post on the Arduino.cc forum, I'm afraid they seem to jump on newbies in a very harsh way. cheers, David
-
Sunday, 28th Feb 2021 picture. Still standing!
-
I was just going to say that, but you beat me to it!
-
I also have that one and still find it a bit heavy in places, but a useful reference book once you have got going. As was said before, you absolutely need to have the device working in front of you to learn anything. I have also got "Programming Interactivity" by Joshua Noble on loan from the library but it is far too advanced for me, and I don't think I have got anything from it yet, but will hang on to it for a while. If you have the internet freely available there is a series by Paul McWhorter on Youtube which is at the other end of the scale, ie very very slow, but he does a very professional presentation and that might be the way forward for an absolute beginner like me: https://www.youtube.com/playlist?list=PLGs0VKk2DiYw-L-RibttcvK-WBZm8WLEP They are a very recent production but I found his introductions very tedious after a few. I have got to number 18
-
I have taken it out and it is 2 seconds on and 2 off which is what I should have said it was in my last. it was 2000 millis that made it 1 ssecond changes. now I need to adapt it to make a timedelay for my button
-
const long interval = 4000; Is making it isophase = 1second off and 1 second on. but the serial monitor is stopped, I'll try taking out the (currentMillis < previousMillis) now, thanks
-
there is a useful looking timeout sketch in the elapsedMillis library which looks promising, but way above my pay grade at present, I am getting there very slowly. I have cleared out all the delays and various other redundant bits from my code and pasted the present version below with Jes's code tagged on at the bottom. It all compiled fine and when I ran it, I could not do anything with the blink speed which seems to be roughly 4 per second. I can't see where the following is used, so no doubt it is part of the problem: " const long interval = 1000; // interval at which to blink (milliseconds) " The processor seems to be wizzing along now when I watch the serial monitor. I'm going to set up my spare UNO with a simulator circuit shortly because I don't want to upset the current working system. Thanks for all your help and comments so far. ________________________________________________________ Feb2nd Sketch_____________ // Remember outputs need to be low to energise the relays int myPin = A2; // INPUT Analogue Sensor int stoke = 2; // INPUT Stoking Temp Sensor (Bottom of store) int houseUFH = 3; // OUTPUT UFH Relay int annex = 5; // INPUT Annex Pump int house = 6; // INPUT House Pump int alarm = 7; // OUTPUT Alarm Light Relay int clok = 8; // INPUT from Clock int veryHot = 9; // INPUT Boiler too hot int StoreUFH = 10; // OUTPUT Store UFH Relay int button = 11; // alarm cancel button const int ledPin = 13;// the number of the LED pin int dt = 250; // Delay of 250 mSec void setup() { Serial.begin(9600); pinMode(myPin,INPUT); // pin A2 pinMode(stoke,INPUT); // stat acts 70deg pin 2 pinMode(houseUFH,OUTPUT); // Yellow Relay Wire pin 3 pinMode(annex,INPUT); // pin 5 pinMode(house,INPUT); // pin 6 pinMode(alarm,OUTPUT); // Blue Relay Wire pin 7 pinMode(clok,INPUT); // 5v from clock pin 8 pinMode(veryHot,INPUT); // stat acts at 85deg pin 9 pinMode(StoreUFH,OUTPUT); // Green Relay Wire pin 10 pinMode(button,INPUT); // push button pin 11 pinMode(ledPin,OUTPUT); // Indicator LED pin13 } void loop() { int analog = analogRead(myPin); // Reads data from myPin (A2) pin and puts in analog Int int readStoke = digitalRead(stoke); // Reads data from stoke (2) and puts in readStoke Int int readAlarm = digitalRead(alarm); // Reads data from alarm (7) and puts in readAlarm Int int readClock = digitalRead(clok); // Reads data from clok (8) and puts it in readClock Int int readHot = digitalRead(veryHot); // Reads data from veryHot (9) and puts it in readHot Int int readUFH = digitalRead(StoreUFH);// Reads data from pin (10) and puts it in readUFH Int int readBut = digitalRead(button); // Reads data from button (11) and puts it in readBut Int int ledState = digitalRead(ledPin); // Reads data from pin (13) and puts in ledState int if (readClock == 1){ digitalWrite(houseUFH,LOW); // Turns House UFH on pin3 Serial.println("House UFH Turned On"); } if (readClock== 0){ digitalWrite(houseUFH,HIGH); // Turns House UFH off readClock == 0 } if (readStoke == 0){ Serial.println("Boiler Requires Stoking"); Serial.println( ); digitalWrite(alarm,LOW); // turns alarm light on digitalWrite(ledPin,HIGH); // turns LED 13 on } else{ digitalWrite(ledPin,LOW);digitalWrite(alarm,HIGH); //alarms off } if (readBut == 1){ Serial.println("button pressed"); } if (readHot == 1){ digitalWrite(StoreUFH,LOW); // Turns Store Pump relay on pin 10 Serial.println("Store Pump Turned On"); } else{ digitalWrite(StoreUFH,HIGH); // Turns Store Pump Relay off } Serial.print("Stoke = "); Serial.println(readStoke); Serial.print("Alarm = "); Serial.println(readAlarm); Serial.print("UFH = "); // sending to serial Monitor Serial.println(readUFH); Serial.print("Storing = "); // sending to serial Monitor Serial.println(readHot); // here is where you'd put code that needs to be running all the time. // check to see if it's time to blink the LED; that is, if the // difference between the current time and last time you blinked // the LED is bigger than the interval at which you want to // blink the LED. unsigned long currentMillis = millis(); // Generally, you should use "unsigned long" for variables that hold time // The value will quickly become too large for an int to store unsigned long previousMillis = 0; // will store last time LED was updated // constants won't change: const long interval = 1000; // interval at which to blink (milliseconds) if((currentMillis - previousMillis > interval) || (currentMillis < previousMillis)) { // save the last time you blinked the LED previousMillis = currentMillis; // if the LED is off turn it on and vice-versa: if (ledState == LOW) ledState = HIGH; else ledState = LOW; // set the LED with the ledState of the variable: digitalWrite(ledPin, ledState); } }
-
Believe me, in December, when I started this caper, nor did I have any idea what was going on. I thought i would plug the thing into a PC, download someone's ready made code from t'internet, tweak it a bit, then off we go. A fortnight ago I was for giving up, and then I re read my code, realised that the relays needed a LOW to work them and how to sort the if ... else arguments a bit better and now I have a thing which is protecting the boiler from boiling and giving me alarms when I want them for a total investment of £25 or less. And its kept me off the streets. The first thing you need to do is invent a control problem that you would like to solve. cheers.
-
my goodness, there is some knowledge on here! I came to the right place
-
So, I shall have a go at this for a start, am I correct in thinking that the processor runs through the whole program at it's best speed and each delay completely stops the process for that ampunt of time? The blinking alarm light is perhaps the main feature of the project because it gives a remote indication of the need to attend to stoking, but that could easily be replaced with a flasher unit (like in an old car indicator) unless a separate flashing loop could be run within the Arduino.
-
you will enjoy it - the hours fly by, but you will have something to show at the end of it!
-
You are are right there is nothing time-critical. in fact the delay for the button is going to be set to 20 minutes because it takes at least that long to regain it's heat. The overheat thermostat triggers the storing pump virtually immediately so that would have been an issue, but it definitely won't overheat when it is needing stoking.
-
Thanks again, Perhaps I need to read up on interrupts before I pursue this further? I have no idea about them, but have an idea that they have something to do with computer keyboards? I have zero experience of programming since my ZX81 ! So I have a very long way to go, but it has been most satisfying to find that what I have done so far actually works, and works well. https://www.youtube.com/watch?v=aMato4olzi8&list=PLGs0VKk2DiYw-L-RibttcvK-WBZm8WLEP&index=28&t=802s "buttonNew = digitalRead(readBut); if (buttonOld ==0 && buttonNew==1); " comes from the lesson above, and I wondered if I could adapt it for my purpose.
-
Perhaps I out to upload the sketch somewhere rather than cluttering this forum with it? But I haven't a lot of time at the mo, so I shall do that tonight and reply to your questions. if (buttonOld ==0 && buttonNew==1); is part of a trial which I haven't finished yet. There is a version connected to the boiler which works properly without any working code for the button. Thanks for your very quick replies, here is the full sketch to be going on with: int myPin = A2; // INPUT Analogue Sensor int stoke = 2; // INPUT Stoking Temp Sensor (Bottom of store) int houseUFH = 3; // OUTPUT UFH Relay int runPin = 4; // INPUT Heat Available Temp Sensor (Top of store) int annex = 5; // INPUT Annex Pump int house = 6; // INPUT House Pump int alarm = 7; // OUTPUT Alarm Light Relay int clok = 8; // INTPUT from Clock int veryHot = 9; // INPUT Boiler too hot int logStoreUFH = 10; // OUTPUT Log Store UFH Relay int button = 11; // alarm cancel button int ledPin = 13; // OUTPUT Indicator LED int buttonNew ; int buttonOld=1; int dt = 500; // Delay of 500secs void setup() { Serial.begin(9600); pinMode(myPin,INPUT); // pin A2 pinMode(stoke,INPUT); // stat acts 70deg pin 2 pinMode(houseUFH, OUTPUT); // Yellow Relay Wire pin 3 pinMode(runPin, INPUT); // stat acts at 56deg pin 4 pinMode(annex,INPUT); // pin 5 pinMode(house,INPUT); // pin 6 pinMode(alarm, OUTPUT); // Blue Relay Wire pin 7 pinMode(clok, INPUT); // 5v from clock pin 8 pinMode(veryHot, INPUT); // stat acts at 85deg pin 9 pinMode(logStoreUFH, OUTPUT); // Green Relay Wire pin 10 pinMode(button, INPUT); // push button pin 11 pinMode(ledPin, OUTPUT); // Indicator LED pin13 } void loop() { int analog = analogRead(myPin); // Reads data from myPin (A2) pin and puts in analog Int int readRun = digitalRead(runPin); // Reads data from runPin (4) and puts it in readRun Int int readStoke = digitalRead(stoke); // Reads data from stoke (2) and puts in readStoke Int int readAlarm = digitalRead(alarm); // Reads data from alarm (7) and puts in readAlarm Int int readClock = digitalRead(clok); // Reads data from clok (8) and puts it in readClock Int int readHot = digitalRead(veryHot); // Reads data from veryHot (9) and puts it in readHot Int int readBut = digitalRead(button); // Reads data from button (11) and puts it in readBut Int if (readRun == 1 && readClock == 1){ Serial.println("House UFH Turned On"); delay(dt*2); digitalWrite(houseUFH,LOW); // Turns House UFH on pin3 } if ((readRun == 0) || (readClock == 0)){ digitalWrite(houseUFH,HIGH); // Turns House UFH off if readRun OR readClock == 0 } if (readStoke == 0){ Serial.println("Boiler Requires Stoking"); Serial.println( ); digitalWrite(alarm,LOW); // turns alarm light on digitalWrite(ledPin,HIGH); delay(dt*3); digitalWrite(ledPin,LOW); // alarms off and will now flash repeatedly digitalWrite(alarm,HIGH); delay(dt*8); } else{ digitalWrite(ledPin,LOW);digitalWrite(alarm,HIGH); //alarm off } buttonNew = digitalRead(readBut); if (buttonOld ==0 && buttonNew==1); if (readStoke ==00){ digitalWrite (alarm, HIGH); } if (readBut == 1){ Serial.println("button pressed"); delay(dt*2); digitalWrite(alarm,HIGH); // Turns alarm relay off pin 7 delay(dt*10); } if (readBut == 0){ digitalWrite(alarm,HIGH); // keeps alarm Relay off } if (readHot == 1){ Serial.println("Store Pump Turned On"); delay(dt*6); digitalWrite(logStoreUFH,LOW); // Turns Store Pump relay on pin 10 } else{ digitalWrite(logStoreUFH,HIGH); // Turns Store Pump Relay off } } Post crossed, I'll answer tonight, thanks, David
-
Hello, sorry to hi jack your thread, but I thought it might get attention from some - one who could help. I have programmed an Arduino UNO to control a farm outhouse boiler via relays ( which need to be set to LOW to energise) and it is working well apart from a problem with the alarm cancel button which has absolutely no effect. Can anyone here help me solve it it please, there is probably a simple answer and it will stop me going round in in circles like this code seems to be doing. I Have got a pull-down resistor on the button which solved an intermittent print problem on the serial monitor. The alarm lamp is outside to signal when the boiler needs more logs, and the button is to press when the first person gets to it so that the furnace door isn't opened unneccessarily. thanks, David if (readStoke == 0){ Serial.println("Boiler Requires Stoking"); Serial.println( ); digitalWrite(alarm,LOW); // turns alarm light on digitalWrite(ledPin,HIGH); // turns built-in LED on delay(dt*3); digitalWrite(ledPin,LOW); // alarms off and will now flash repeatedly digitalWrite(alarm,HIGH); delay(dt*8); } else{ digitalWrite(ledPin,LOW);digitalWrite(alarm,HIGH); //alarm off } buttonNew = digitalRead(readBut); // these button new and buttonOld variables are my ongoing attempts to sort it and should if (buttonOld ==0 && buttonNew==1); // probably ne in the setup loop if (readStoke ==00){ digitalWrite (alarm, HIGH); } if (readBut == 1){ Serial.println("button pressed"); delay(dt*2); digitalWrite(alarm,HIGH); // Turns alarm relay off pin 7 delay(dt*10); } if (readBut == 0){ digitalWrite(alarm,HIGH); // keeps alarm Relay off }