TandC
-
Posts
387 -
Joined
-
Last visited
Content Type
Profiles
Forums
Events
Gallery
Blogs
Store
Everything posted by TandC
-
Looking at the options for our new shower arrangement... On the old boat it was simple - the shower was fed from the Morco 61b gas boiler so we set the temperature on the boiler, and leave it alone. There was a bog-standard mixer shower valve but the cold/hot inlet sides were fed from the same pipe coming from the boiler so no adjustment other than flow rate. On the new boat we have a calorifier and so will need to run both a hot feed and also a cold feed to the shower mixer. Lots of the mixer bar showers available are thermostatic - such as this - https://www.wholesaledomestic.com/colore-brushed-brass-round-thermostatic-bar-shower-valve/ Is that going to work okay?
-
Try to stick to the original question... they weren't asking about what colour spectrum for radiators.... Hearth/fireback construction detail was the query: And to answer that - purely from my experience/view for what that's worth I've had a fireback that was 5mm thick tiles onto 18mm plywood - simple. The Squirrel stove when installed was about 100mm away. Never had any problems and when I removed that when we stripped the boat, I made a point of chipping a tile off and from what i could see, there was no burning. But - I think that there is no definitive standard/guidance if you're building for RCD compliance (someone correct me if there is) - and in the absence of black and white clarity, then this approach as described here is what a lot of people aim to follow: http://www.soliftec.com/boat stoves 1-page.pdf Air gap, calcium silicate, etc - . It's what i've followed for my new installation because I've tried to do it to whatever standards i can apply. I've also got a 5mm layer of tile backer board stuff because i wasn't sure how well the CS board would take a tile (not yet got to tiling yet). The problem is that it makes for a very thick detail, pushing the whole hearth construction further into the room.
-
I've had two tanks made by Jay Wolfe Engineering - and they're used by my local boatyard too. Both mine were made to measure stainless steel. Excellent quality, excellent service. Based in Kingsthorpe near Northampton. Stainless was always my go-to over plastic for the cleanliness/taste, but the boatyard also recommended it as if on the off-chance in the future there was ever a problem it is easier to repair than plastic. I just hope I never have to experience that....
-
Thanks - i just found via a slightly different route - but one that probably applies to other areas - the library has a Business and Intellectual Property Centre (BIPC) and one of the services they provide is full access to the Standards.
-
Slight diversion but connected to the topic - if I were to go into my local council-run (not university etc) library and enquire as to whether they can provide access to specific ISO standards such as this discussed here, what exactly am I asking for.... Is it just "how can I access ISO Standards please..." Or are these buried in something else? I've done a quick online search through the library catalogue service for "ISO Standards" - "British Standards Online" etc -but it doesn't return anything so prior to going to talk to someone at the library it'd be good to know what to actually ask for.....
-
Can I shorten the Webasto supplied exhaust??
TandC replied to TandC's topic in Boat Building & Maintenance
Thanks folks - that's the sort of thing - Munsens probably easiest to attach. Ta. -
Can I shorten the Webasto supplied exhaust??
TandC replied to TandC's topic in Boat Building & Maintenance
All good thank you - I have had a reply from Butler - this is the marine exhaust (stainless steal, cylinder type) and it can be shortened, noting that it needs enough length to allow a swan-neck. The clamps supplied aren't the best as they provide no "stand off" distance - so if you screwed them direct to a piece of wood it would pull the silencer tight up against that. My first thought while offering it up was that this couldnt be good for the heat transfer. I'll need to make some steel brackets and clamp to that. But otherwise, I think the routing will work nicely keeping the bends to a minimum and still reasonably compact. -
Trying to work out the positioning of the various Webasto bits, but the exhaust supplied is pretty long leaving a load to try and find a home for.. Feeling like a balloon animal manufacturer here... One side of the silencer the exhaust is 850mm long while the other end is 650mm. I have asked Butler Teknik for any guidance on minimum required length, warranty issues etc but no reply and as I wanted to see what fits at the weekend I'd appreciate any other advice....
-
Is blacking just bituminous paint
TandC replied to truckcab79's topic in Boat Building & Maintenance
Cratch cover?? It must make it a bit miserable inside if you've always got a load of moisture coming in from the bow and running under your feet ... -
Is blacking just bituminous paint
TandC replied to truckcab79's topic in Boat Building & Maintenance
If you're able to - removing the felt entirely, repainting, and then putting the slabs down onto something to raise them off the baseplate would be a better solution to allow some airflow under to help the bilges dry. Old hosepipe, thick tile spacers, scrap UPVC etc are all good. Having a wet through bilge like that is pretty uncommon now. -
Even worse - think it's £35 a year subscription.... that makes for some expensive remove control. I am fully intending on laying in bed and firing it up remotely each morning so I can get my moneys worth!
-
Is blacking just bituminous paint
TandC replied to truckcab79's topic in Boat Building & Maintenance
Ah in which case yes, crack on and slap it on! I used Toolstation "BlackJack" last time - held up to the general moisture of condensation etc fine. It's a bastard to get off with a wire brush tho as it gets hot and melts. -
Thanks Jen - that's good to hear (even if it does mean that I probably will just stick with the very expensive TCon2 remote controller from Webasto). I love the creativity in the other solutions... reminds me of when as a child I spent weeks rigging up a string pulley system to open my curtains from bed...
-
Is blacking just bituminous paint
TandC replied to truckcab79's topic in Boat Building & Maintenance
You're talking about your cabin bilges - which with luck, you don't want to see again... I used SML Paint's "Bilge paint" - it applied very easily with roller and brush for the nooks and crannies. It dries very quickly allowing you to get a good couple of coats on and dry. PLenty of ventilation and a mask. It was a lot easier to apply than blackjack/bitumen (ive done it twice previously using bitumen on different boats), leaves a much better finish, doesn't stink of tar for weeks and arguably is a modern solution. Can't remember the cost but it wasn't a lot to get coverage for two coats. -
Hi all - debate ongoing on a Facebook group but interested in thoughts here. What are the options for running a Webasto ThermoTop Evo - with the multi-controller - via a smart control function so it can be turned off and off via mobile phone app when away from the boat? I don't want to use a thermostat, to avoid short-cycling, but want the ability to turn on the Webasto for a solid hour or two when away from the boat. Say, when coming home after some time away etc. There would be wifi onboard and either 12 or 240v. ButlerTechnik tell me the Webasto TCon2 remote app module is the thing - but it's £300 and seems over the top. Google Nest? HeatMiser Neo? Are these options to use - cheaper than £300... How do these other wi-fi enabled products physically get wired into the Webasto control circuit to turn it on?
-
Indeed - the brown in the ceiling is your positive - so that goes into your switch to provide the permanent on supply. Then you need to add some cable after the switch into the positive Wago. You'll need to come back off the switch back into the ceiling void so you've somewhere to put it. That Wago will only be live when the switch is thrown. Then from that, you'll have two brown - one going back through to the LED, one off in your ceiling void to the fan. With the blue neutral it's easier as no switch - just get the three connected.
-
Putting Jen's above into a picture... Wago connectors - those little orange levers flick up, you push your stripped cable into the hole and snap the lever down - these ones effectively join the cables together within the housing, creating a connection across them all. Much easier than the old screw "chocolate block" terminals. They are about the size of a double pencil sharpener (what a strange thing to come to mind...) so you have to find somewhere to tuck them away. So one Wago is for the negative. One is for the switched positive. You need to take a little piece of cable from the switch, into the Wago. Then another piece of cable into the LED, and another cable goes off to the fan. Ditto on the negative. You don't have much of the blue negative cable to play with so I expect you will need to take all the light fitting out, lengthen all the cables and tuck everything away under it - up inside the ceiling void.

-
Here's another question on the same sort of topic... Is there a "smart" timer controller that can also be used with a smartphone app? That way, it would be possible to turn on the immersion heater remotely (this being for when on shoreline power and with the onboard wi-fi router on). Surely such a gizmo must exist? This is a good consideration too. Up until now, I have never really shopped around for electric supply on our shoreline - I've been with Octopus for years and years now. Our electric usage is really quite low (current boat is gas for water heating, so 240v is just the other domestic use, we work full time away from the boat etc etc). But, with the new boat - and being reliant on the 240v immersion for all hot water - that will up our usage a fair bit I expect and so may be worth looking into those tariffs where you're incentivised away from the peak periods etc.
-
Really appreciate that NIck - that clarifies things a lot. Yep - it's a SureCal supplied marine immersion.
-
Should have said - for now, i think we'll stick with hte lead acids and see how we get on with them, by the time they collapse, we can rethink - consider the new market options which in 3 or 4 years i expect will have come down in price a fair bit The online stuff says 10w for energy saver mode consumpton, and 30w for battery no load consumption, this for both the 12/2000 and the 12/3000. Not really sure what the difference is between those two modes? (this is a taking a bit of diversion away from teh immersion heater but all helpful stuff all the same !!)
-
Yep - appreciate that it would be probably not be worth running the batteries down for hot water. I need to investigate with MasterVolt how configure-able the solar charger is - it states in their limited bumpf that it is possible to set the system up so that once battery bank is fully charged it can be used to switch a water heater load on - and presumably to switch it off again at set values. Also, it's likely we would be onboard (sunbathing!) if we were to use the solar to heat water - monitoring the battery SOC, considering the weather and sticking it on for a few hours where possible, manually. Also with MasterVolt - their 12v/2000 versus 12v/3000 CombiMasters state no difference between their standby power draw - should we believe that? If they really are close enough in their power consumption, aside from the physical size differences, why not go for the larger capacity?
-
Well thanks folks - in some ways, I am glad I asked because it's been annoying me... and the nagging feeling was that I should have gone for the 1kw all along. ALthough now I have the worrying task of swapping the factory-fitted 3kw for a smaller one. Plus £90 wasted... hey ho. I guess as long as a smaller one is the same length, it will still heat the whole tank fully - just take longer to do so? Which as you've said is not really an issue for when on shorepower. The other option is to run the engine briefly i guess if we're really desperate to heat the water quickly from cold to give it some extra oomph. And realistically, it's only a few times a year when we go on holiday or wotnot that we'd be turning off the hot water to allow it to go cold. And if it opens up the option of harvesting a bit of solar-powered hot water then that appeals.... Next question - for a 1kw immersion, what would the recommended inverter be - to allow a continuous draw for a 1kw immersion plus a bit on top so we can still run a 240v fridge/freezer, a few power sockets etc for normal devices (not a kettle or iron or anything powerful). Our power usage is very low when on batteries - we just run a 240v fridge with freezer box. No TV, no washing machine, just a few chargers and wotnot.
-
I have an as-yet, not quite installed calorifier from SureCal. It is a large 90lt twin-coil vertical unit, which will be sat in an insulated box in the engine bay (no, it cannot go inside the boat, no we do not have room for another smaller calorifier). At the time, when I ordered it I thought that I would order a 3kw element because the only time I would be using it was when at the mooring where we have a 32mp supply. My thinking was - go big - as it will be the main domestic water heating source (there is the engine, and a Webasto for central heating via the calorifier, but for the vast majority of time, it will be immersion heater). I thought if we're going to be using an immersion anyway - then go for a large element to help in getting the temperature up quicker should we go away and come back to a cold calorifier. And then when we are out and about cruising, we'd either have been moving, or if static would run the engine for a battery-top up each day and this would be the main water heating source when out and about. And finally, we could run the Webasto to heat the calorifier, as the last option (although the Webasto is also linked to a towel rail in summer/whole heating system in winter). But - now, I am questioning myself... by going for a large 3kw immersion I am not ever going to be able to run that with any surplus solar generated once batteries are charged. While a widebeam, it is unlikely to have solar panels much larger than 1.5kw (I've not got to that stage yet, but rough guesswork on available roof) - and I appreciate that in this country, we rarely get maximum available sun etc etc. I will likely be installing a MasterVolt Combi 12/3000 - so that also places a limitation on the continuous output....also, I'd need one that has the switching of a load function Have I been too hasty? Should I have opted for a smaller immersion element which could be used to heat water through excess solar? Or, does my original thinking still stand up?!
-
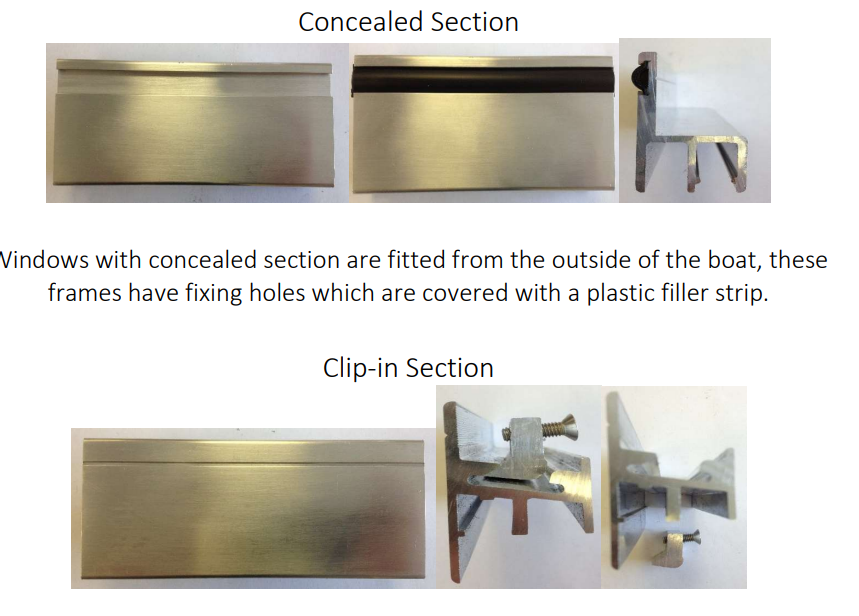
As above replies - but if this helps visualise: If it is screwed from the outside, yet you cannot see screws, it may be because it is a "Concealed section" construction - with the frames screwed in from the outside, in a groove in the window that is then filled with a rubber strip that hides the screws. You prise that rubber strip out gently with a screwdriver to reveal the screws and press it back in to cover. Or - they could be fixed using clamps from the inside - Clip Ins. The window frame pushes into the hole from the outside, then the clamps are tightened from the inside, and then a window liner fitted inside covering the window clamps/insulation etc. If the latter, you have to do some gentle exploration in removing an interior window liner to get access to the window frame/clamps from the inside. Image taken from the Caldwell's Windows brochure - not associated, although they did give me excellent service and i would recommend them !
-
plus 1 for using a wet vac. Will save you loads of time. I use a good splash of this degreaser from Screwfix in flexible builders bucket, regular changes of the water, gradually get down to just plain water rinse. Then vac it out - repeat. https://www.screwfix.com/p/no-nonsense-degreaser-5ltr/897JL?kpid=897JL&cm_mmc=Google-_-Datafeed-_-Auto and Cleaning?kpid=KINASEKPID&cm_mmc=Google-_-TOKEN1-_-TOKEN2&ds_rl=1243318&ds_rl=1241687&ds_rl=1245250&gad_source=1&ds_rl=1247848&ds_rl=1245250&gclid=Cj0KCQjw1aOpBhCOARIsACXYv-eGcDlxiuXJ5Y1uKzSCoBIeQgzi8k6U6hXtZo-Q-9LTluo5uigrOFYaAip6EALw_wcB&gclsrc=aw.ds