


Tony Brooks
-
Posts
30,052 -
Joined
-
Last visited
-
Days Won
139
Content Type
Profiles
Forums
Events
Gallery
Blogs
Store
Posts posted by Tony Brooks
-
-
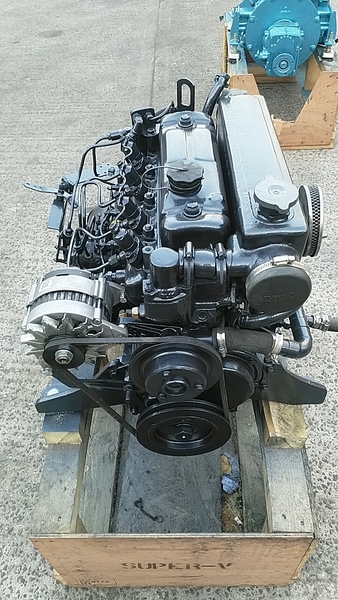
50 minutes ago, Kingdom Isambard Brunel said:
I don't see the adjusting bracket being on top of the alternator but under it as usual. The top end of it can be seen behind the adjusting nut and bolt, the adjustment seems to be at maximum, time for a new correct size belt I think!
There is normally a metal bobbin spacing the front mounting bracket. this boat has a stack of washers as a substitute.
If you look, you will see that the alternator drive end bracket seem to be more or less horizontal between the front mount and adjuster bracket mount. I would expect to see the majority of the alternator girth stuck out the starboard side with the adjusting bracket all but underneath the alternator. In the photo, it seems the majority of the girth must be pointing downwards. The adjusting bracket in the photo must be a long curved item running between the engine and alternator for us to see the end in the photo. I am sure it is the wrong-handed alternator and it sticks out, away from the engine, far more than it needs to when correctly fitted with the right adjusting bracket.
You can see what I am on about in this image:

You can't see the adjusting bracket fixing when looking from directly above.
It is easy enough to change the A127 hand, and may require a drill, but as I said, probably not worth the OP worrying about it until the autumn, so he can enjoy his boat.
-
9 minutes ago, T_i_m said:
Assuming it's not been mentioned as yet but is it an illusion or is the alternator out of alignment?
It certainly looks that way and I think it may be the wrong handed (not rotation) alternator, because we can see the adjustment bracket attachment when it would normally be underneath the alternator. However, I don't think the OP should worry at this stage unless it starts eating belts.
Now you draw my attention to it, something also looks odd with the alternator brackets mounted on the engine and distance pieces on the bolts. I don't think they are standard and might be the hangover from a dynamo.
-
12 minutes ago, AJLElectronics said:
You are talking about a hazard which is not normal.
Given the state of boats before the BSS. and cars before the MOT, I would question that statement. People have to recognise the hazard and mitigate it by maintenance. Unfortunately many don't.
Example. In a Thames lock, along with a small GRP cruiser with a Ford petrol engine, plus a horrible stench of petrol. Having talked to the owner, it was clear that he was completely oblivious to the danger. The cause was a faulty carburettor needle valve together with a worn throttle spindle, so when fuel flooded from the jet onto the throttle butterfly and out of the worn spindle. I have noticed this on a number of boats and many more cars. I also suspect many owners would not recognise deteriorating fuel hose and minor fuel leaks.
This is why the Thames Launch regulations mandated up draft carburettors with a drip tray fitted with a gauze flame arrestor.
-
10 minutes ago, Bryan M said:
I was getting clouds of white smoke.....
I suspect some may not have absorbed your comment about needing lost of cranking two weeks ago.
Then it is injecting fuel, it should at least try to start, so if it is not, then despite the ambient temperature, the air in the combustion chamber is not getting hot enough. That points to low compression (worn engine, valves being held open) or lack of glow plug heat.
Try turning the engine over by hand and compare the force needed to take it over compression with the other engine. Otherwise, check there is a gap on all the valve clearances and then get a compression test done.
This all assumes that you have not been messing with injection timing, valve timing, or valve clearances.
A further thought and long shot. The skew gear that drives the injector pump drive has an oil strainer and oil jet located below the manifold at the back port side of the engine. If not regularly cleaned, especially the strainer, the jet blocks causing the skew gears to wear. This gradually messes up the injection timing. So it might be a good idea to pull the strainer and jet to ensure they are clear and in good condition.
-
54 minutes ago, Mike on Sea Hustler said:
Quick final question in this subject, if I vent the rocker box and crankcase into an open milk carton am I not opening up the issue of carbon monoxide poisoning. Just thinking
Not really. Diesels do not make much CO because they always run very lean in petrol engine terms. The amount of piston blow by, which is what you are venting, in a fair engine is not that great, so it further reduces the amount of CO that gets vented. A 1.5l engine at 1500 rpm will draw in a bit less than 750 litres of air a minute, so say 700, depending upon the volumetric efficiency of the engine, so much of any of that small amount of CO vented into the engine room will get drawn into the engine. It really is not a problem. On a very old and badly worn engine, smell from the fumes may be a greater issue.
If you are really concerned, take the inlet manifold off (four nuts) and get it drilled and tapped to accept a hose tail, so any oil mist goes straight back into the engine, but I would not bother.
-
and the OP has yet to quantify the amount of white "smoke". Clouds or wisps.
-
29 minutes ago, Kingdom Isambard Brunel said:
Try removing them as suggested but on a hot engine. Sometimes they come out more easily.
Not so easy if it won't start.
-
7 minutes ago, Mike on Sea Hustler said:
Just as an aside this is a pic I took once the engine was sitting down on the bearers, hopefully you will concur that they show a reasonable amount of clearance
Yes, looks fine to me.
-
9 minutes ago, AJLElectronics said:
If there was a market I would be up for designing one, but I can't spare the time on something that I might sell two of.My feeling is litres per hour is the easiest for most boaters because many have hour counters and know how much fuel they buy, so I suspect you might sell less than two.
-
2 hours ago, gary955 said:
is it likely to go bang and spray the utility room and all the clean washing in acid?
As long as there are n nasty smells (rotten eggs), or hot spots on the battery during charging, or liquid/mist flowing from the vent port, then an explosion is unlikely unless you do something a bit silly, like disconnecting the charger while still turned on so it creates a spark.
2 hours ago, gary955 said:One goes into charge at 14.5v but the other goes into float at 13.7v. I guess the smart charger thinks it's already charged but I've no idea why. Should I take it off charge? is it likely to go bang and spray the utility room and all the clean washing in acid?
Edited to add. After about 15mins It's just started charging at 14.3v
I suggest that is fairly normal behaviour. As the charging current a battery will accept from many charging sources rises the charging voltage gets depressed and as the current falls the charging voltage increases. I think that battery was flatter than the other one so allowed more current flow at first.
-
42 minutes ago, Bryan M said:
Turns out is the starter relay.....the matching one on the other engine clicks when the starter is engaged. I diagnosed that the feed from the key operated ignition switch was intermittent and after removing, cleaning and tightening the connections, the engine now cranks reliably..... however it isn't starting and the ambient temperature was about 28C.
It last started ok about 2 weeks ago but took quite alot of cranking to spring into life.
Investigations so far......
Fuel cock is open.
Stop control in correct position (confirmed at engine end).
The battery is fully charged (13.6V), voltage drops to 11.4v when cranking (without glow plugs energised) and cranking speed seems normal.
When cranking we get white smoke out of the exhaust.
Checking the glow plug terminals with them energised, they are all 11.3V (comlow meters can be quite accurate and so can locations and both inexpensive so a panel instrument showing the current MPG is not difficult. Just seems that no-one is interested enough to justify someone bringing a model to a mass market, not even the suppliers of the popular water and fuel gauges. pared to 10.3V on the other engine which starts easily).
I'm puzzled in the different voltages on the glow plugs between engines - would the higher voltage on the non-starting engine imply that they are not taking enough current and not heating enough?
It could of course be a fuel problem.....is my next step to remove clean & test glow plugs, or check/bleed the fuel system?
All thoughts appreciated!
Sounds as if some glow plugs may be burned out. Normally I would say take them out and put them across a 12V battery to see what happens. If you are getting clouds of white "smoke" - not a few wisps, then you should have fuel being injected, but not enough heat in the cylinders to ignite it.
The problem with 1.5D plugs is that if they have not been taken out every couple of years and the holes decarbonised the pin ends jamb in and snap off as you try to undo them, so if you have a clamp type ammeter use a cable between each glow plug and the battery to see how much current each are drawing.
If you have to take them out, then the best way is to "worry" them out. Tighten one flat (1/6 turn), then loosen the same amount and after every three sequences undo them another flat, but they are likely to still snap.
-
59 minutes ago, Mike Todd said:
low meters can be quite accurate and so can locations and both inexpensive so a panel instrument showing the current MPG is not difficult. Just seems that no-one is interested enough to justify someone bringing a model to a mass market, not even the suppliers of the popular water and fuel gauges.
The cheap consumption readouts as found on cars are not, usually, flow meters. They are simply pulse length and frequency counters because the fuel pressure is known and the injector orifice size is also known, so time and frequency and pulse length makes it a trivial ECU calculation, it is really all software (firmware?) based and not a physical flow meter. I doubt an add-on for our mechanically injected diesels would be a cheap development - it will probably require two flow meters, plus calculations and display.
-
I would try spirit wipe (panel degreaser), but it is just a guess - or cheaper for a test area, try nail varnish remover.
-
1 hour ago, Arthur Marshall said:
Is there a physical reason why the boat cannot be moved? If not, I'd just take it out one night and move it elsewhere. If there are genuine reasons why the boat should not have changed hands, which seems unlikely if the marina has taken your money, any dispute over ownership or money owed by a previous owner then ceases to be your problem and becomes theirs.
I don't think that the OP has actually stated that he paid the marina. This is more likely a private or off site brokerage sale where there are monies owed to the marina by the vendor, so they may have a lien on it, thus a fraudulent sale. I wish the OP would be a bit more forthcoming in respect of the circumstances of the sale and who the money was paid to. On the basis of what he wrote, this could be a third party selling the boat and the marina seeking to protect the actual owner. We see a few each year where adverts have been lifted from proper sites and buyers are scammed of a lot of money.
If there is any fraud, then doing as you suggest might make the OP subject to prosecution for theft. This needs resolving properly and not by internet advice.
-
 2
2
-
-
Yes, got it in one.
In theory, you could block the rocker cover breather and rely upon the one on the side cover, but as this is an older engine and BMCs do seem to like to vent fumes I would not, just direct both hoses into the milk bottle.
As you say, there is not much oil, but it is enough to wet the filter mesh/foam and then trap loads of hair and dust. Actually the mesh or foam in those filters is supposed to be soaked in oil and allowed to drain before fitting, specifically to catch dust and hair, but as boats tend not to be used on dusty roads it is easier to leave them dry. Some Vetus and older Lister engines do not use an air filter, only a silencing box, so it is no big deal.
-
13 minutes ago, Mike on Sea Hustler said:
Aaaaaah so the rocker cover breather (possibly wrong rocker cover anyway) should not be connected to the pipe that protrudes from the crank case at all. And if it was in the past it shouldn’t have been. So to solve this problem I connect just the side case breather to the air filter? Is that correct? And run the rocker cover breather to a catch pot?
Yes, that would do, but I would use a T piece, like a Yorkshire T with stubs or pipe soldered into it to join the two hoses that you have and the use the other stub to run into the catch bottle. I would not run any 1.5 breather into the air cleaner nowadays because they tend to drip oil.
-
20 minutes ago, Kingdom Isambard Brunel said:
Looking at that photo it seems likely that the "non diesel" rocker box breather is connected, incorrectly, to the side chest breather. Not a good idea!
Yes, asking for oil leaks, especially on an older engine.
-
31 minutes ago, emm said:
Thanks but I think these maybe private freehold not leased from CRT?
But the only way you will find out for sure is to "get on your bike" to visit any sites that you identify and talk to the moorers.
-
19 minutes ago, TCTC said:
Thanks both.
Tony the NRV is the item marked 5 on the drawing. I do have a vernier caliper and some thread gauges so I’ll try to get some more accurate measurements when I get back to the boat tomorrow.
Thanks, so more a valve to keep a degree of pressure in the fuel system than a NRV, although it will act as such - like the valve in the BMC 1.5 filter heads on the return pipe.
Just for information. There are "add on" NRVs on the market that are supposed to allow the use of flexible leak off pipes, but the BSS does not seem so keen on metal leak off pipes as they once were.
-
They seem to be all over. Some on the South Oxford, south of Fenny Tunnel, some on the GU/Oxford west of the Puddle Banks, and some on the GU North of Calcutt locks, that I can remember. I can't be any more exact than that. I would suggest Google Earth will give you the information you seek. Just blow the map up and follow the canals.
Try this for the GU one https://www.google.com/maps/@52.2782573,-1.344255,113m/data=!3m1!1e3?entry=ttu&g_ep=EgoyMDI1MDYxNy4wIKXMDSoASAFQAw%3D%3D
-
41 minutes ago, Kingdom Isambard Brunel said:
It is a banjo rather than a union.
If you consult thread tables on the web you should be able to establish what it is.
Whilst true, that presupposes the OP has a thread gauge or callipers to get the measurements.
12 hours ago, TCTC said:It's the thread downstream of the non-return valve, marked up with a red arrow
I can't see a non-return valve, as KIB says it is a banjo. I would talk to MES Midlands, @RLWP who may know or have a suggestion.
Downstream means moving leftish from the banjo, if you have a non-return valve to the left of the banjo, maybe that is what has a different thread, I doubt it is a Lister part.
-
7 hours ago, Mike on Sea Hustler said:
Strange how ‘not’ having the engine start could sound so nice. Been a long day but everything is pretty much connected now, apart from the raw water intake as I’m waiting on a 1/2BSP female to 20 mm hosetail, I’m also waiting on a fitting ordered from ASAP for the fuel Line, seems the new lift pump has a different thread so
my 25 ur old connection won’t screw in. And I still have to connect the crankcase breather, which is like a Chinese puzzle. I have the rocker breather coming over the end of the heat exchanger and heading in roughly the right direction towards the lift pump, then there is the crank case breather itself sticking out the side and the air filter. I have a piece of hose from the rocker cover and a short length of metal pipe with a 90’ bend in it and a short branch coming off the side at 90’ with two short lengths of heater hose obviously used to connect it up, but I’ve twisted and turned this thing till I’m blue in the face, trying every possible configuration and still can’t get it to line up. Gave up, came home, go back on Sunday after a day off, maybe a not so knackered brain will be able to solve it then
If you are saying that, in effect, the breather is a single hose running between the rocker cover and the side plate, then it is wrong and will not and can not act as a breather. The majority of 1.5D breathers were a hose from the side cover and into a spigot on the air cleaner, so crankcase fumes would be drawn into the engine and consumed during combustion.
Although some Calcutt (and possibly others) also had a breather fitted into the oil filler cap, i think that your engine may have acquired a petrol engine rocker cover, which did have a breather connection.
When 1.5Ds age they tend to blow oil into the air filter which drops into the bilge. My suggestion to you is that you see if you can find a T connection to join the two hoses, and the put a length of hose on the spare arm that terminates in a (say) 4 pint milk carton to catch any oil. Any fumes that exit the craton should then get drawn into the engine, along with a lot of air, to be burned.
Maybe you need some longer hose. I am sure it is ordinary car heater hose.
-
1 minute ago, Lady M said:
They are also silent and work well on gas or mains electricity. We have found this a handy choice for cruising or in the marina.
But also tend to react badly (stop cooling) if they go much out of level, which is why Electrolux used to supply a levelling spirit gauge with a new fridge. I understand the way the fridge is leaning has different degrees of effect.
Says he, who had an email from France asking why the fridge had stopped working, and it turned out the son's motor home was parked on a slope.
-
23 minutes ago, Mike on Sea Hustler said:
Well I have repositioned both cables on the solenoid post so that they are well clear of any chance of a short circuit going on, made sure the 6 mm spade is well insulated and also clear of any possible short and touched the heavy cable to the positive and Bingo, nothing happened. I’ve either blown the wiring to kingdom Come or I’ve solved it. Only way to tell will be when I turn the key to test the engine (hose at the ready to
pour water into the sea strainer once I’ve fitted it.)
I am sure that you have solved it. Now, when you get it running, we have to find out if it is charging properly.
Oh oh that looks expensive
in Boat Building & Maintenance
Posted
I should have added that as there seems to be enough space around the alternator (unless it makes oil filter changing difficult) I don't see any need to change it. But it would be a good idea to ensure the belt is correctly aligned.