


Phoenix_V
-
Posts
1,729 -
Joined
-
Last visited
Content Type
Profiles
Forums
Events
Gallery
Blogs
Store
Posts posted by Phoenix_V
-
-
it
10 hours ago, fer said:Then up to Hertford, but with the Ware Boat Festival being that weekend, I wonder if mooring will be a struggle. Anybody there already? Does it get very busy?
The lower Lee has a certain character which is not to everyone's taste but persevere it really does get better. its busy all the way to Hertford but there are spaces to moor away from the train stations, pot luck actually getting one of the limited moorings in Hertford but worth it to say you have reached the terminus should be space in Ware on the outskirts away from the festival (or they might take a late booking to join the festival). If you have come all this way do visit the Stort, one of the prettiest rivers and usually lots of space in Bishops Stortford.
-
 1
1
-
-
"The consideration was that one third of all future rents and fines were to be paid to the Crown with the balance used for the benefit of navigation. "
and does anyone know if that is still happening just curious
-
1
-
-
A search on the duck for 72' narrowboats only came up with 3
-
This will start you off https://marine.honda.com/support/manuals
workshop manuals may be available from Seloc as well as Honda
There a re a lot of general books on boat maintenance if you browse, also some specific to narrowboats which might be less relevant..
I use this one The Complete Book of Yacht Care - long out of print bu t available second hand. Nigel Calder's books are worth a look but have little to say on outboard boats.
-
 1
1
-
-
There are a few in France or Belgium but presumably being more expensive than a normal lift bridge only seem to be used where there is lack of space for the counterbalance here is a modern one near Bruges where they have moved the counterbalance at 90 degrees to the bridge

and here is another modern one on a roundabout in Lille actually 2 one each side of the roundabout but thesehave has a rather large machine room and the support wall appears to have a large crack in it so probably not one to copy
-
1
-
-
This one is still going - just

-
1 hour ago, Alan de Enfield said:
Convinced them it would be far cheaper to have an electric fan heater running , and, they eventually had the Alde removed and a Squirrel installed.
Not sure about that a 2kw fan heater running flat out would use just over 330 kWh at 30 p per kWh do the math
-
Which Python was this please
-
2 minutes ago, MtB said:
I was about to type much the same suggestion. Possibly it might alternatively mean 'no overtaking'.
as per my post
Just now, Rob-M said:Perhaps it would be clearer if they used the same images as road signs.
why would you not use the same signs as other waterways the road sign has a picture of 2 cars even more confusing
-
38 minutes ago, PeterScott said:
Bit of a gap, but back to the OP question, then ...
and sadly have no idea what this is trying to say... "Convicts prohibited" ... "Do not leave the tunnel through the airshaft" ...
It's difficult to think of silly suggestions ... And a bit of context: it's part of this larger sign ...
European waterways use a standardised system of signs known as CEVNI seems logical for crt to follow suit rather than trying to create their own "Great British " confusing sign.and No its nothing to do with the EU its under a United Nations commision.
https://wiki.unece.org/display/TransportSustainableCEVNIv5/ANNEX+7+-+Waterway+signs+and+marking
-
1
-
-
we had an all singing and dancing opso auto change over regulator one time we came to the boat and found gas had run out, changed bottle and a day later gas had run out upon investigation there appeared to be a plug at the bottom of the unit which had literally blown out (trapped water and frost???) decanting all the gas into the locker (thankfully the drain pipe did its job.
So now we have a simple regulator with no opso auto change etc.
The company who made the original have gone out of business.
-
1
-
-
On 11/03/2025 at 12:17, Onewheeler said:
On the way out to the Saône from the marina at St Jean de Losne. Good price too.
Dunkerque Grand large marina
-
15 minutes ago, Machpoint005 said:
No, I've used them if they were provided by the employer.
I've also provided them as an employer.
did you declare for income tax purposes?
-
We had 2 Shorelines over the years both failed through loss of gas, never had that with a household fridge. Think I'd rather take a punt on a Chinese 12v or mains plus inverter.
-
BCC Broxbourne Cruising Club
Which boat club ar these displayed in?
We need some new stock does anyone know of a cheap source, printed would be fine
-
5 hours ago, ditchcrawler said:
Its another case where the OP has not given sufficient information to give a true answer
its a gas warm air heater none of them use an excessive amount of leccy - he said it was a gas heater - several people assumed it was diesel
-
1
-
-
OP says its a gas heater not diesel
-
1
-
-
2 hours ago, Alan de Enfield said:
That does look rather nice and just think - NEVER need to worry about rust !
It is a little 'square' but usable.
I wonder if it is painted or self colour might not need to ever paint it too
-
26 minutes ago, Tonka said:
Looks a bargain for someone probably better on wide waterways though because of the cabin
-
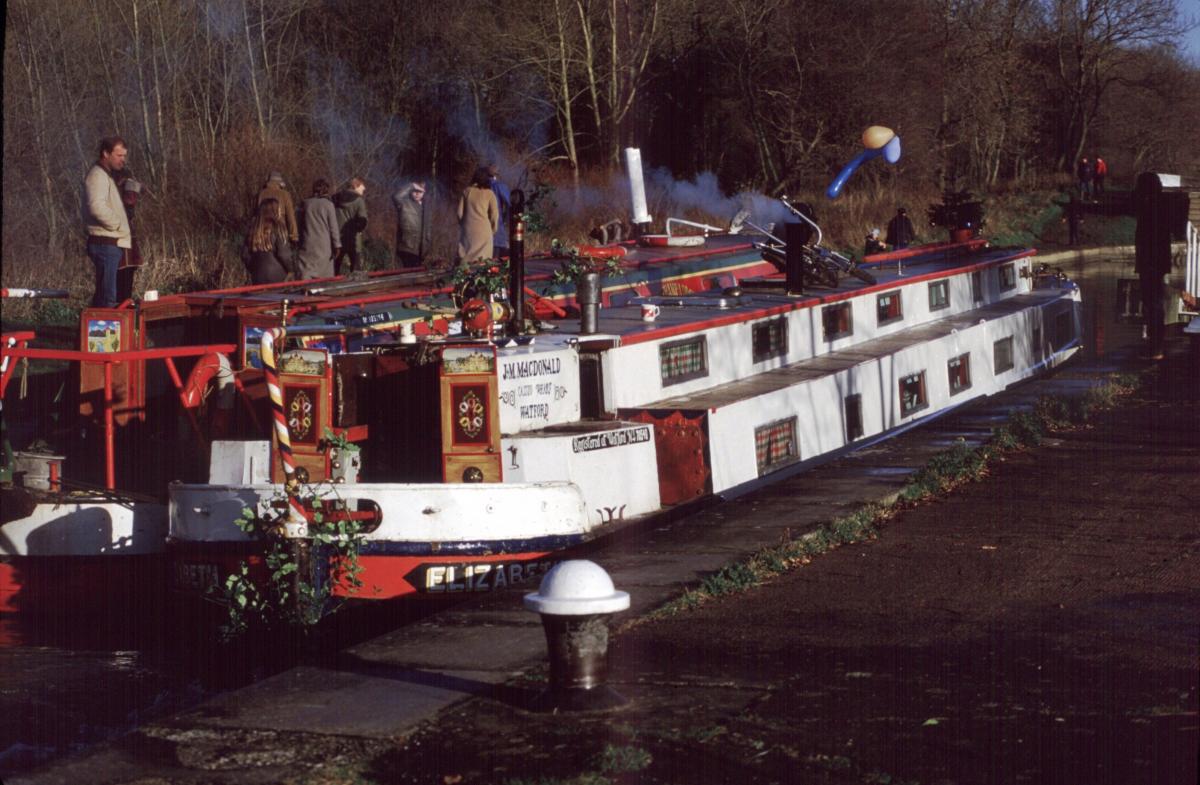
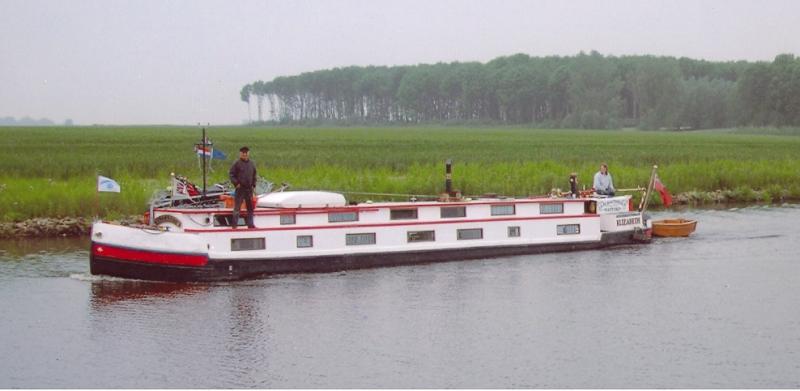
havent read the entire thread but in case this hasnt been osted before the late Jim Macdonald's Elizabeth
-
1
-
-
Very strongly built boats but as anything 53 years old depends on how its been looked after (hull interior and engine) and depends on price. Get a survey.
-
2 minutes ago, MtB said:
Od course I do.
And I am not selling my boat, but the point I'm illustrating clearly escapes you.
and mine escapes you, one has a genuine document but no signature would normally be accepted on face value but could be checked by the pedantic the other is fraud whether or not likely to be detected
-
1 minute ago, MtB said:
Excellent, so I can copy the whole document for my own boat including the HIN which should also satisfy all but the most pedantic. Yes?
You could copy the document but I would suggest you change the name of the boat builder and amend the hin appropriately perhaps use a dead boatbuilder.
You do know this is fraud?
-
On 03/02/2025 at 18:58, PeterF said:
One thing I was reading the other day is that there really are only 2 approved bodies (approved by Government) that do RCR and PCA. HPI verification Services and IMCS (International Marine Certification Society).
I am self fitting lithium so wanted to look into this. The powers that be state lithium is a mod needing a PCA. The one thing that is concerning reading the regs is that a complete PCA is then required rather than just a check of the mod. Also, how does this affect the likes of Four Counties Marine installing lithiums, is his work needing a PCA. It will not stop me going ahead, I got the ISOs for small craft lithiums and wiring so will do a compliant install.
jobs for the boys
I thought it was debatable whether fitting a new battery was a major modification requiring pca - where did that particular bit of nastiness come from please?
i am thinking of going lithium (removable in the event of sale!
Which is the current ISO for wiring and lithium please


Government produces guidance for lithium battery installations in boats.
in General Boating
Posted
some were some were not