


Jrtm
-
Posts
2,560 -
Joined
-
Last visited
Content Type
Profiles
Forums
Events
Gallery
Blogs
Store
Posts posted by Jrtm
-
-
I'm not sure if it should be here or in general maintenance but as is history related thought I would put in here.
Is or was there a specific number ba k cabin slide top wooden water rails?
I've seen a few that have them in diffrent places and have around 3, ive also seen just a few that just have either 1 at the top edge (very back edge by the doors) there are often just an angle iron, or half round metal or wooden bar. And the odd one with 1 at each end
I know the logic behind them and as im now rebuilding my back cabin slide as ive got the only opportunity to do it I want to add these on too as I didnt have any before and water dripping over the egde was a big pain.
But is there a reason why 3 or were there ones with 4?

-
Thanks
-
16 hours ago, koukouvagia said:
As a former owner of Owl I'd be very interested to know more about this.
Seams odd for the money spent to them wanna sell on in a very short time, I know she's well looked after by you!
-
I do have a pic but unable to tell if its the original that was on the boat, also I cant see all the exhaust in the photo, so its not really much help
-
as title after a shot one really but I'll take /buy anything as long as its an old original or original copy
-
The rollers are 14hp there a compleatly diffrent engine if you look the heads are same way round but exhaust and inlet on other sides to 2dm
-
There are actually about 6 of these engines on ebay. 5 in rollers 1 as listed above. Rollers range from 500-3k
-
Just now, frangar said:
Bet it would still sound nicer than a jap digger engine!!
Yep!
-
4 hours ago, frangar said:
Nice National Twin....would need a gearbox etc but if its the right price.......
This is not a normal narrowboat engine, internals are smaller the heads won't fit the 2dm.
There is a roller on ebay to with the same engine in at 3k
-
I've only take a few as was very busy trying to get it all done in the month lockdown,
Paint is all 1940s-1950s proper engine enamel paint mid brunswick & signal red all old but new paint. The block will be done the same. I'm very lucky to have had this in the back of a shed. I have enough to do more but as its now unobtainable and nodowt very rare
-
 1
1
-
-
-
9 hours ago, Tony Brooks said:
Probably the standard bump clearance measurement procedure in both cases. Build with no or the thinnest shim, put lead wire/multicore solder on the top of the piston above the gudgeon pin axis, fit head, rotate engine a couple of times by hand, remove head and lead, measure the squashed lead and then use that to work out the required shim thickens. I suspect that if there is no liner protrusion you could use a DTI to calculate the block face to piston crown difference.
Yes correct.
I should have liner protusion of 0.010"
I had no shim in the conrod before but it also then allowed the oil to seal out with a 0.010" shim this should act as a seal and just means I run a very slightly thinner head gasket shim.
-
7 minutes ago, NB Esk said:
Sounds good, any chance of some photos? Also, what are the "new rod shims"? Thrust shims?
I've got a few pics ill post but didn't do many as gone along due to when I've been doing the work and having to just get it done,
Rod shims sit between the conrod and bearing housing. There use to be 2 ways to adjust the hight of the piston,
Under the rod
On the cylinder head gasket, there use to only be 2 head gaskets the rest was done from the rod, now new rn have fixed rod and adjust from the head only.
-
1
-
-
30 minutes ago, dave moore said:
I wrote it a few years back, not the first I’ve done.....
Nice to see it used rather than fmc on modern boats.
You'll might a call once I need/get my sign writing done, which you'll reject doing once you find out its getting clayton cabbages on it, lol
-
OK just an update.
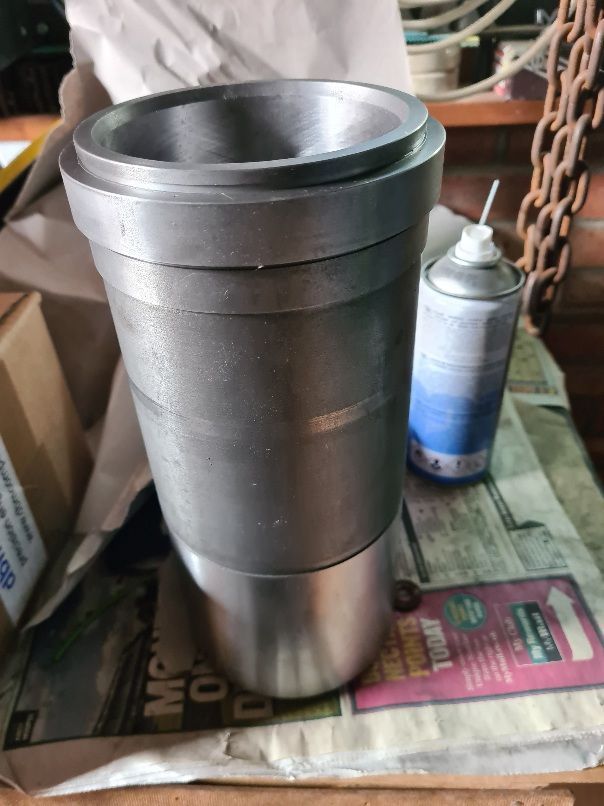
All heads fully rebuild, new valve guides, new intake valve chest seal, new rocker bushes, new rocker bars, new brass water seal around the injector with seals, rebuild injectors with new nossles, re designed droppers on the rocker covers, new decompression lifters and levers aswell as 2 sided and individual cylinder shut off. New gaskets and head caps for water and intake and exhaust covers. Recut injector seats. All heads fully delimescales and all water ports checked and made sure all flow water freely including round exhaust outlet. Head .002" skim.
New liners (copies of genuine national 1940s liners), new liner seals, cleaned and prepped block for liners to go back in, (just need to sort the very small crack at the week point at the back of the block.) Top of block 0.002" skim.
Fully cleaned and piston ring groves checked pistons, new gudgeon pins and retaining clips, New con rod small end bearing honed to new gudgeon pins, new rings all gap checked to new liners. New rod shims.
Checked and measured big end bearings, cleaned and checked big ends on crank.
I can now supply any of the above parts that I have replaced. Liners can be ground to fit r/n
-
2
-
-
There are reasons for doing it, depending on the engine.
After a long day you normally alow to run for a few mins as all the heads block ect will be very warm the idea is to alow the water to cool these parts before shutting off.
If direct water cooled it will cool quicker.
The idea behind a rev up then shut off is to use any final fuel in the lines and pump and cylinder / cylinders normally if the engine is then going to be left for a few days+
A direct shut off depending on engine will always inject fuel into the cylinders so you rev then shut off to stop this and use it up.
It also comes from very old engines where by you hold the fuel pump fully shut or fully open to kill the engine by cutting the fuel. Some pumps there shut off is after a pump some before. If after you ov get a quick rev then the fuel cuts out again the idea is to use the fuel up in the cylinder and it cant work its way into the oil when stopped. This might not seam much but on 2 stroke diesel you burn a little oil if fuel gets in this oil over time you can end up with more fuel in oil causing run ons, so you use your fuel up before killing.
-
https://m.apolloduck.com/boat/narrow-boats-traditional/614490
Not historic but was looking threw the historic / working boats.
Not seen tco used before on modern boat
-
1 minute ago, Tracy D'arth said:
Will the block stitch?
Ah this was an idea I thought about but you cant get to the very middle to bottom from outside as the timing case is in the way, (i can't remove this thats not a easy job and I also then run the risk of knoking one of the engine block stands bolts out which is very bad like sinking bad)
I maybe able to do it from inside (liners are already out) but I think its right on a weak corner before the thick part of the block.
I cant get to boat to photo to show the point at the mo.
I can get to the inside but not 100% it can be done from inside.
Welding (mig/arc) won't work as its too old and the iron won't weld well its been tried in the past before my ownership. Hence braze is best.
-
Does anyone know if Mike from Victoria (royalty fuels) is still doing deliverys. I tried last year to find out and saw the boat at a few shows but it didnt look like Mike on board and didn't look like was selling....??
-
not sure ive fone some ringing around, its getting people on site to do the job, as I have to work around the museum and around public areas so its the comes in under there health and safety.
Hence if I can get the kit its my insurance ect and i can then work around the public areas or when I know there is no public
-
34 minutes ago, jake_crew said:
Could you get yourself to Stoke Bruerne ? The blacksmith there might be able to help.
Or Candlebridge Fabrications at Blisworth.
Otherwise, I've seen a few mobile/floating welders around the cut.
No boat is stuck at bclm. With no current access to public or staff except a few. Ive managed to get special permission to go on site for the day (first time sence march). Wanted to get at least the block done, and if got chance the rivets in the engine room while I had the opportunity at same time, rivets can wait its the block thats the important bit to get done, without this the engine can't go back together. And the block is stripped as best I can but I cant get the block part out as its very very difficult to strip it further without causing far more problems and then would have to try and lift the block out the engine room doors, my roof is a fully sealed roof as the engine was part rebuild before the engine room went back on
-
Argosheild is normaly 5% welding gas for mig/tig welding its normally a mix of 3 gasses, if was a mig I would be fine i have a bottle still (no welder except arc but the only way to weld well would be to tig.)
Worst case I may have to hire a tig welder if I can find one
-
1 hour ago, BEngo said:
You will struggle to rivet successfully by heating the rivet in the hole. Hot rivets work because when you hit them the diameter expands to fill the hole and is stopped by the cold plate. The outside of the rivet is then chilled so 'frozen' in size. The head then forms and finally the rivet contracts lengthways as it cools, clamping the plates together. Heating the rivet in the hole will mean a red hot (or nearly so) plate round it, and this will just deform as the rivet is expanded.
Can you not up sticks for a quieter bit of towpath then return when the riveting is done? Depends on whether you are using an air or electric riveter and need to power that I guess.
N
PS. There are alternatives to BOC, but they are even more expensive.
Hi i can't get the boat out of the museum at the moment, a the museum is shut no way of lifting the bridge and b the engine is in bits due to some of the work being carried out, total top end rebuild including new liners ring and rebuilt heads.
I need to braze inside the block,
As above the rivets can wait but the block cant as I cant put engine back together without re sealing a old weld that wasn't sealing, i want it doing semi proper hence brazing rather than just some form of liquid metal or fiberglass. Its right on the corner on gearbox side,
Shame there is no low temp alternative ?.
Think I'm going to have to look a buying a kit, just be expensive at around 300+ ish for new bottles + hire + buying a regulars and torch.
Was just hoping not to even if I found a local or someone that would lend me one for the price of replacement gas
-
The small bottles very small (1L tiny) bottles won't last long enough you get around 10 mins of use, i have 2 block parts to braze, and around 8-10 rivets (engine room rivets) i need to heat up once in the holes reason being, the museum might be open it might be shut but I have to do on the boat due to others pos walking around the site the only safe way is to pop the rivet in heat up then hit it. (I cant just put a metal sheet down and do on that like I would at home or out and about as it has the potential to set the wood on fire the engine room is steel, i could put on the roof but there is still alot of wood around the spot i need to rivet has no wood near it.)
Hence looking for a good but portable size oxy kit


Ebay vintage engine sales
in Others
Posted
There is a list ha or hr 2 generator set on ebay too,
he also had a rn head, not anymore though! I did speak to him a while back he has quite a bit of stuff its finding the people who need it, he has a few cranks too, he has some national and rn parts but there for the later national engine and I only know of 1 of them around