


IDS
-
Posts
217 -
Joined
-
Last visited
-
Days Won
2
Content Type
Profiles
Forums
Events
Gallery
Blogs
Store
Posts posted by IDS
-
-
Do you have a filter on the pump inlet, does it collect crud? If the little mushroom valves round the pump chambers don't seal well, then the pump will not achieve full pressure as efficiently, and so may take longer to shut off. Once the pump has shut off, does it retain pressure in the system well (for example if you don't turn on any taps or have any leaks then the pump should not cut in again for hours). I found a grayish deposit building up on these valves after long use.
Have had similar issues with water leaking slightly from housing, fixed by tightening hold down screws, it is poor design. I intend to check pressure in system, higher pressures will make this worse.
-
An accumulator will also make your pump last longer (or at least make the contacts on the pressure switch last longer)
Edit to add :- To answer the original question, before you start playing with the pressure switch setting you really need to temporarily fit a pressure gauge somewhere in the system so you can see what you are doing. If you have an accumulator, then there is a convenient schrader valve on the end of the accumulator where you can clip a tyre pressure gauge.
-
They are cheap enough to buy, as above, but also easy to make up yourself (ebay 5 mm elastic cord £1.40/metre) and a few spare metres of the cord are always useful on the boat.
The trick to threading the 'bobbles' after you've the made the loops is to stretch the loop with a length of wire looped through it, then slide the bobble down the wire and over the stretched elastic.
-
I buy them from inline filters (http://www.inlinefilters.co.uk/), part no PF7824 FILTER-Fuel(Cartridge), £2.88 +vat . (together with fuel spin on filter and oil filter for my Thorneycroft)
Good service from them,
-
If you fit isolation valves, make sure they are "full bore", cheaper ones usually are not.
-
The pump spec says it is good for dry running up to 30 mins, if it is still making some noise it is probably still running. If you drain it down inspect the pump chamber for obstuction.
Prime culprit for no circulation is an air lock somewhere. Inspect the pipe runs for possible air traps.
-
Most water pumps have little valves built in as part of the pumping mechanism in the pump head. These can leak pressure, if dirt or foreign material gets into the pump. Check that you have a filter or strainer fitted between the tank and the pump to prevent this. These pumps are usually easily serviceable via service kits available from chandlers (but a bit costly, though cheaper than a new pump. For the Whale Universal pump the kit takes the form of a complete replacement pump head. However as a first ploy you can strip down the pump head and manually clean the valves, there may be some obstruction that has been sucked into the valve preventing it sealing. On my whale pump the valves are little rubber mushrooms which can be removed and cleaned up, after removing them from the pump head. If the valves appear damaged or perished then a replacement head is required.
Check also that you don't actually have another leak somewhere else in the system between the pump and your taps, shower, toilet etc.
-
A sander doesn't get into the rust pits, which is where to want to get the loose stuff out. A hand held wire brush would work but is excruciatingly hard work.
-
I did this job in August, and you have my sympathy.
For the initial scraping I used an electric scraper like the picture below. It was a great device, a scraper with a hammer drill action, but small and lightweight. Mine came from Lidl at £14 (branded as Parkside), it does a fantastic job. Unfortunately Lidl only stock them now and again, they come from a chinese manufaturer and are occasionally sold under other brands like the one below . Bosch used to market them but not any longer.

Don't bother trying to do your tank at this time of year if your boat is in the water, it will be impossible to paint with bitumen due to condensation forming as you try to paint. Wait till next summer.
I was fortunate to be able to borrow a 'fresh air full face mask' which made the job bearable, would highly recommend, and probably the only possible way to do it with an angle grinder.
For painting the bitumen the fumes are not too bad but it helps to direct an airstream into the tank to flush fresh air in. I used a fan heater (with the heat switched off) positioned at the lip of the tank.
Our boat has two tanks (one each side), so twice the pain. On one I simply scraped and then 2 coats bitumen. On the other I scraped, then cleaned off with with an angle grinder and twist knot cup wire brush, then coated with vactan, then 2 coats bitumen. In 3 or 4 years time I'll have a look and see how they are faring.
Good luck, it's a terrible job to do
Ian
-
Are the isolating valves on the 15 mm pipe 'Full bore' or do they introduce a restriction? Many domestic valves are restrictive and used on outlets.
-
These scrapers are brilliant and cheap for scraping rusty peely paint. It works a bit a chisel in an impact driver.
http://www.amazon.co.uk/dp/B004WN52M2/ref=pe_385721_37986871_TE_item
Lidl occasionally have identical units in their tools event at the same price After scraping an angle grinder with a hard wire brush gets the rest of the rust out. If you have a smooth surface (ie not rust pitted ) then 'clean off discs in an angle grinder are very good.
You will need quality dust masks etc if you are wire brushing rust, especially if you enclose it in a tent.
-
If the PRM sump plug is very inaccessible (like mine), you can also suck the oil out of the filler hole with a suitable hand pump and a bit of plastic pipe.
-
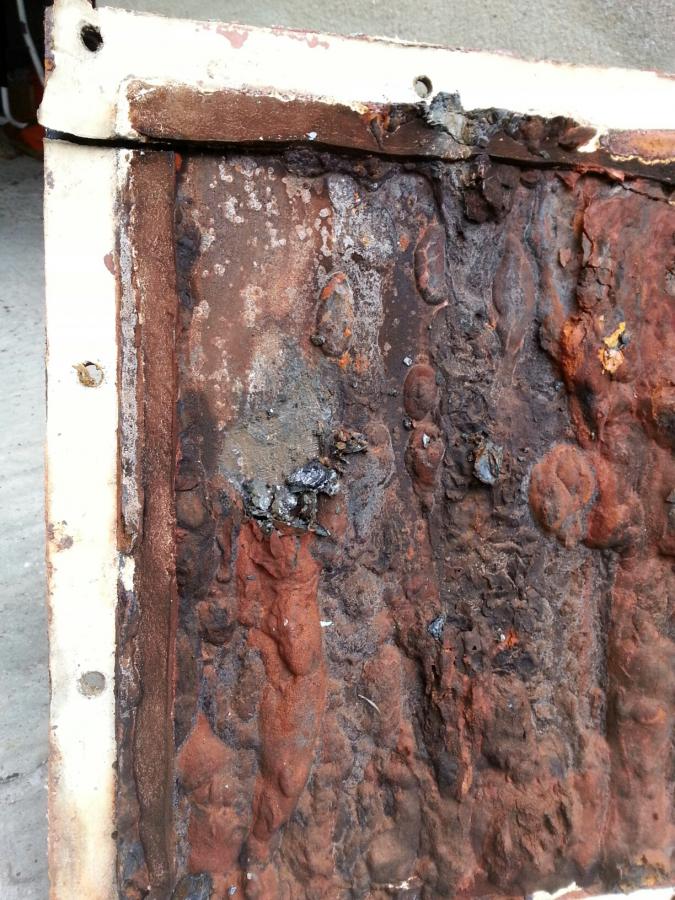
Just embarked on some long overdue water tank maintenance, not done since I've owned the boat. Now I know why I've been putting this off for so long. My tanks form the sides of the well deck, so there are 2 of them, each 2 m long, one each side connected by a ballance pipe. So twice the agony.After draining and opening the side mounted access panels, the inside looked frightening with large encrustations down the sides of the tanks, which look like it could be rust. Photo of access panels shows the sort of stuff.My first thought was that it was lots of rust, but it yields to a scraper leaving a very pristine surface of the original plating, no obvious rust or pitting. The encrustations are very black, soft and crumbly beneath the crusty superficial rusty looking tint on the surface, I wonder if it is a degradation product of the previous coating, which I assume was some kind of bitumen. It has actually done a superb job of protecting the steel, even after many years (>9 ) of no tank maintenance.My question is what does the forum recommend as a coating now, since I discovered today that the bitumen product stocked by Midland Chandlers is no longer WRAS approved for potable tanks. I was checking the manufacturers (Everbuild BlackJack) Tech data sheet for coverage, and there they state there that it is 'not suitable for potable water tanks', On the tin it used to say it was.Edit to add: Everbuild confirm the product is no longer certified and should not be used for potable tanks.
-
I prefer my gauge at eye level, not below knee level
-
These work very well and are simple to fit in the delivery pipe from the tank.
http://mcsboatproducts.co.uk/portfolio/fresh-water-gauge/
Had ours for 6 years with no problems, trivially small current drain from 12v.
-
It looks like a relay which may be part of your battery charging system. It gets warm because it has a poor connector or relay contacts which have some non zero resistance. The more current you put through it the hotter it gets. You must check where the wires go to find out what its function is. It needs to be checked and replaced by someone competent with electrics.
-
After scabbling and cleaning up with grinder, I used Craftmaster Rust treatment to spot treat rust pits and welds, then craftmaster grey anti corrosive primer. Their Rust treatment is probably similar to other rust converters, but it doesn't leave a residue that needs to be cleaned off.
-
Once you have a bare metal surface cleaned with a grit disc in the grinder or orbital sander, keep dry and brush down till clean, then wipe down with white spirit. This is the last time you should use white spirit on the surface, once you start painting use only tack rags to remove dust, otherwise you will also remove a bit of the paint that you have just put on.
For getting paint off the roof hire a scabbler from your local hire shop. Lots of threads on here about them. A bit heavy to use on cabin sides unless you are quite beefy !
Edit to add - 'Clean and strip discs' work very well in the grinder for the final clean down, they look like a thick rigid sponge pad impregnated with grit, they dont clog and last quite well. Just google them.
-
To diagnose your battery health and state of charge you need a Hydrometer. Fully charged cells have a specific gravity of 1.265 to 1.280 (depends on battery type and temperature) Check all individual cells, look for any that are significantly different from others in the battery, which will indicate faulty cells. You will find tables of specific gravity on the internet that will help you understand what is going on with you battery bank. Just google 'lead acid battery' .
Terminal voltage can also be used to monitor state of charge, but not accurately when the battery is in use either charging or discharging. It is recommended to monitor the voltage after charging, but let the battery rest for 6 to 12 hours with no load before measuring. There are numerous provisos with this method including temperature and battery type, but it is a good way to get to know your batteries. Again the internet will provide tables to help determine the state of charge from the measurement.
If your current state of charge monitor is only measuring voltage then it will always be fooled if current is being charged or discharged.
-
Your canal plan settings are probably a bit pessimistic, but take the advice of Heritage when you get there. They will deal with question many times a week.
-
You will feel well exercised after Bosley locks but do take care of safety with the 9 YO . With 3 full days it will all be over much too quickly, so enjoy as far as you get, and don't be too ambitious. You will get the bug and be back for longer trips in the future .
I agree that a walk to Marple Aqueduct is is much better use of time.
Ian
-
The Caldon canal is great, and Hanley and district may be ugly but is also very interesting for it's industrial archaeology especially round Etruria Junction which is worth looking around. You may also like to visit the Emma Bridgewater pottery factory which is adjacent to the canal in Hanley. Don't be too optimistic about your travel times as we are now into school holidays and busier times at locks where there could be queues (especially the Etruria staircase). You could also lose an hour or more at the Harecastle Tunnel. A good destination would be the Holly Bush pub on the Caldon, but be prepared to turn for home earlier if things go slowly. To your advantage at the moment we have have light evenings that allow you to extend your days cruising if necessary. There are some good moorings between Harecastle and Etruria. Note that the Caldon is mostly quite remote so not many shops and pubs.
Destination Bugsworth Basin and Whaley Bridge would make for a more relaxed first time cruise, which would be just as enjoyable. If you find you have time on your hands then explore to the south of Congleton after you get back from Bugsworth.
Remember that the canal is best enjoyed when you don't have time constraints.
-
Also check that you have at least 4 mm2 cables feeding the power to the fridge. The voltage drop across smaller cables is significant when the fridge tries to start. We had similar problem on an old fridge, which was cured by replacing thin cables. If it works when the engine is running, but misbehaves when only running on batteries then check the cables.
-
Thanks for the prompt replies and the tips and suggestions, I'll get some quotes from the suggested operators and request a fast model !!
Ian


Debdale Wharf zinc spraying - has anyone had it done?
in Boat Building & Maintenance
Posted
We had our 1988 boat blasted/sprayed/epoxy in Aug-2013, the first one they did. Debdale lifted it out last summer for us for an inspection, to see how things were going and everything looked really good.
They had a formula for pricing each phase according to square metres, so price depends how far up the hull you go, with blasting, spraying etc. They will give you this over the phone if you want to price up what you want done.
We're very happy with the job so far.