


Greenhorn
-
Posts
16 -
Joined
-
Last visited
Content Type
Profiles
Forums
Events
Gallery
Blogs
Store
Posts posted by Greenhorn
-
-
5 minutes ago, mrsmelly said:
Yes. I have valves on my system to divert or close either the heating or water heating system independantly. You could always have a rad in the bathroom on to dump some of the heat?
How do you stop the Webasto cycling when it’s just heating the water ?
as I said in my original post and in the diagram, I’ll keep a towel rail on all the time.
-
I guess my main concern is what do you do in the summer?
can the Webasto be set to come on for just the amount of time it takes to heat the water then and then switch off?
-
Quick question
im currently fitting out my barge with a 2 pipe central heating system using a 5.2kw Webasto Thermo top c. Now as most people know and also states in the user manual they need to be correctly loaded. They state 10% more making it 5.7. I really only plan on 2 rads plus the water tank. I don’t think this will reach the required load.
Question is can I install another radiator in the engine bay? This will not take up any room plus will load the Webasto enough in the summer when all other rads are off (apart from towel rail). I can’t see anything against it in the BSS regs. See attached drawing if not see in my other recent post.

-
1 hour ago, Bee said:
Ah, you need to listen to yourself then!
The more i read on here the more sleeples i get...?
-
22 minutes ago, Murflynn said:
keep
quietcalm and carry on")
i keep trying to tell myself that
-
Thanks for the replys. This is taken from the RCD website.
a conversion of a watercraft which changes the means of propulsion of the watercraft, involves a major engine modification, or alters the watercraft to such an extent that it may not meet the applicable essential safety and environmental requirements laid down in this Directive.
The first part is clear to me that im exempt however the second part is not. I bought the boat with BSC certificate however im doing the work on a hard stand in essex so do not need to keep it up to date untill relaunch. I am unsure where the boat will be kept once finished so at a minimum i am working to BSC regs.
10 hours ago, Alan de Enfield said:I think you are probably correct the 2017 RCD changes would appear to apply.
I may depend on what you mean by 'fit-out'. How far are you going ? Is the engine being changed ? etc etc
If it has been stripped out and you are basically starting with a 'sail away' then it will apply.
‘Major Craft Conversion’ would be applicable to the fit out of the majority of sailaway boats, and needs to be factored in when planning your fit out. Once you have completed the fit out of your sailway boat, the boat would require a Post Construction Assessment and the documentation, builders plate and CE markings all need to be updated. Although a self assessment is possible, it is not recommended as the fitter would resume all responsibility as the manufacturer and it is also a lengthy and involved process. In the worse case scenario, it could mean you are held criminally responsible if the boat sank and there was loss of life. It is recommended that you appoint a professional to complete the post construction assessment, this would be at of cost of around £2000.
My boat is not CE marked.
-
I have a old dutch barge hull aprox 1920, it was fitted out for liveabaord around the 80's. Im midway through a fitout. Do i come under the RCD? or just BSC?
Thanks
-
I come from a petroleum engineering background, mostly maintenance of RAF fuel installations. people have been known to open or close valves that Should be well left alone (unless when servicing for example). A simple lockable valve handle and strong cable tie is something I’ve had to do before and after hearing concerns about valve placemat on here I’ll make sure to do this on the boat also.
-
 1
1
-
-
6 hours ago, WotEver said:
It’ll make no difference which line you put it in. If it’s closed then there will be no flow through the cauliflower loop wherever you put it.
“Balance the system
Balance the radiators with the lockshields and remember to fit a lock shield / balancing valve to the Calorifier coil outlet pipe.”Again taken from the Webasto manual. I imagine its there to restrict the out flow and keeping the hot coolant in the coil for longer?
-
33 minutes ago, system 4-50 said:
You wouldn't. You just get some extra bends which reduce the speed of the flow by a probably tiny amount which will only matter if you are operating at the limits of the tiny pump.
The bleeding problem occurs in the converse, where the valve has been eliminated and the two pipes to the header have been reduced to a single pipe.
Scenarios:
1. 1 pipe to header, no valve. Hard to bleed.
2. 2 pipes to header, no valve. Added drag to flow, header acts as radiator.
3. 2 pipes to header, with valve. Easier bleeding over [1], better flow in normal operation than [2].
As you say it’s stated within the Webasto manual so that’s why I included the valve.
-
Thanks for all the reply’s
so other than not needing the non return valves on the outlets back to cold line everything else looks ok?
-
34 minutes ago, system 4-50 said:
Calculate the total expansion of your speedfit when it heats up. The expansion on mine turned out to be 6" and wiggled all over the place so I re-did it all in copper.
Calculate the total heat output of your radiators etc and ensure that it meets Webasto's recommendations.
I installed mine without any check valves or whatever they're called whatsoever and I haven't found a need for them on my double-pipe system. The pipes go straight in and out of each radiator. I don't have a cauliflower. I have a 2 pipe reservoir with bypass as in the Webasto manual "best option" and I don't have any problems with bleeding though I can't see any way around loosening the boiler top hose but that only required doing once so far and was easy.
Maybe a silly question but how do I workout expansion?
-
1 hour ago, David Mack said:
You don't need the one way valves. They will just hinder the flow from the Webasto pump.
As drawn, you have no way to heat your hot water without having the radiators on, unless you turn them off individually (and you don't have a valave on the far radiator). Better to have an additional valve in the main hot pipe just after the T to the calorifier, so you can turn off the whole of the radiator circuit. Equally, having this valve open and the calorifier valve closed will give a quicker heating up of the cabin space if you arrive at the boat in cold weather.
The diagrammatic presentation doesn't show the pipe gradients, but you should arange the pipework so that there is a continuous rise in the main pipework towards the radiators and the main header tank (with bleed valves fitted to the radiators). Otherwise you will have difficulty getting air out of the system when filling.
My only reason for not being able to turn off certain radiators is for correctly loading the wabasto. I plan to keep the towel rail and top rad open to deal with this. The bottom one can be closed when not needed (in summer)
-
This is taken directly from the Webasto installation manual
”Balance the system
Balance the radiators with the lockshields and remember to fit a lock shield / balancing valve to the Calorifier coil outlet pipe. Also, do not pipe the Calorifier in series with the spine“thanks for pointing that out tho as I’ve just noticed it says to put the balancing valve on the outlet not the inlet as per my diagram
-
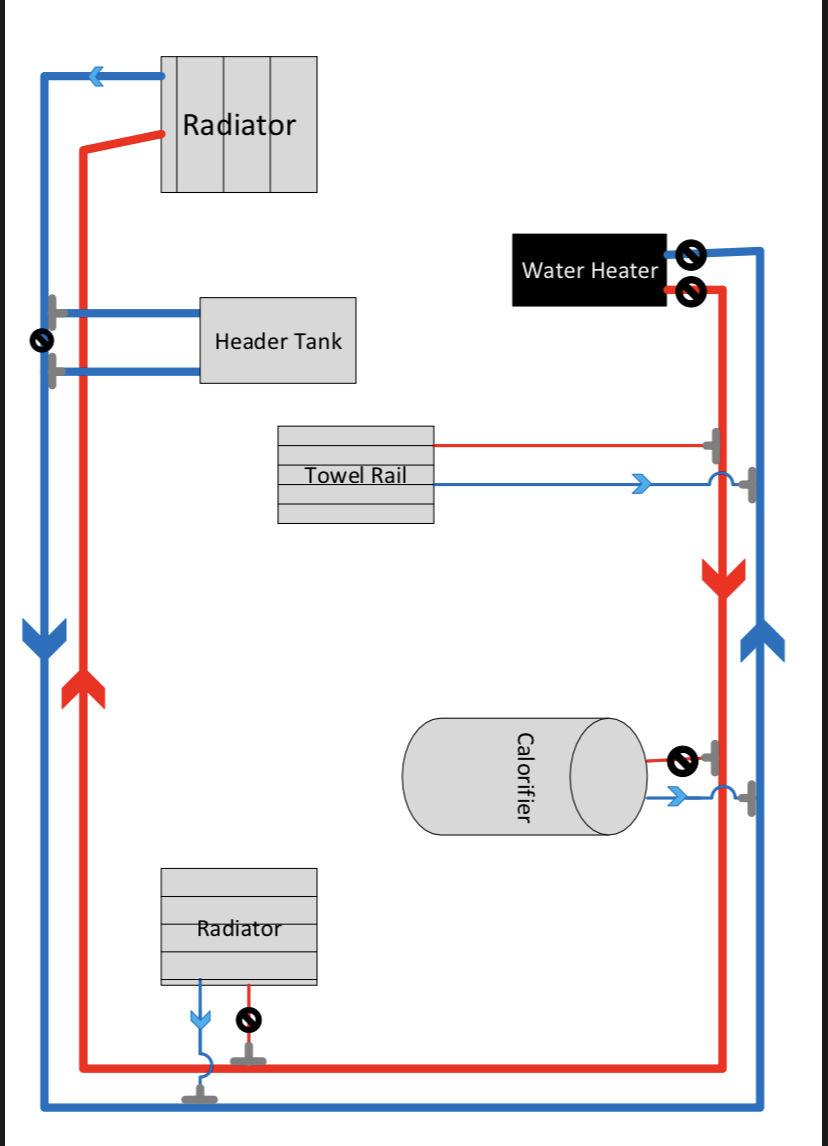
Hello everyone Alto this is my 1st post on here I’ve been reading the forum for some time. I’m at the plumbing stage of fitting out a Dutch barge. I was wondering if anyone could point out anything I’ve missed or need to think about with my central heating plans. I’ve attached a basic diagram of what I hope to do.
I’ll be using a Webasto thermo top C
55L calorifier
22mm speedfit for feed and return ring
15mm outlets to the rads and calorifier
double pipe header tank
isolation valves are black “no entry” symbols
oneway valves are light blue direction symbols
Thanks

Loading Wabasto correctly
in Boat Building & Maintenance
Posted
the wabasto came with a timer I’ll look into how that works And what I can pre set.
no the calorifier has a immersion but I’m not sure if I’ll be on shore power all of the time.