


Steph H
-
Posts
33 -
Joined
-
Last visited
Content Type
Profiles
Forums
Events
Gallery
Blogs
Store
Posts posted by Steph H
-
-
Thank you all for your replies. Just been looking on Bedazzled and found these
https://bedazzledledlighting.co.uk/product/cab6-satin-chrome/
So speaking as someone who is clearly a thicko when it comes to these things, will I be able to wire these straight in?
-
When I bought my boat it had strip lighting throughout which wasn't the nicest, nor was it LED, so I thought I would go through and change them all. I found these
https://www.downlightsdirect.co.uk/md-29-mini-puck-downlight-surface-recessed.html#description
Which seemed to fit the bill perfectly. I bought them, installed them and now they don't work. The boat lights are controlled in sections by switches placed throughout and as I went through the boat changing the lights they worked fine, however a few days later when I went to use them they came on and then went off straight away. There was no pop, no tripping of any fuse switch, there is still power going through the circuit, but the lights now won't work.
When I wired them up I didn't use a driver as they were such a low voltage, my brother and I figured they would work fine from the 12v system and so wired them straight in. However we are now wondering if the 12volts was still too much for them.
Can anyone provide any suggestions? Or ideas? We've both searched through the website and pdf documents that came with the lights but there doesn't seem to be anything to tell us what the maximum voltage should be going into them.
-
I'm in the process of doing my t & g and have used Zinsser Cover stain
I'm going to finish with Armstead Eggshell
https://www.brewers.co.uk/product/AG0905F
This won't give a high gloss finish but will give a good hard wearing surface and make the boat look bright.
I've been a decorator for over 20years and just feel like on wood, oil based paints give a much hardier and better finish.
-
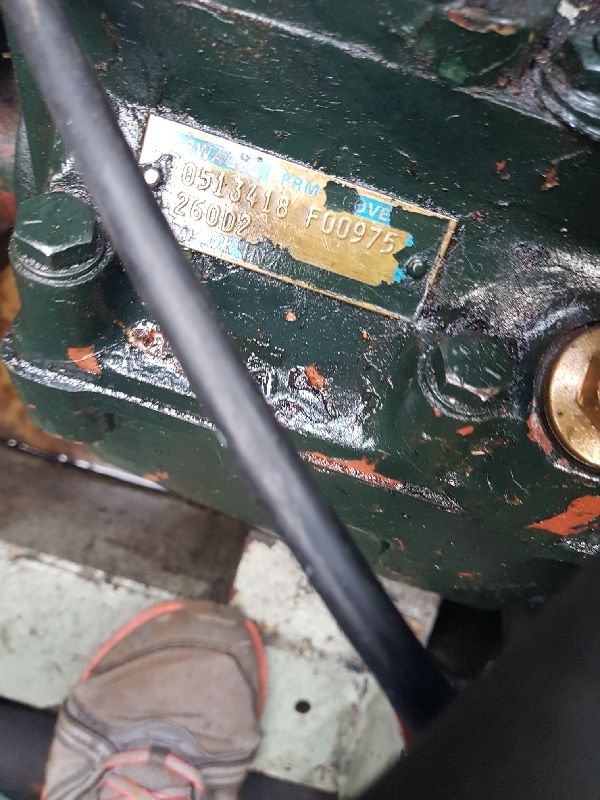
59 minutes ago, TheBiscuits said:
It is.
The D means it's the dropped/offset shaft version so it's different to the C version where the shaft is in the centre so seems to go straight through. The C model won't line up between the engine and propshaft on your boat.
The 2 means it's the 2:1 ratio box - they also did a 3:1 ratio (3 version) which means your propeller would turn at the "wrong" speed.
I think it was only a few years ago they dropped it (2017?), and they are still selling the 260C so parts are still available.
Is there something up with it, or were you just trying to identify exactly what you have for future reference?
Just trying to identify for future reference and to learn about what I've got. I'm getting manuals for the engine and gearbox so that I can learn about them and wanted to make sure I get the right one.
Thank you for your help ?
-
 1
1
-
-
Aahh ok thank you. I was looking for specifically 260D2 and just wasn't really getting anywhere and as I don't know about these things at all, still learning hence trying to find out information I didn't know that it was am old model.
I didn't know if the D2 bit was important to finding the right model ?
-
I'm trying to identify the gearbox that I have on my Beta 38 engine. I can see that it is a Newage but the numbers that are on this plate don't seem to relate to any gearbox model that I can find.
Any help or suggestions?

-
Some great replies thank you.
As a fairly new boater I've just found it difficult getting into a marina at times and its rather off putting when marina staff look at you like your an idiot, so just wondered what the reasoning was.
Now when I go into one I'll be marking myself out of 10 and humming the Dam Busters music ??
-
 1
1
-
-
There is probably an explanation for this but I can't think of it.
Why are marina entrances so narrow?
-
23 hours ago, WotEver said:
Note that the basin doesn’t require a trap as shown in that picture. It can simply exit straight to a skin fitting.
I'd not clocked that thanks, that was left in from the previous sink.
-
42 minutes ago, dor said:
At least the old tank doesn’t look’fresh’.
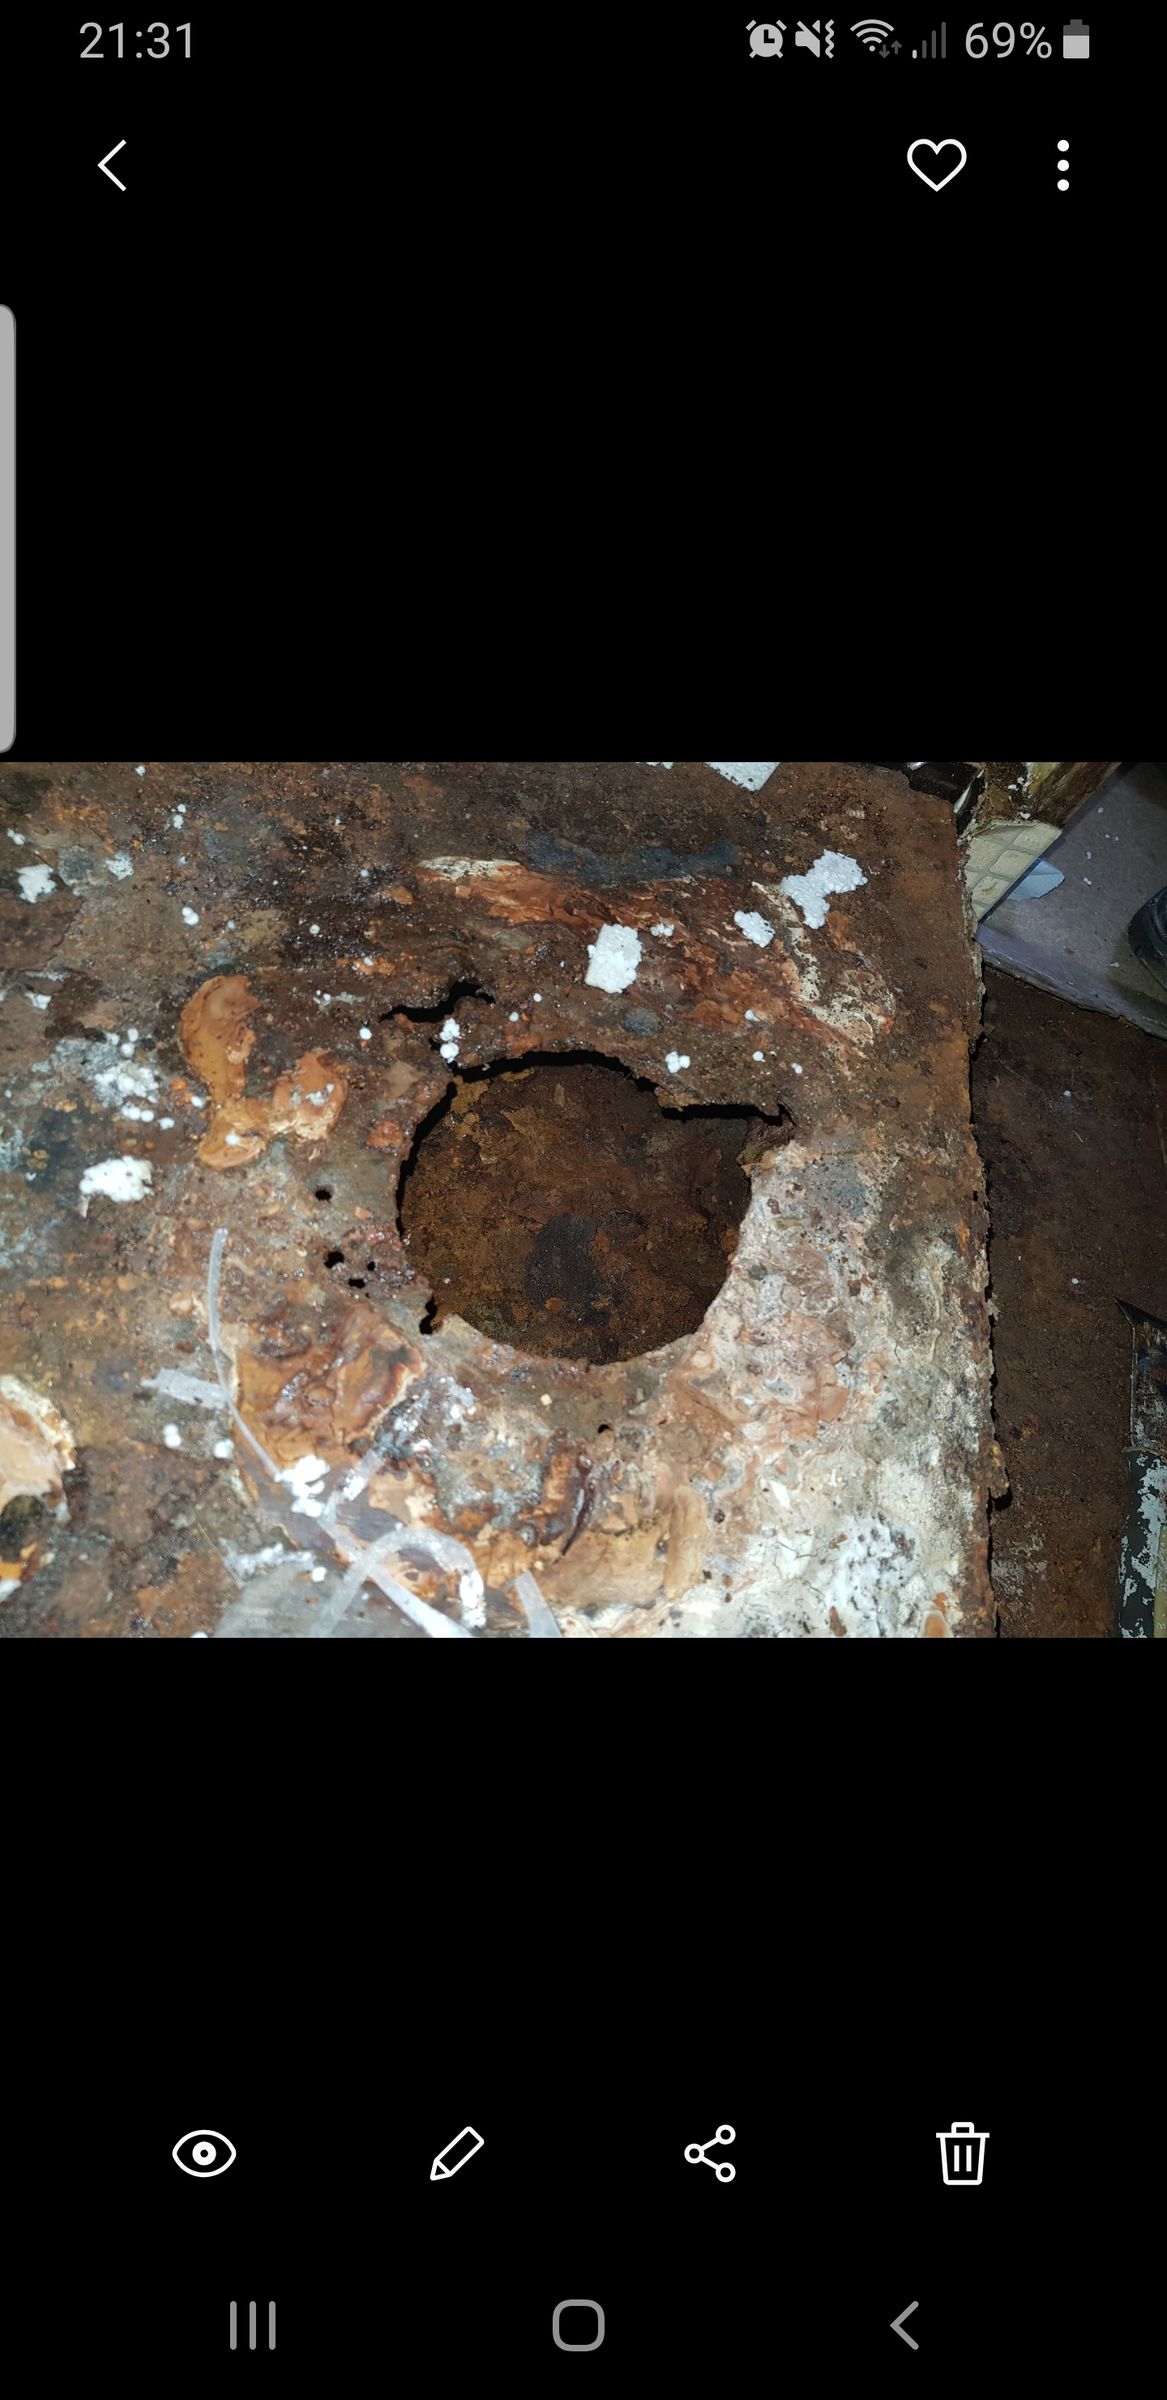
No I'm pretty sure its 12 years since it was covered over. There was a weird smell when the saw was going through the metal but it didn't stink like the one we took out last weekend ??
-
On 02/09/2020 at 13:13, J R ALSOP said:
I went past your boat the other day, is that a new tank on the bank wrapped up or is it the old one removed?,
I have seen integral tank removed that had to have new plate welded into hull side as it was so badly corroded.
I am coming that way later in the week so will slow down and see how you are getting on.
Hello! That was the old one! That must have been whilst my brother and I were inside madly capping off pipes so we didn't get dirty water and smell all over the place lol.
Please do, say Hi if your passing. ?
On 02/09/2020 at 13:13, J R ALSOP said:I went past your boat the other day, is that a new tank on the bank wrapped up or is it the old one removed?,
I have seen integral tank removed that had to have new plate welded into hull side as it was so badly corroded.
I am coming that way later in the week so will slow down and see how you are getting on.
Hello! That was the old one! That must have been whilst my brother and I were inside madly capping off pipes so we didn't get dirty water and smell all over the place lol.
Please do, say Hi if your passing. ?
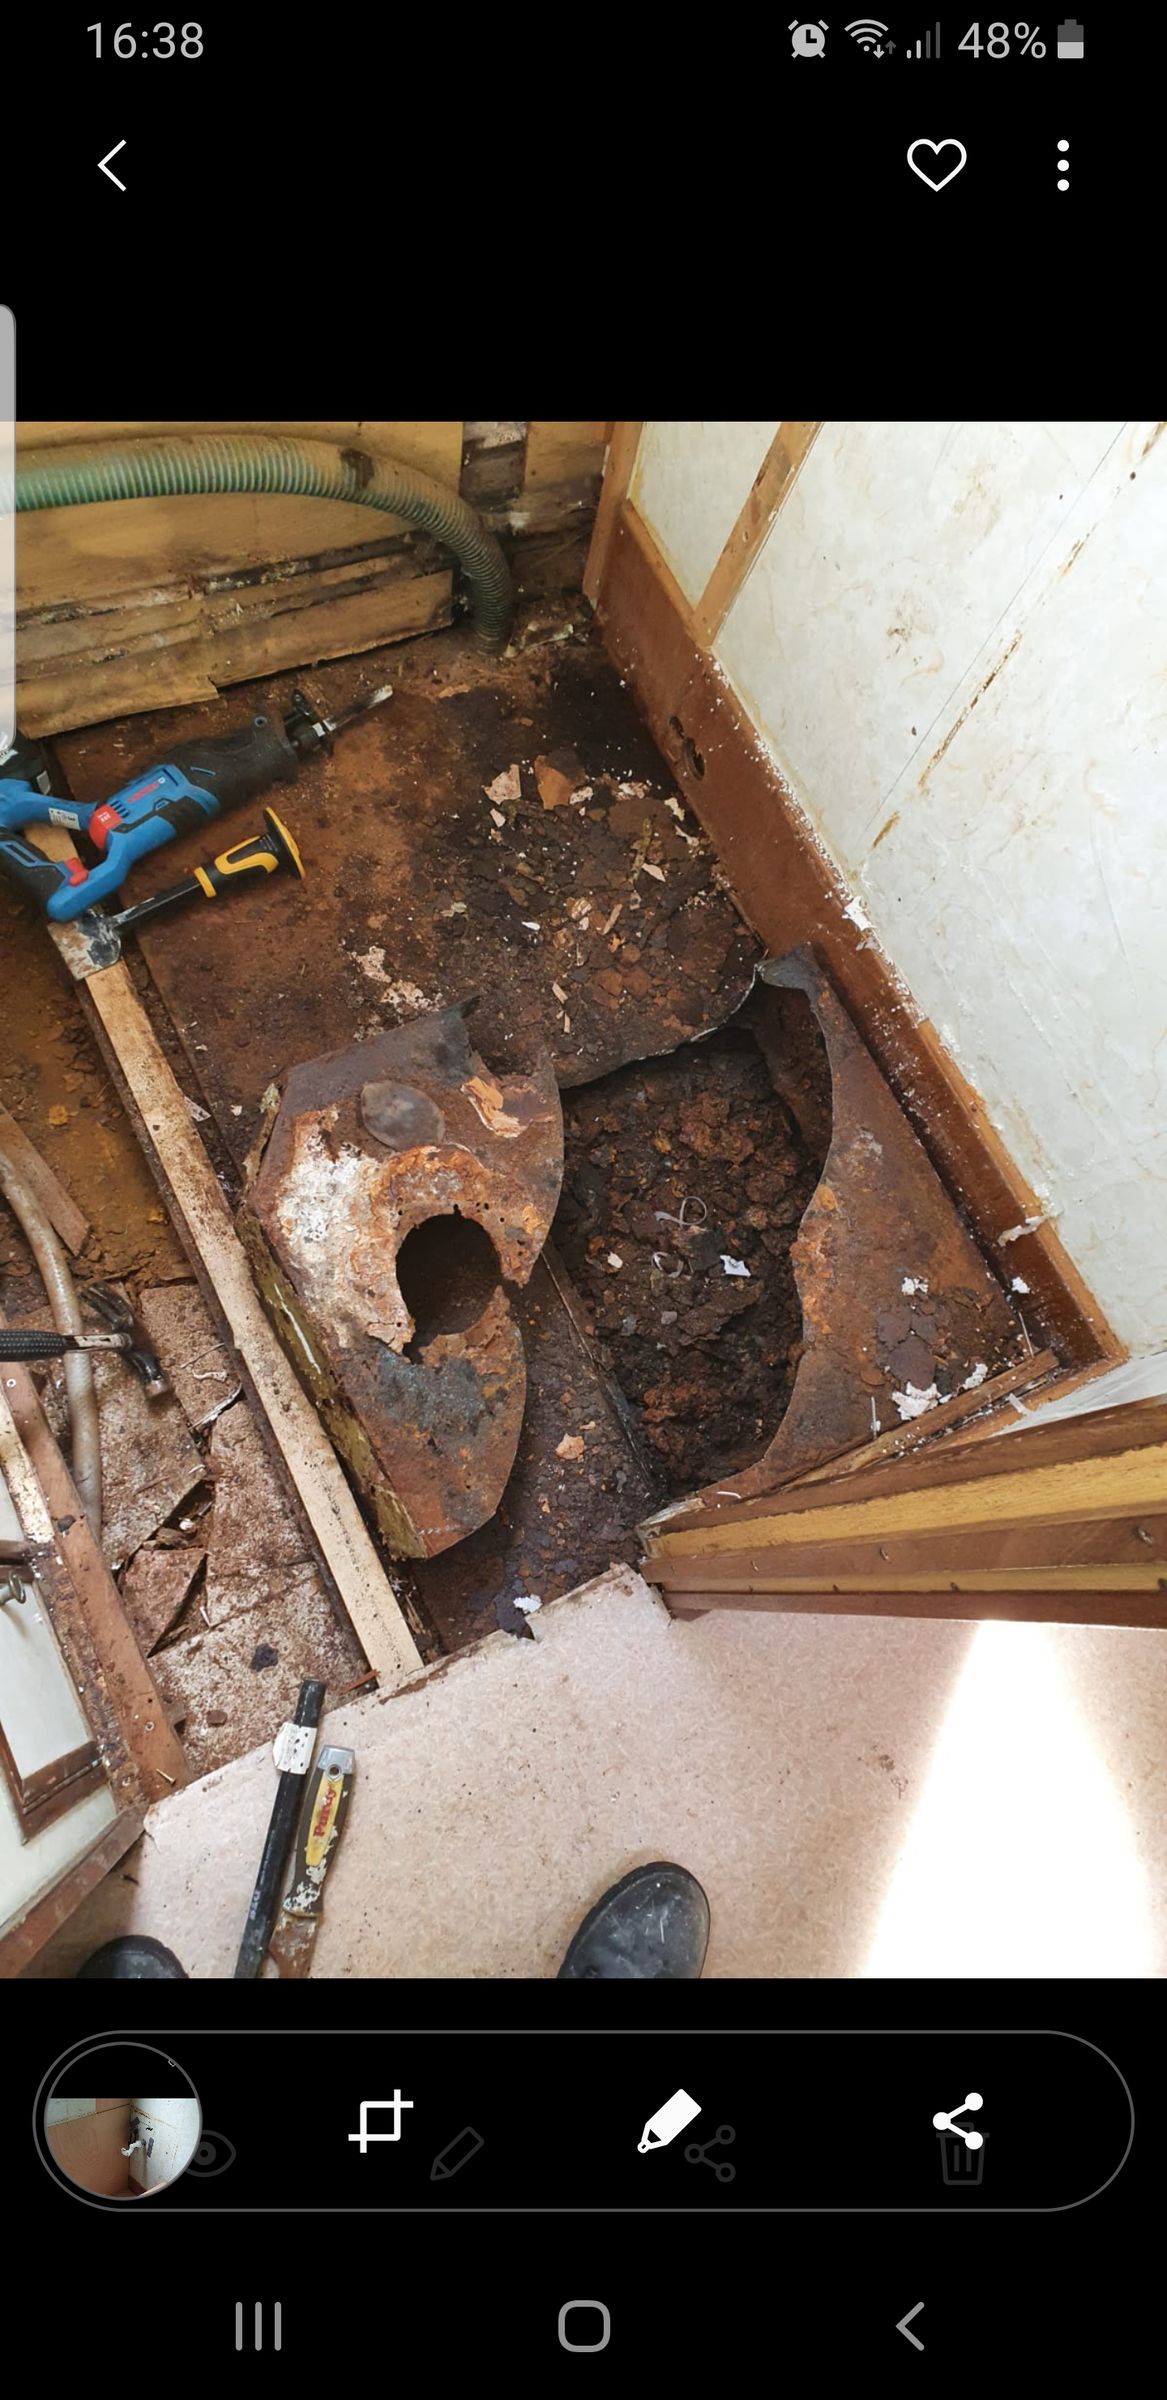
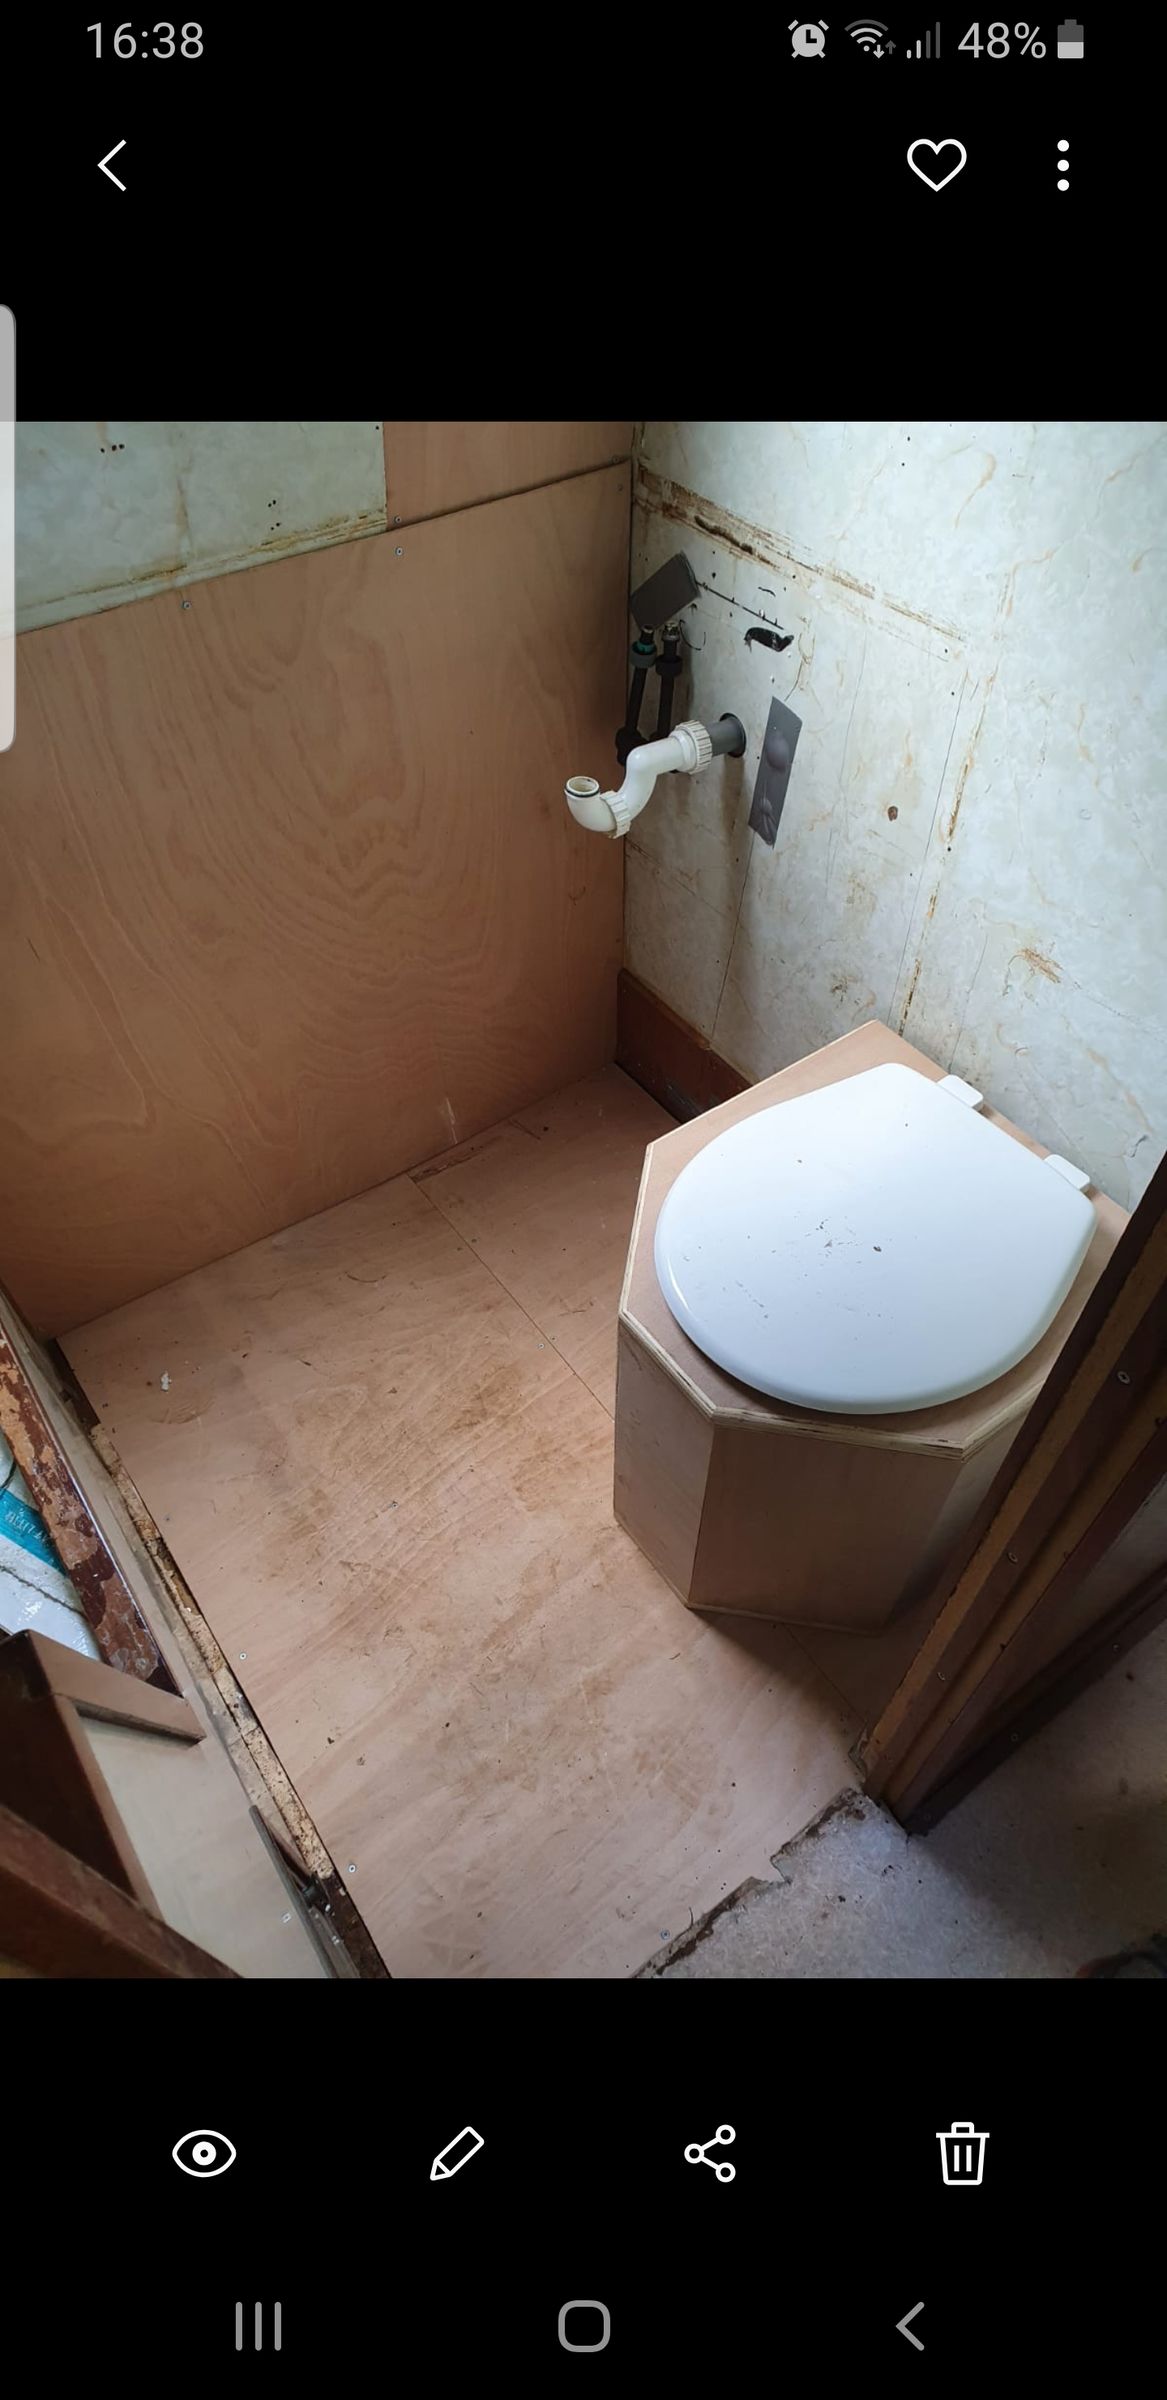
Because I know you'll all be dying to know how we got on I've uploaded a couple of pics. Brute force and some judiciously used electrical tools got the plinth bit out and now I have a floor and a wall! All praise goes to my brother who did all that, so grateful.
-
2 hours ago, J R ALSOP said:
I went past your boat the other day, is that a new tank on the bank wrapped up or is it the old one removed?,
I have seen integral tank removed that had to have new plate welded into hull side as it was so badly corroded.
I am coming that way later in the week so will slow down and see how you are getting on.
Hello! That was the old one! That must have been whilst my brother and I were inside madly capping off pipes so we didn't get dirty water and smell all over the place lol.
Please do, say Hi if your passing. ?
-
I wasn't planning on getting the boat lifted out till next year for blacking and am wondering about 'making do' with this tank until then as in cutting out the bits that are visable and covering it over and then next year when the boat is out of the water getting down and dirty in there to get it out and see what's going on.
The tank doesn't look to be very deep as it's butted up against a rib and my understanding is that they are approx 6" in height. I have a feeling the tank is shallow but large.
Any thoughts on integrity of the strength/bracing of the hull if I cut away the little bit that's poking up through the floor?
-
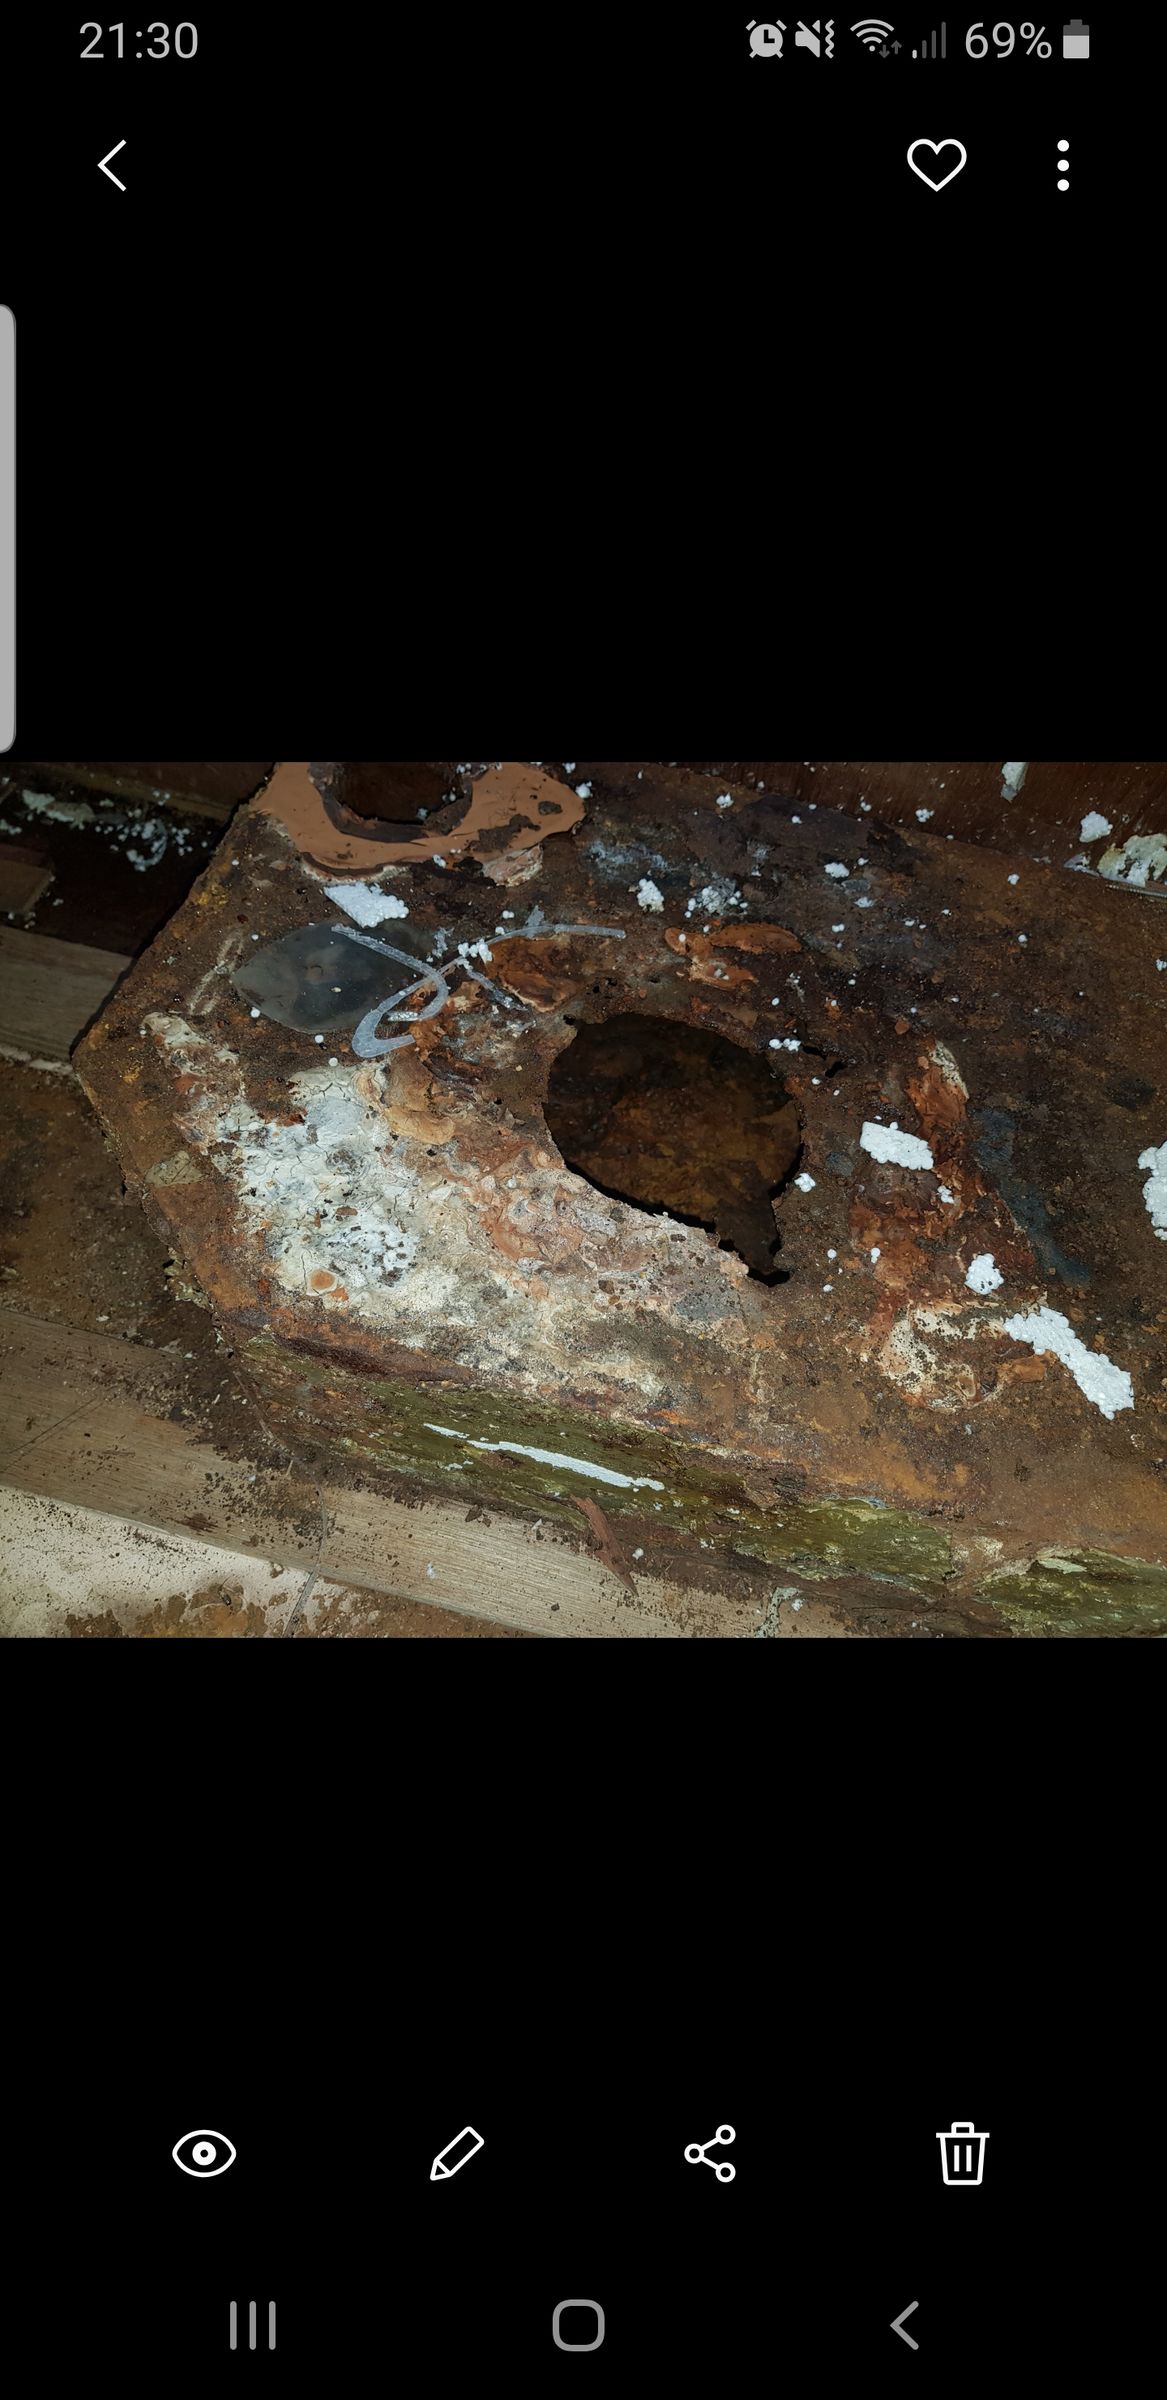
I removed my macerating pump out today and the tank under the bed. However under the toilet bowl I discovered another tank from a previous drop through pump out toilet.
I was hoping for some advice, possibly someone who could come and take a look in person, the boat is in Rugeley, Staffordshire at the moment.
My ideal would be to remove the tank altogether but it clearly goes under the back wall of the toilet. I'm concerned because if the amount of rust that we've found, I've poked a stick through it and hit what feels and sounds like solid steel, but having a load of rust in the hull area is not great.
If the tank can't be removed then I was wondering about cutting the bit off that sticks above the floor in the bathroom and blocking that area off so as to give a flat even floor area in what is already a tiny bathroom. Would that be possible?
Any and all suggestions welcome. Have included at least 1 pic, hopefully the others will load too
Cheers
Steph

-
6 hours ago, Tony Brooks said:
In that case you don't need the white valve and pipework when you reposition it all.
The accumulator can go anywhere on the COLD system so look for odd lost space under double beds etc. It rarely needs attention. The PRV can be relocated to the hot side of the calorifier (where most people expect to find it) and the outlet piped into the engine room bilge or overboard. Although the accumulator will act as an expansion vessel as well providing there is no non-return valve on the cold inlet to the calorifier it may dribble a bit so hence the outlet going to the engine bilge. With the PRV where it is I don't think there is a NRV in your system.
That just leaves the pressure switch and pump to be located somewhere accessible but out of your way.
OK thats great thank you.
Have been checking out your website and think it will be an invaluable resource
")
-
9 minutes ago, Tony Brooks said:
The valve with the red knob - the PRV - is in exactly he same position as where I put mine because it vents water back into the tank when/if it opens. However it is useless there if there is a non-return valve on the cold inlet to the calorifier (hot water cylinder) so that needs investigation. If the hot water comes from an instant gas water heater then the PRV is not needed but it won't do any harm until it leaks.
I can only think the white valve is to allow the tank to be drained via and external pump connected to a drain point somewhere, possibly near any calorifier.
I have a suspicion that this is an ex hire boat laid out for minimal breakdowns and easy maintenance. In my view that is good. It would explain why the PRV is where it is, No hirers phoning up saying hot water keeps leaking from the boat.
If this is a holiday boat then you might thin about mounting the whole lot on a board with easy to undo pipe connections. That way you can drain down and take all those expensive bits home for the winter to prevent frost damage.
Are you aware that the water pump should NOT be screwed down tight. The screws shoudl just be tight enough to locate it in position. If you tighten it down hard it will transmit vibrations to the board under it and that may well resonate and make the vibrations worse.
Yes it is an ex hire boat but I'm renovating it to become a liveaboard, hence the desire to make the floor space the whole set uses minimal. I'll be living aboard through winter so shouldn't need winterising. The hot water tank/calorifier is at the other end of the boat.
Will keep that in mind about how tight the screws should be on the pump, thank you.
-
8 hours ago, dmr said:
Yes, the stopcock should be right next to the tank but the rest can move to a more convenient place. Keep good access to the pump, it will fail and need replacing at some stage. The little white valve can most likely go, I don't know what it does. The thing that we assume is a pressure relief valve can maybe go somewhere else to discharge overboard. The pump should ideally be mounted upright (vertically) on the wall somewhere. Some people say the pump should be connected with short lengths of flexible/rubber hose rather than plastic pipes, its a good idea but a nicety rather than essential, might make the plumbing a tiny bit easier. It could all be a bit neater and take up a bit less space.
...............Dave
Thank you. I think I've got just the spot that has easy access but is out of the way.
7 hours ago, blackrose said:Connecting the pump with flexible pipe isn't essential until the pump vibrates one of the rigid connections loose or cracks it. Essential or not it's just best practice to do it properly with flexible connections and it should help to reduce pump noise a bit too.
If the pump is mounted vertically on a bulkhead then make sure it's the right way around with the pump head below the motor.
It does vibrate and I can tell it's because it's not screwed down properly, definitely something I will rectify.
Thank you
-
5 minutes ago, BEngo said:
The thing you have labelled calorifier is in fact the accumulator. It appears to be rusting and is probably close to failure. It should be renewed before it starts leaking and the pump empties your water tank into the bilges
The thing with a red ring connected to the black pipework appears to be a pressure relief valve. This will stop the downstream pipes from being overloaded if the pressure switch fails.
I am not sure why there is a white valve (with round knob) next to it. It appears to bypass the pump and could be used with the pump off to depressurize the water system, though opening a tap with the pump off would do that too.
The clear plastic thing next to thr pump is a strainer or coarse filter. Ot needs an occasional dismantle and clean.
Ok thank you, will look into getting the accumulator replaced.
This probably will be a dumb comment ?
But the whole system shown takes up a large amount of floor space under some seating, is there any way of compressing all of this? How close to the water tank does it all need to be? Could it be moved further along the pipework to a more convenient (for me) space?
-
8 minutes ago, Keeping Up said:
That's not a calorifier, it's an accumulator which is a pressure reservoir to stop the pump from cycling rapidly. The square grey thing is a separate pressure-switch (a Square D) which is good because the ones in the pumps are unreliable.
Oh ok! My mistake, thank you for putting me right.
?
-
I'm trying to understand the water system on my boat. I know where the outlet pipe comes from the tank, and I can tell I've got a small calorifier for the kitchen sink and the main water pump. What I'm not sure about is the other bits.
I've added a couple of photos one which I've labelled with the bits I recognise.
Any help would be appreciated, thank you ?
Ignore my label of calorifier I've now been told it's an accumulator. ?♀️
-
Thank you all for your replies, really appreciate the thought and effort gone into them.
Just to address a couple of things that have been mentioned.
I will be getting Solar at some point, but that will be when funds become available.
I had already thought a twin tub would be the way to go and sufficient for my needs, so thanks for the link, will put it on my watch list.
I've already got a 12v fridge freezer which I'm very pleased with so am keeping that.
I'll definitely be replacing the batteries in the next 4-6 weeks-ish.
I will be wanting to use some tools for longer periods, I am very aware of the noise factor with this so am going to try and find somewhere out of the way to do noisy work. ? and will definitely be keeping it well within the noise hour requirements.
I think for now I'm going to go with a genny, that will get me through my short term requirements and give me an alternative power "source" for the time being. And give me some time to do yet more research on inverters and just what my needs are. It may be that solar becomes a bigger priority than an inverter as I've got friends who have said I can do washing whilst at theirs. Fine for the short/medium term but I'm sure they'll get sick of it after a while.
As far as storing the genny, I understand about storing it outside etc, but can someone give me a plain and simple explanation of where I can store it exactly? The same with the petrol? I've read the regulations but they make my eyes glaze over. So can I store the genny on the stern? I have a cruiser stern, with gas locker at the back. Or on the roof? Be bloody heavy to lift up there. Or on the bow? Not massive but doable. The same questions with the petrol? Obviously DO NOT have either in the cabin, or near vents into the cabin, but what else do I need to be aware of? If its stored in the stern will the vapours go into the engine bay and explode when the engine is started? Or point me in the direction of a clear and plain explanation?
Again I apologise for sounding like a moron, but I clearly still have a lot I need to learn ?
-
I have at least one question in this post. The background is, I bought my boat (to be a liveaboard) earlier this year and have just finished doing the first part of the move of it to the Midlands, Rugeley to be exact. It is an ex hire boat so whilst I can move straight on board, it doesn't have all the bells and whistles. Such as no inverter, everything is 12volt, which is fine for now, however I am going to need to get an inverter for a washing machine (not needed straight away) and the occasional use of a hair dryer (definitely not needed straight away) and power tools etc. I am doing a minor reworking of the internals and some exterior work over the next couple of weeks and so will need access to to 230v power. It currently has two, old leisure batteries, that will be replaced shortly, and added to as needs/funds be. Solar panels will be added at a later date, as funds are available.
My question is as follows, do I get a generator to do the work I need to do? Or do I spend the money on an inverter? I realise that the inverter will use power and I will more than likely need to have the engine running for certain tasks, (vacuuming, orbital sander etc). But I'm not sure on wether I can just get an inverter, wire it in and work from there? Or do I need other bits and bobs to get it all to work? I have a battery monitor that needs fitting. Is it just easier to go with a generator for now and then sort out an inverter at a later date?
Budget is a little limited, I have the funds for one or the other (generator or inverter) but not both.
Hope that isn't too confusing and please don't lambast me for being a twit, I'm still learning.
-
7 minutes ago, system 4-50 said:
Yes.
Are you doing it yourself? Remember to allow for pipe expansion.
Yes, well my brother will be doing it. He's fitted numerous heating systems domestically so not worried regards the plumbing. Am getting a professional to fit boiler and marine systems.
-
Just now, mrsmelly said:
Yes.
Thank you ?
-
1
-


Lighting problems
in Boat Building & Maintenance
Posted
OK, thanks all, I've just ordered them.
Don't worry I've gone for warm white, don't want to feel like I'm being interrogated ?