


jessie
-
Posts
35 -
Joined
-
Last visited
Content Type
Profiles
Forums
Events
Gallery
Blogs
Store
Posts posted by jessie
-
-
35 minutes ago, Eeyore said:
Give a location, I’m sure someone in your area will know of somewhere that supplies off cuts.
Good thinking, I'm regularly in Southport, Preston, and Garstang.
Any info re offcut sellers most welcome.
-
20 minutes ago, Eeyore said:
Best guess is about 30mm of exposed thread (assuming 1.5 mm pitch), way too high. No wonder it required adjusting several times.
If I "inherited" that as a maintenance job I might say something like "it needs sorting, but live with it till you've had the life out of the mounts, it will give you time to save up for the remedial works". I'm sure you've had a similar conversation.
Minimum of 20mm shim/packer on the rear mounts, although I might go for 25mm given that you already know the static deflection. That would leave you with approx 2mm of exposed thread on a new mount for a 25mm shim or 7mm for a 20mm shim.; both figures will increase as the mount is adjusted for settlement.
Great, I feel like I'm on the right track.
Where is the best place for buying 20-25mm flat bar in small pieces? Approached one place but they weren't interested in cutting small.
-
52 minutes ago, Eeyore said:
Wow indeed, I don't think I could manage that with my fat fingers 😇.
The mounts should/would have been readjusted after the first 48 hours or so, did that happen?
Sounds like the shim plate will be quite thick. In this case weld them in and drill and tap to allow the use of set bolts to hold the mount down. This makes them much easier to position during the set up as you don't need to grow a third arm to hold the nut under the beds!
If other people do the servicing is it possible that someone did you a favour by tightening a loose mount; by tightening the top nuts instead of the bottom one.
Other than that everything goes south with age as @IanD mentioned.
Not sure about after first 48 hours but they have been adjusted several times when the boat was serviced by an engineer i really trust to know his stuff. He told me to never tighten the top nuts and always the bottom ones so i'm pretty sure that hasn't happened. The difference in height between a new mount (to the top of the metal cup), and this one, is just 4mm.
2 minutes ago, Eeyore said:Scary
I know, it definitely wasn't quite that high when bought, but i think maybe 20mm shims all round should work ok.
-
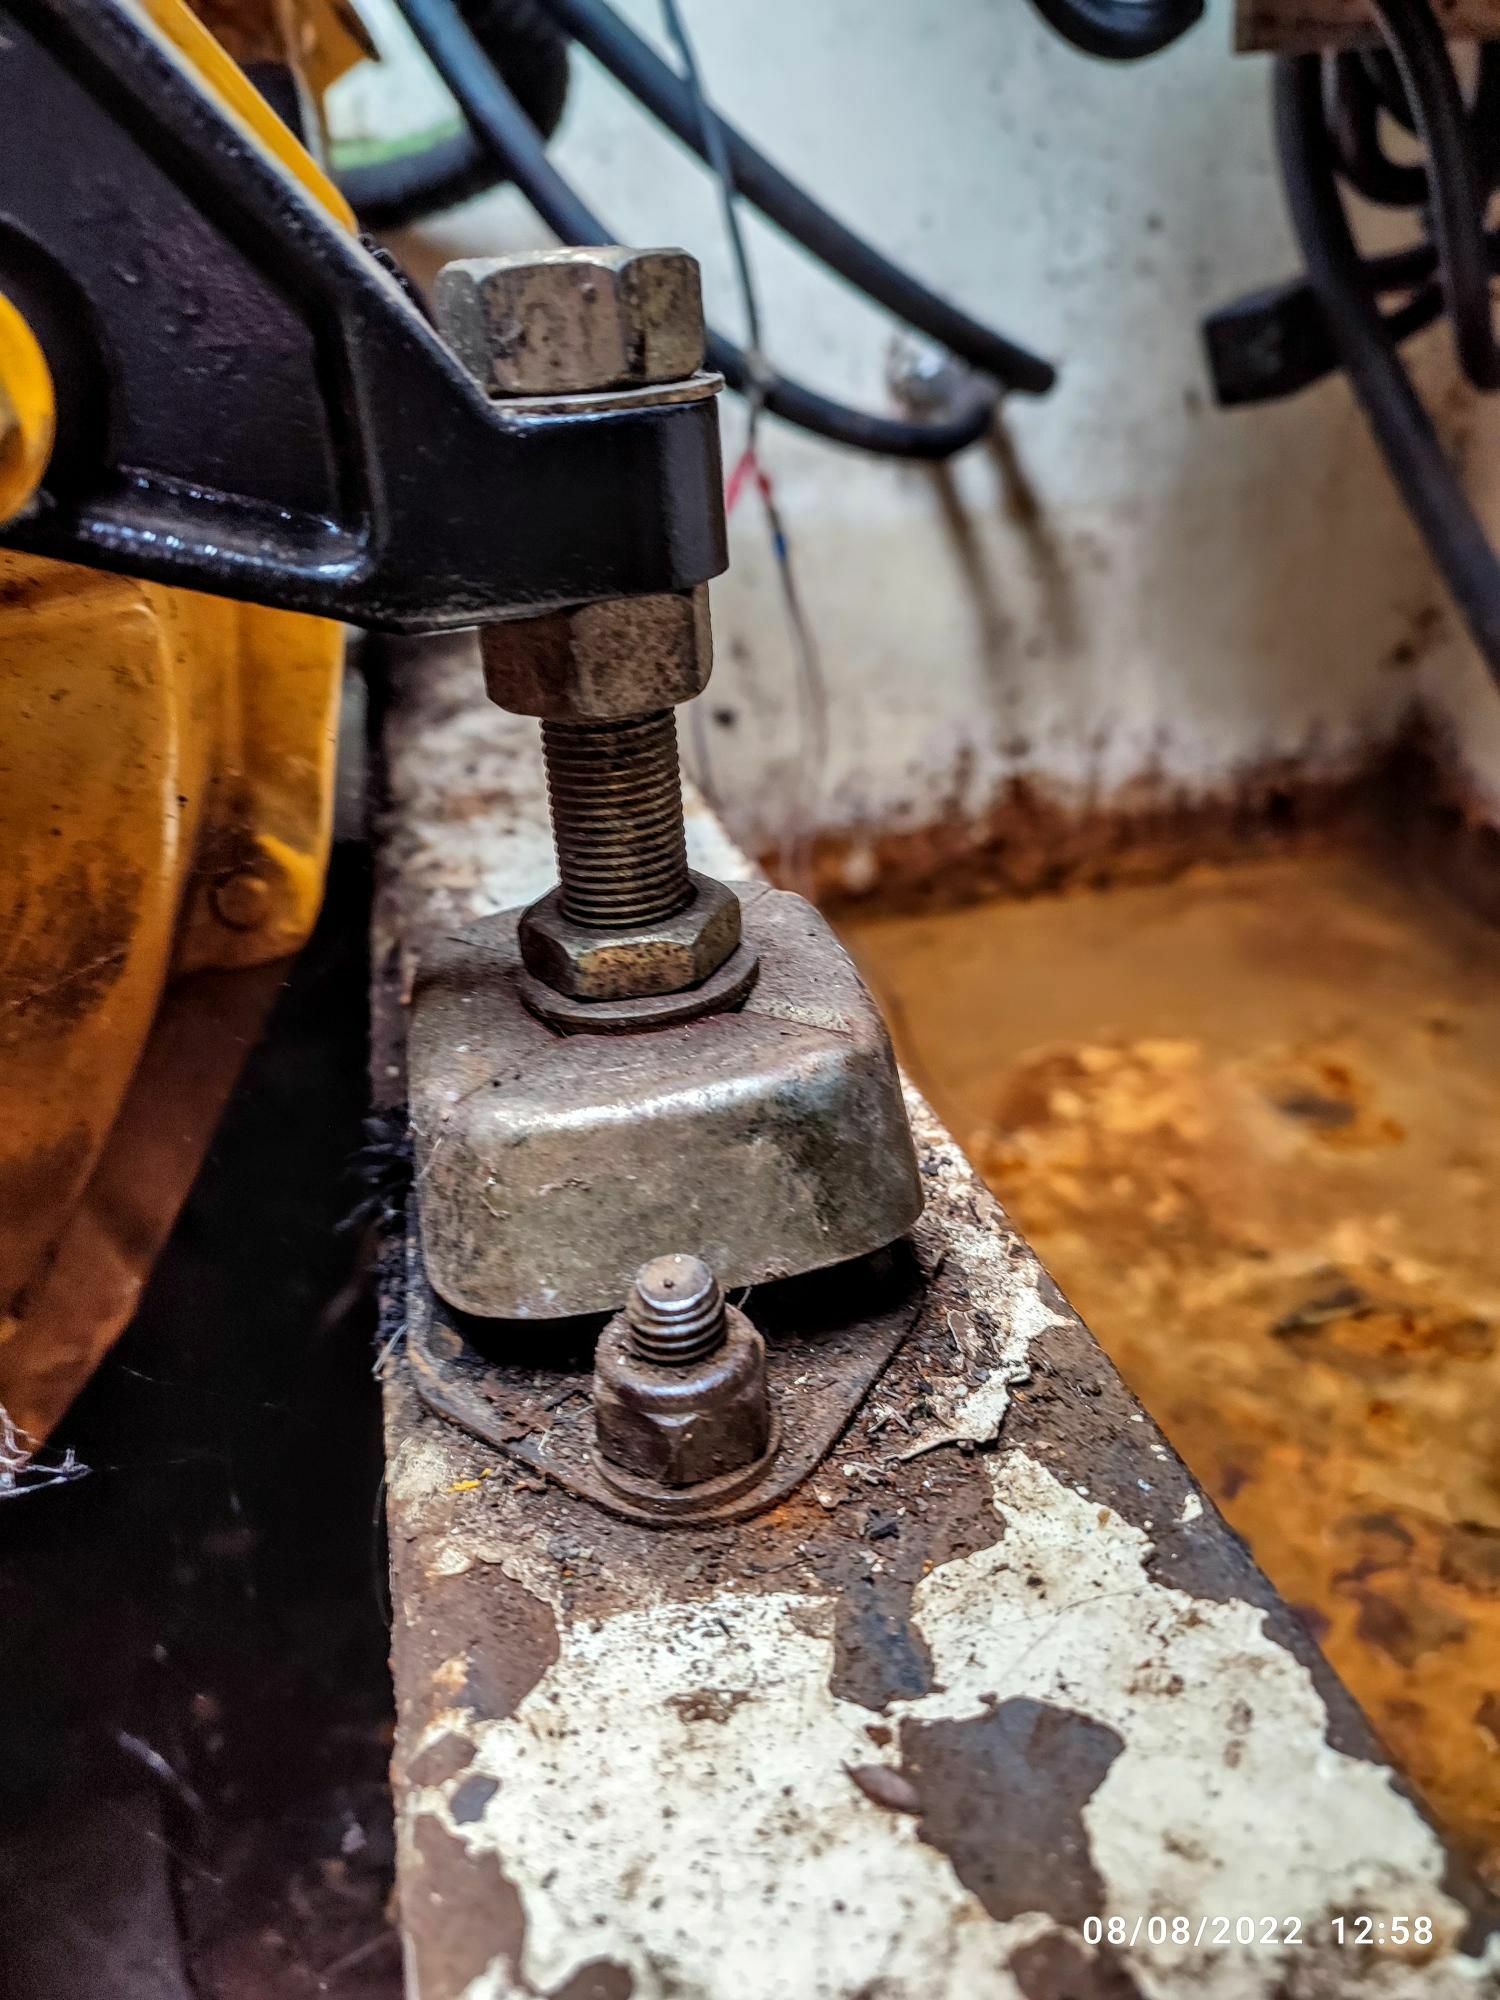
This is one of the rear mount, they are both at the same height, there is a lot more room for upwards adjustment on the front mounts.

-
Wow, this thread has taught me a lot, and there is much more to this than i am likely to learn.
One thing that confuses me is that my engine mounts look fine, the rubber isn't sticky, I can still fit my finger beneath the metal cup over the rubber, yet the engine is lower than it was, (or the prop shaft is higher) but cannot be adjusted higher as the bolts are at the top of the thread.
So, i am looking at putting steel shims in to raise it so that
a) it can be aligned correctly and
2) the bolts can be further down the threaded rod.
But, how did it drop? it's mounted on steel.
-
On 28/08/2022 at 23:33, Eeyore said:
K100 mounts would be a bit hard, but the K50, K75 and K100 (shore hardness 45, 55 and 65 respectively, and may be stamped on the base of the mount) are generally similar in appearance.
K75 mounts all round if the weights are even, and are also good for up to approx 55% of the weight on the back end and 45% on the front. Should give static deflection a bit either side of 3mm.
Between 55% and 60% on the back end is a bit of a grey area given the available choice of mount, but above 60% on the back will require K50 mounts on the front.
K50, AVI SM1600-45 and Aquadrive 50212 are similar specs.
K75, AVI SM1600-55 and Aquadrive 50213 are similar specs.
K100 similar to AVI SM1600-65 which is a 90kg mount.
Thanks Eeyore, I went back to look at the mounts again, and phoned a vetus dealer to check and they are indeed K75 mounts, the inverted metal cup over the rubber is slightly different on the different models.
-
 1
1
-
-
Hi all, When choosing engine mounts do you assume that the capacity of each needs to be somewhere above 1/4 of the engine size as there are 4 mounts, but movement will add some weight occasionally?
I have vetus 38hp engine weighing 185kg. The mounts currently in place appear to be k100, ie a capacity of 100kg (based on their dimensions), but in the spec for these mounts it says suitable for small engines upto 80hp.
So, will the K100 mounts be ok? I can't say for certain that this is what is already fitted, it just looks like it.
-
On 04/05/2021 at 22:10, The Gravy Boater said:
When I bought the boat the engine mountings, drive plate and cutlass bearing were all replaced upon the advice of the surveyor.
I have the same engine, what size engine mounts were put on? i'm just about to replace mine.
were they the Vetus K100?
I agree they are reliable and the gear change clunks.
Issue have experienced and been told is common to vetus engines is the cast engine feet that go between the engine and the flexible mounting sometimes crack due to vibration. I have replaced two in 17 years. It's worth just checking them when you do any other checks.
-
1
-
-
Thanks all, I bought them but not fitted, but it shouldn't be too difficult.
@LadyGI was going to do it single handed but managed to cajole friend and family to help. Are you doing it this year?
-
Are nav lights compulsary on the Ribble link? I can't find anything in the skipper's guide about it, or on CRT website, or on these forums from a search. Sure I heard that they are but seems odd that it's not mentioned anywhere.
-
9 minutes ago, Peugeot 106 said:
Sounds good but the drill for M5 is 4.2mm. 3.2mm is for M4.
Foe this sort of job engineers supplies really are your friend as they have all the bits and bobs in one trade counter
D'oh! I looked it up too. I'll do a test.
Yes I'll check out where the nearest engineers suppliers is and use that next time.
Hopefully next post will be look at my shiny new windows😀
-
Thanks so much for all the advice and suggestions, I've ordered some 5mm taps, and 3.3 drill bits and stainless steel machine screws with countersink heads. I realised there is thickness in the frame to allow for countersinking and if they are too big I'll have the tapped hole and can try a different head.
There are currently no holes drilled in the doors, the windows came predrilled, so I can only tap the hole through the steel of the door but it's 4mm, so should hold.
When I was ordering I couldn't see any of the flange head type, I have seen them since but the order is in now.
It's really good that you all took the time to offer help, thanks again.
-
Thanks @Ryeland I'll have a look for some of those, I think that's what was used for the air vents covers iirc, sounds like the best option if the trim will go on, it's a very narrow channel
-
7 minutes ago, Tony Brooks said:
Have you thought about pop-rivets? They have a nice flat head and as you need to drill the holes can choose small ones. If you go that way it would be best to buy a decent pop-rivet gun, the bent metal ones are rubbish.
If you use aluminum rivets they are easier to "pop", can be drilled out more easily, and may act as an anode to have a marginal effect on corrosion around the hole.
Would that work with the steel door being lined with 1 inch of wood? i'm not sure the rivet would have room to go through and flatten out on the inside of the door, or have i misunderstood what you mean?
4 minutes ago, David Mack said:You will sometimes see countersunk machine screws with nuts on the inside suggested. Which is fine when you first fit them, but a real pain if you should ever need to remove a window.
yeah, i think it would all have been a lot simpler if the doors weren't lined, but i can't remove the lining without wrecking it 🙄
-
Thanks Tony, they are door windows and will be screwed into the metal plate of the door, holes not yet drilled as screws not yet sourced, its more a problem finding screws with a head that will fit into the channel on the window and still allow the trim to be fitted over them
2 minutes ago, David Mack said:My windows are fixed with woodscrews passing through the steel into the wooden window liners. You should find a wider choice of woodscrew.
Hadn't thought of doing it that way, but it would work as the doors are lined with inch thick ash...thanks David, i'll look into wood screws.
-
Thanks Mike, that was my plan for tomorrow but in general i've had quicker responses on here. I've looked in a few shops, but the heads are too big.
-
Has anyone fitted Caldwell windows, the ordinary one that are fitted by screwing them to the surrounding metal? I'm struggling to find self tapping screws that will work and have a small enough head to fit the rubber trim over them.
-
Thanks everyone, i ended up delaying till Spring to get some jobs done on the boat. It's good to know it will feel safe and the internet is ok.
Thanks for the weather tip re Glasson Dock too.
-
Thanks everyone, that's really helpful, i can cycle into Preston if i need to, good to know it's generally safe.
-
Thanks @TheBiscuits good to know, are there any places you didn't feel were safe to moor?
-
Hi, Can anyone give me an idea of mobile wifi coverage on the Lancaster, specifically on the 3 network?
I'm planning a trip but need to be able to use my wifi for work.
Anyone with recent experience?
thanks
-
1 hour ago, Alan de Enfield said:
It really is dead simple with the MT50 - its so simple even a pensioner can do it !! (and it has a lovely smiley face when it is happy)
Ordered! The picture helped?
-
 2
2
-
-
1 minute ago, Higgs said:
I might be better, to extend your options, get the two appliances to work without conflict, and maybe buy that lead to set the charge controller.
Thanks Higgs, i'm definitely buying the lead but like the idea of having the settings for maximum charging capability for part of the year at least, i guess it feels like a compromise either way, but I agree, the no conflict and extended options approach would make life easier...I could even buy a fridge now i've got the power to run it.
-
1
-
-
Fitted new jabsco water pump to replace the slightly leaking original one that has lasted 15 years and so owes me nothing. Very pleased that i can now leave the water switch on without the pump kicking in every 10 minutes?
-
1
-

Which engine mounts?
in Boat Equipment
Posted
Thanks, that's great, made contact and looking promising😀