

NB Watersnail
-
Posts
149 -
Joined
-
Last visited
Content Type
Profiles
Forums
Events
Gallery
Blogs
Store
Everything posted by NB Watersnail
-
NB Water Snail - Lengthening and beyond!
NB Watersnail replied to NB Watersnail's topic in Build Blogs
She's far more determined than me when it comes to cleaning. Wait till you see what she's done to the engine! -
NB Water Snail - Lengthening and beyond!
NB Watersnail replied to NB Watersnail's topic in Build Blogs
Thanks for all the comments. I'm glad to be able to give something back after reading and enjoying threads like this for years. RichardH, I fully agree. Lengthening a 30 year old boat is not financially sound if you wish to be able to recoup your spend in the near future. We will end up with a boat that is possibly going to be worth less than the money we have put in, let alone the time we have put in ourselves. But for us, it's not just about money. Having a boat that suits us, that we are proud of and meets all of our needs as a home is important. We could have sold up and bought a second hand boat for similar money - we've still not spent enought to have been able to consider a new boat as an option. But we would still have been in a second hand boat, that probably wouldn't have suited our needs (we couldnt find one in budget when we looked) with the ever present possibility of unknown problems. There is nothing on this 30 year old boat that hasn't been checked, double checked, hit, ultrasonic tested, painted....... There are no hidden problems. To me, that is well worth the potential loss if we were to sell up. The bottom line is that we have no plans of selling up in the near or distant future, so for us it is worth while. I can also see the viewpoint that lengthening an old boat makes no sense. To a leisure boater or someone who has bought a boat with the intention of resale at some point, I think even I, as a lengthening advocate, would be hard pushed to create a valid financial case for lengthening. -
NB Water Snail - Lengthening and beyond!
NB Watersnail replied to NB Watersnail's topic in Build Blogs
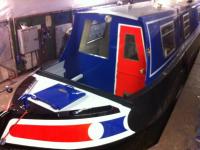
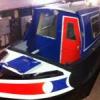
Coachlines finished, we started to fit windows. Just the tape left to remove now: The Engine Bay had a coat of Bilge paint too Tiller Arm The rear bulkhead pattern was choosen from a book. It's a designed used by Shropshire Union Boats and seemed to match our colour scheme well. It's also a bit different to the all too common 'mouse ears' A tidy roof, all fitted and sealed. On our last day in the paint dock, we decided to get some ballast in, as it would be our last chance to get a van anywhere near to the boat before the homeward journey. We rpoed in a friend and my brother to help unload 1 ton of paving slabs that my father-in-law had going spare. 90 slabs later, one small scrape on the fresh paint and the boat had a layer of slabs all the way through. It didn't make much difference to the waterline, but the boat felt a lot more stable! Finally, we ended up outside to await the engine being refitted then the journey home. Next time, engine rebuilding! -
NB Water Snail - Lengthening and beyond!
NB Watersnail replied to NB Watersnail's topic in Build Blogs
On to paint. We struck a deal to use a paint dock over the Christmas period and decided to save some money by doing the prep ourselves. With the aid of a friend, we spent a week grinding, scrabbling, stripping and needle gunning. Everything at home slowly turned black, relatives thought we were going death and I now have a deep seated aversion to grinders, but eventually all of the old paint was off! It also seems that at somepoint in Water Snails life, somebody had decided that stripping the paint off was too much hard work, so the whole boat had been skimmed in filler! Finished! Next came several days of grinding, rust treating and filler untill everything was rust free and relatively smooth. We've not tried to polish this boat to perfection. It's an old boat, with battle scars and a story. We don't want to cover that up! We'd also decided to put the first coat of primer on too, before handing over to the professional painter. So after a thorough de-grease, lots of cheking of the mositure monitors, we got the rollers out. In the middle of January we were ready to hand over to Chris, to put the rest of tha paint on and make it look beautiful! We'd worked hard and fully appreciate the cost of properly painting a boat now. Would we do the prep again or pay the money next time? I'd pay the money any day - boat painters earn it! A blue undercoat came next: A white base coat for the bow decoration We used Ronseal Black Floor paint on the gunwhales. It's incredibly tough stuff, a slightly satin finsih, very good in the wet and I always have a can of it at work for touch-ups! I missed out on getting any photo's of the gloss coats going on as work prevented me from visiting the boat for a week, but on the next visit Chris was marking up the coachlines. -
New-ish ownership. It must be well over a year ago that it changed hands.
-
NB Water Snail - Lengthening and beyond!
NB Watersnail replied to NB Watersnail's topic in Build Blogs
I'm deliberately keeping costs out of it at the moment. We've had so much done, that a lot of things have overlapped. I might elaborate on material costs a bit further down the line, but the cost of the physical work done is a matter i'd rather keep between myself and the people who have done the work. I'm sure the key question for some people will be 'how much does a lengthening cost?'. The simple answer.....it isn't simple! Thickness and quality of steel have a huge bearing on it, so does who you use for the work. We had quotes ranging from £10k-£20k, based on a basic steelwork and materials only lengthening of 20'. Good question Moomin Papa. By the time we made the decision to replace the tank the old pipework and pump had been removed, along wth the batteries and wiring. The simplest option was to use our 'emergency' bilge pump and a loose battery. The original water take off was also quite high up the tank, the bilge pump drained it almost dry. -
NB Water Snail - Lengthening and beyond!
NB Watersnail replied to NB Watersnail's topic in Build Blogs
Thanks Ray. I'm trying to get up to date. I probably won't get any more up now before next week - even that might be a push as we're trying to get the engine ready to go back in now. -
NB Water Snail - Lengthening and beyond!
NB Watersnail replied to NB Watersnail's topic in Build Blogs
The next stage of work for us was to get the inside ready for insuation. We needed to get the sprayfoam done before hte boat went back in the water as it was now December and the risk of condensation forming inside the hull was too great. We started by taking the wire wheel and needle gun to any visible rust in side the cabin, hull or baseplate. This was followed by 2 coats of Dacrylate Red Primer. Leaving the Whole of the inside one colour and ready for insulation to bond too. I started by battening the roof: Then the cabin and hull sides. All battens were fixed using either self tapping screw or a hilti gun. I have to say that the hired in Hilti Gun was the best tool ever! I spent 3 days screwing the roof and cabin side battens on. The same amount of fixings on the hull battens took me 2 hours with the Hilti gun! And it was great fun, especially the lingering smell of gun powder! We also made and fitted Sapele window liners and plywood mushroom vent liners. All drilled and fixed with Stainless Screws. On the 20th of December the spray foam team arrived. It was their last job of the year and they arrived so early that by the time I arrived (the time they were due to start) they had already completed half the boat! Finished! The new stainless water tank was sprayfoamed too: After a lot of head scratching a cutting, it finally slid into it's new hole. We'd made our deadline, to be back on the water for Christmas....just! The crane arrived on Christmas Eve - their last job of the year too! Next up - Paint! Ah, nearly forgot! While we were out of the water we also had: The rudder reshaped A new baffled skin cooling tank A new propshaft The stern tube refurbished A new ring on the roof Epoxy blacking on the new hull sections and then the whole boat was given 2 coats of Intertuf16. The rest of the hull had always been treated in this way, so we'll carry on! Finally new anodes were fitted. -
NB Water Snail - Lengthening and beyond!
NB Watersnail replied to NB Watersnail's topic in Build Blogs
While the stern was outside, we decided to have the engine out and thoroughly clean and paint the engine hole. From this: Via a LOT of this (who's got the best wife?!?): To looking like this in primer A few weeks later, the rest of the hull was completed, the stern was moved back inside and welded back on It's a cabriloet narrowboat!!! We had a long wait here as we decided a stainless water tank would be a good idea. Unfortunately the boat had come out of the water with a full integral tank, so we had to cut a small hole at the top of the tank and get a bilge pump in there, connected to several hundred feet of hose to get the water in to the cut. Once the integral tank was empty, steve cut the rear bulkhead off of it and I spent several afternoons on my back wire wheeling and painting it. Eventually, our new stainless tank arrived and was located inside the boat. All the time spent on this delayed the rest of the work as the tank could only go in before the new cabin went on. The next stage was to rebuild the cabin in the 'hole'. We'd taken the decision very early on to remove the awful tubular handrails and replace them with box cants, It took Dave quite a time to get them just right, welded on and ground off smooth, but now you'd never now they weren't there. We also had the pole and plank brackets relocated, new steel rear doros were fitted, along with turning one of the old window apertures into a set of side doors. All the reduntant roof holes were filled in and Steve and Dave took a lot of care making sure the old and new met smoothly. Even cutting some of the exisiting cabins sides off to reform them and get them straighter than they were before! A note here to say how good Brinklow Boat Services were. Evey little thing was done with so much care and attention, liberally washed down with tea and cakes. I can't reccomend them highly enough! -
Our cockatiel loves living on the boat. So much so that he was quite grumpy for the first 3 months back in a house. I think he's as keen to get back on the boat as we are! Cockatiels (or any small parrot) make excellent boat pets. Dependant on size, cage requirements aren't huge. They cope well with a bit of temperature fluctuation. Not much mess, no large stock of food to keep in. Ours flys up and down the boat and loves sitting in the window watching the world go by! Dad's got a cockatoo - much larger! She loves the boat too, but would probably be too big to comfortable live on it.
-
NB Water Snail - Lengthening and beyond!
NB Watersnail replied to NB Watersnail's topic in Build Blogs
More will follow shortly, when I can get a few minutes on a real computer, not a phone. Struggling for time between working on the boat, rebuilding it's engine at home and trying to keep my business going too. Never a dull moment! -
NB Water Snail - Lengthening and beyond!
NB Watersnail replied to NB Watersnail's topic in Build Blogs
Crane Day - Lovely weather but quite chilly! Tucking it into the Shed at Brinklow A few weeks later the stern end appears outside! Around this time we had the hull surveyed as it was due again and it seems a very oportune time to resolve any issues! Other than a couple of little plates on the swim, all was sound. But the surveyor expressed concern that our 6mm base plate was quite corroded on the internal areas he could get to. No doubting why this was. Rugby Boats had used gravel as ballast! We always intended to remove all the ballast eventually, but the recommendation was to strip out the boat entirely and remove all the ballast, allowing for a full internal inspection of the base plate. So, many more weekends of ripping 30 year old plywod out, shoveling tons of gravel and taking it all to the tip and we had a totall empty shell, now in two pieces. We decided at this point that we would do things properly, if anything looked like it might need attention, it would receive attention. This is our home, we intend to keep it, so let's get it right now. It was agreed to replace the base plate for a metre forward of the lengthening and 2m to the rear. This wasn't an over plate. We were able to remove the old baseplate and totally replace it with 10mm blasted and primed seet. Creating new edges (chines?) along the way. The remaining old baseplate was found to be in excellent condition, as all the ballast was in the rear half of the boat, so this was left in place. We'd also decided to use the best steel we could, so all of the new base plate, hull sides and gunwhales were supplied from the mill blasted and primed with 2 pack epoxy. This was to enable us to use epoxy blacking on the new section to match the exisiting epoxy blacking that was laready on the boat and had served us well. The cabin sides and roof were too thin a sheet t be blasted, so we had these pickled and oiled - it's the next best thing. The new hull section takes shape The forward joint Did we mention this is no small lengthening? 6m or 19'! We're nearly doubling our internal cabin space! -
NB Water Snail - Lengthening and beyond!
NB Watersnail replied to NB Watersnail's topic in Build Blogs
Just trying to organise photos into PhotoBucket. It may take me a few days to cover the past years work! -
i've been an avid reader of build blogs on this forum and assorted boat/car/bike forums over the years, so I thought with a big project now well under way it was time for me to give other people something to read. We bought Water Snail 7 years ago as a rather dilapidated, but useable, ex-hire boat. She was built by Colecraft and fitted out by Rugby Boats for use in their hire fleet around about 1981. She passed into private hands in the mid 90's and spent time on the GU, Lower Thmes and then finished up at Abingdon, where we bought her. On the day of the survey in 2006 After a partial repaint on our home mooring in 2010 After 6 years of living abord, we decided that 38', although mageable, was marginal for us to live on and set about planning a lengthening. Many people have asked us, why not sell up and start again? Whny not buy a sailaway? Financially for us it didn't make sense. We worked out a ball park figure for the lengthening, then realisticlly vauled what Water Snail was worth in her current state, added the two together and took that as our budget. We took that figure to look at various second hand boats. A new shell and fitout was out of budget. We're also very attached to her and were convinced she'd make a beautiful 'big boat' with a bit of care. Our Bukh DV20 was also a big consideration, we'd gotten used to a nice sounding, solidly reliable engine. Many of the second hand boats we looked at were marinised vehicle engines. Just not my cup of tea. Finally, we can ilustrate the point often made on here, that once you have lived on a boat for a while you will becoming very picky about layout and fitout. Try finding a second hand boat, on a biudget, to meet very specific requirements and you will quickly start thinking of refitting them partialy, or fully, to meet your needs. So why not refit the current boat? So a lengthening and refit it is! We spent many evenings drawing up scale drawings for internal layouts, trying to partialy keep some of the internal fit out in place so we could move back on quite quickly. A plan was settled on and we went to see Brinklow Boat Services to book her in for the lengthening. We must have caught Brinklow at a good time as they managed to squeeze us into a slot only a few months down the line. All of a sudden the ball was really rolling! Never underestimate how long it will take to move off of a boat. We spent every free weekend packing and took van load after van load to storage. Eventually we started to strip the linings out from 1m either side of the cut line. We'd decided to cut on the rear edge of the rear windows, to keep the rear section easy to ove and allow us to keep a bedroom and kitche intact for the journey to and from Brinklow. April 2013 We arrived at Brinklow, finished ripping out lining and insulation and left the boat waiting to be craned.
-
Hi Rich, That was indeed our mooring. Glad you enjoyed it!
-
This post cannot be displayed because it is in a forum which requires at least 10 posts to view.
-
We've actually been there nearly 7 years, but have been away having a lengthening/bottom plate/paint/engine rebuild/insert any job that could be done here.... Our mooring has been empty since last April, yes that is unusual, moorings never stay empty long at Sovereign. We should be back early March, so pop down and say hello when you're next at the boat.
-
I had a wander up and down the canal north of Banbury today. Looks fine to me. The worst bit always seems to be Cropredy, but i've heard no reports of that being bad for a while. It's certainly not what i'd call 'high' in Banbury centre. Wandering off topic - I spotted your boat in Sovereign today Athy, must try and say hello in person when we get back, we have the mooring on the furthest end from you, the one's that been mostly empty since last April!
-
We fitted a Shoreline under counter fridge a couple of years ago. It replaced an old Engel of a similar size. Far more efficient, larger and the freezer box really does work. I've yet to work out what it draws, but we have a 220ah battery bank and 52W of solar panels on the roof. At this time of year during daylight hours it seems that the fridge is using barely more than the panels put in over the day. That's only a feeling, I've not done the maths. Think it was just over £400 quid, the only downside has been the freezer door catch has snapped, nothing a little tape hasn't been able to fix for the past year. Make sure you can leave plenty of air space around it, ours gets quite hot up the back, must drill some vent holes into the bilge behind it one day!
-
Taken from the Waterscape website: "UPDATE (04 August 2010): For further information the 'Babbie' timber is a piece of oak about 9" thick which protects the solid part of the lock cill." So there we go!
-
This post cannot be displayed because it is in a forum which requires at least 10 posts to view.
-
This post cannot be displayed because it is in a forum which requires at least 10 posts to view.
-
This post cannot be displayed because it is in a forum which requires at least 10 posts to view.
-
This post cannot be displayed because it is in a forum which requires at least 10 posts to view.
-
This post cannot be displayed because it is in a forum which requires at least 10 posts to view.