martyn 1
-
Posts
468 -
Joined
-
Last visited
Content Type
Profiles
Forums
Events
Gallery
Blogs
Store
Everything posted by martyn 1
-
Sorry for the late response wading back in. Ive been away playing with JP2's and Samofa's. So from you last response about the firing, if it is firing equally on all cylinders and reasonably well e.g. running away from the starter momenterily and lots of black smoke then you can rule out anything that effects only one cylinder. so that rules out the individual elements, delivery valves, injectors. And although your compression reading is pitifully low that is not surprising as A. If you have a starter issue and the other cylinder are still compressed or the starter is really struggling you wont spin it fast enough to get a sensible reading and B. the 600psi in the manual for starting compression is for an engine that has been running and then compression tested so up to temp not one that hasn't run in years and is cold in comparison so that doesnt surprise me. If you have enough compression to fire when turned over then that isnt the issue, even with very worn out pistons/liners/rings in the temps we have been seeing recently it will still go, although may be a bit more of a pain to get there. If your getting it fire and black smoke then it isnt compression because if it was sufficiently low enough to stop it running it wouldnt fire at all/very little and the smoke would be grey. So I would be checking now. (on the assumption that you are certain the valve clearances are set correctly. that when cranked with only one cylinder at a time compressed it is firing and has black smoke and that the level of attempt to fire is equal accross all the cylinder) 1. Check that you have good fuel pressure at the pump. (with a delivery valve removed and nut refitted, pump rack at full fuel position and anywhere in an engine rotation other than at the spill point (if you dont get fuel at first turn the crank 1/4 to 1/2 a turn and it should start flowing). Fuel should flow from the port and provide a jet up from the pump of about 2 inches at a minimum. any less than this and you have low fuel pressure. So if that is the case check for blocked filters/blockages in general and closed/partially closed valves...... once you are certain you have decent fuel pressure then move on. 2. Make sure the spill timing is spot on. If you want me to talk you though this whilst your stood next to the engine then give me a call. you will need a spill pipe not just an open port on the pump to get this correct. 3. Not likely a cause unless its sticking near the no fuel position but I would check anyway to rule it out. Ensure the govenor rod within the engine (end of the rod about 9/16" dia has a spring around it before contacting with the bell crank is free to move and that also applies to the bell crank (throttle arm) make sure it moves with no tight spots. 4. Try starting it. pump rack at full fuel. in high compression. decompressed at first and drop each cylinder in one at a time as if you were hand starting it. this will allow the starter to spin it to a greater speed that when trying to drag all three compressed cylinders around
-
Hi Ian, So as it stands now, every time you try and start it, it fires but wont pick up? Is that correct? If this is correct with all the cylinders decompressed and on each attempt of starting engaging a different cylinder each time is it definitly firing on all the cylinders or does one fire but not on the others?
-
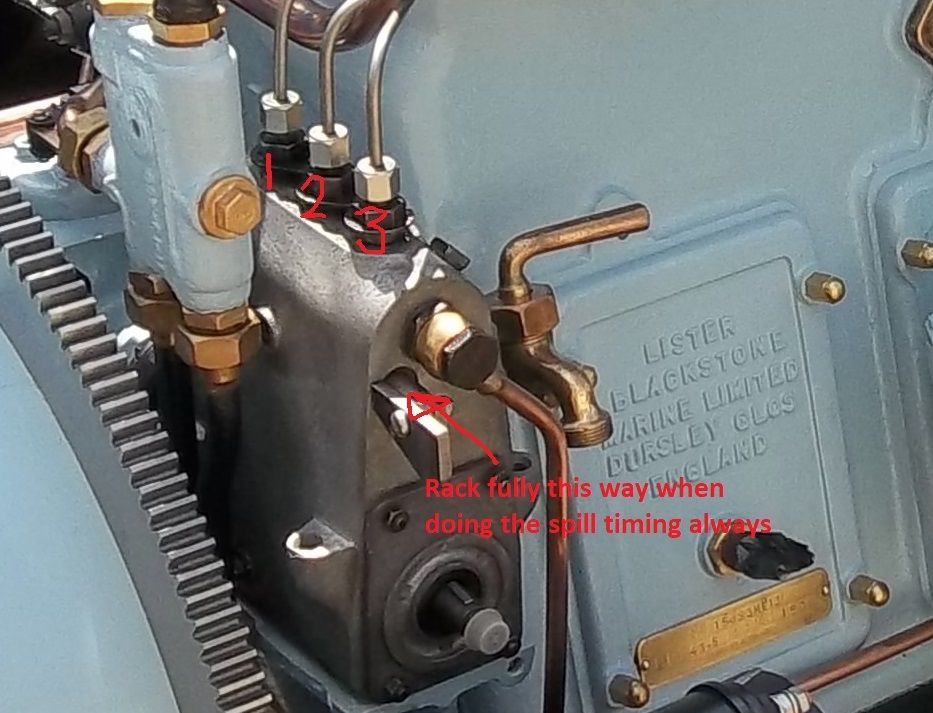
Ok to get things straight, going back to your original post you said you had overhauled it, but you mention you havnt had the crank out so it sounds like it has had a top end freshen up? could you tell us what has actually been done to the engine since it last ran? as this will make the possibilities for the cause alot easier. The JP's are an extreamly simple engine so there wont be much of an issue. You say "No1 pump as marked" which concerns me a little.... Is this the element nearest the coupling on the pump? if not ignore the markings and use that one for the spill timing as that is correct for a JP. yours being a JP3M no 1 cyl is nearest the flywheel and the pipes should be connected to the cylinders as shown below. Closest to block to cylinder 1, center to cyl 2 and furthest away from block to cyl 3. Im just wondering

-
And now think again it has bugger all to do with the 120 degrees between cylinders. the coupling between the pump and engine can be fitted together in two positions. one correct, the other the pump camshaft is 180degrees out from the engine. When you have reconditioned as many of these as I have then you might get it...... I would have to agree with the advice below, Those who have never had one of these to bits to the point to know how to properly diagnose an issue should keep there thoughts to themselves.
-
My guess from your photos above is the injector pump is inserted in the vernier180 degrees out because in your pic there is a o stamped on the vernier (standard on one of these). there is normally a coresponding one on the injector pump coupling if its an original that will line up with this. so if you check the bit of the coupling that isnt visable in the photo and there is a o stamped then rotate the camshaft 180 and reinsert into the vernier with it aligned with the one on the vernier. from there you should have enough adjustment. If that doesnt work then see my comments below. Right, by overhauled your engine did you have the crank out or at least the cover at the injector pump end off? If so then the below will be relevant or if the timing has been out for years as well. This also assumes you are spill timing it using the correct cylinder element on the pump. for a JP3 its the one nearest the drive end of the pump. and using a proper spill timing pipe not just the open end of pump delivery valve nut as that will only get you within several miles anyway. The only adjustment on a JP is the vernier adjuster so if you cannot get the timing right using that you either have the pump engaged in the vernier coupling 180 degrees out or the drive to the pump is a tooth or two out. The second is only relevant if you have had the end cover off to remove the crank, or someone has and has got it wrong reassebling it. I have seen alot of JPs that are like this even what appear to be from the factory. Had one that was injecting at nearly TDC because it was out and another that even fully retarded on the vernier was injecting at near 40 degrees BTDC becasue the gear was out. The way to get around it being a tooth out is a pain to do but easy if done whilst assembling. You need to set the crank so the injection mark is aligned whilst the injector pump drive shaft gear is disengaged from the crank (end cover pulled back, which will require the removal of the oil pump and drive and the flywheel if a marine engine). Now with the crank set at the injection position for number 1. if you now spill time the pump and when at spill mark the coupling and injector pump body with a pair of lines that match up when at the correct point. now with the vernier in the midpoint of its adjustment and the pump installed onto the coupling hold the pump with the lines matched and push the end cover in to engage the gear. if the marks on the pump move a little when you do this and the gears engage dont worry because this can be corrected with the vernier but if it moves alot then you will need to pull the end cover back out and try again. as soon as the cover is fully home you can now adjust the marks until your marks align spot on and you know the timing is close enough for final spill timing once the engine is fully assembled. So if you are certain the spill timing method being followed is correct. ( Turning the engine/pump in the correct direction, cylinder ones element being used, have a spill pipe fitted, injector pump rack at max fuel, you are trying to time it on the correct side of the injector pump cam, element on its way up not down. if this is all correct and it needs more adjustment than the vernier can give then possibly the injector pump is engaged in the vernier 180 degrees out. if its not either of these then the injector pump drive shaft is incorrectly engaged with the camshaft and then you need to follow the above. Hope this helps Martyn
-
Unfortunately no, we could never get the vendor to come to the realms of reality to make a deal. So in the end gave up.
-
Not at all, the last gardner we did was for an RW Davis boat, The Kromhout before that Brinklows, The Dorman we are doing now is a replacement for a JP2M and currently in the pipeline with a customer for a 3LW for a XR&D along with a couple for boat builders in the netherlands so still very people fitting old engines in new boats. On the topic of JP's though I would say they are just out of fashion. You go back a few years and when we got an enquiry it was 50/50 Gardner Lister but these days most are Gardner with the odd Lister Enquiry. I also believe the JP3 in question on ebay belongs to flatplane8 of this parish as he has been re-engining his barge Misterton with a JK4 built from the left overs of one we broke up and another, to give the barge a bit more power.
-
Definitely not something I like doing either. In the last 20 years I have managed to keep it to 2x 6LW Gardners, 1x Lister JP3, 2x Lister JK4's. They are were broken up for spares supply for other engines so as bad as just scrapped. They died so others could live.... The DC3 with its gearbox is 7' 5 3/4" long............ and 2' 8" wide so you might have trouble getting it into a narrowboat engine room ?.
-
A lot to big for a narrowboat but our pair of Gleniffer DC3's are up for sale. large discount for CWDF members of course ? https://www.ebay.co.uk/itm/254514484715 Finally decided that with an ever growing pile of Gardners, Listers, Dormans etc we are never going to get the chance to fiddle with them so got to go. Tiny engines at 2300 kg ish each.......
-
Sure we have several of them. will have a look. PM to follow shortly
-
Well from the pictures I would be putting that piston and associated head in the scrap bin. Don't forget when you get it sorted and put the heads back on to check the piston to head clearance. All of the indian made head gaskets I have seen to date are to thick and wont allow the clearance to be set correctly. It will run but wont be as clean as it can be. Hence we don't buy the Indian gaskets, we make our own to the OEM thickness. We have used heads as well hear
-
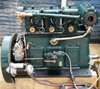
Not technically an eBay engine yet as I thought I would offer it up on here for a week or so before it hits eBay. We now have available a fully reconditioned Samofa 2S108 genuine marine that was rebuilt for a customers new boat, however they had a change of plans and have now bought a second hand boat with a Gardner 2LW, so they have no need for this engine. Photos of the recon in progress on our site. Offers circa £6000. Finished with the below spec 30hp @ 1500rpm 12 volt start 12v 175amp Iskra alternator Custom gearbox output flange to PRM260/280 output pattern Conversion to gear driven jabsco water pump
-
Its not that gear you need, if you use one of those the centreline of the pump wont line up with the centreline of the mount hole. What you need is the gear that is on the piston water pump assembly which has less teeth (cant remember how many off the top of my head), this is what we use when retrofitting a pump to an engine that is in one peice. Or you can do it the way we do when doing a recon but this does envolve removing the front cover of the engine and removing the injector pump drive shaft and modifying it by adding an extension shaft added into the end of the gear. Incidentally this is the way Lister drove the air start valving on an air start JP
-
If your has a greasers or grease nipple it is an earlier type and needs greasing, if its a later type with a carbon ceramic seal it will not have a grease point. If a later seal is retrofitted to a earlier pump housing the grease point is normally blanked off.
-
Well end float is the easiest and most accurate to measure with the engine in one piece, . pry flywheel fully one way on the endfloat, setup and zero your clock onto a flywheel face, preferable onto the end of the crank itself. endfloat should be within 0.00275 and 0.00650" at new/overhauled. Max tolerance stated is 0.012". now lift (bearing clearance) is a bit more subjective because you cant physically measure the bearing and crank diameters. but in short if you can feel lift when you use the prybar its too much. clearance new should be 0.004 to 0.0055", max tolerance is 0.0075". Obviously the tolerances will be different but this applies to any engine as a quick tell as to the bottom end condition.
-
You would think so, but as a JP oil pump is sized for the largest in the range when were talking about the smallest then the pump has alot more capacity than the engine needs. It can maintain half reasonable oil pressure (if you can call 15-20psi reasonable..) on a JP2 long after your in the realms that the main bearing wear is well outside Lister's tolerances and well into the realms of snappy snappy crank. But as I said earlier with a big prybar and a clock gauge you can normally very quickly tell if this is the case in situ and in one piece.
-
Very true, but with a JP2 not having a centre main bearing, if they have worn out bearings then a snapped crank finishes them off pretty quickly and unfortunatly its more common than you might think. 95% of the time it can also be put down to knackered bearings, so had the wear been dealt with when needed it wouldn't of been an issue, regrind, bearings and good for another 50 odd years..
-
JP2M in non running condition no more than £3k tops and idustrial around the £1.5k mark tops. Having personally seen enough "runners" even if it did run I would be wary without a autopsy on it before fitting it to a boat. I have had alot come through the workshop that start and run but are w"£ked when stripped down. And to do a rebuild on one properly they are not cheap. A few things can be checked on one that is not dismantled to give a hint of if its ok or not. amount of compression, endfloat on crank and lift on crank. the later two are normally a good indication of if it will need work.
-
Depends on where you mean by down south but were near Blandford/Poole and can make them up for you.
-
Same setup just not as polished, Personally I wouldn't have it polished as the one in the pic is because you end up with shares in brasso and spending all your time cleaning it rather than using it to keep it looking like it. But in the case of the pic that is what the customer wanted. As split pin has said you would need to remove the pipe and fitting that is on the left of your picture and pointing horozontally and it is in the bottom of the hole that is left behind, but as mentioned it can be very hard to see.
-
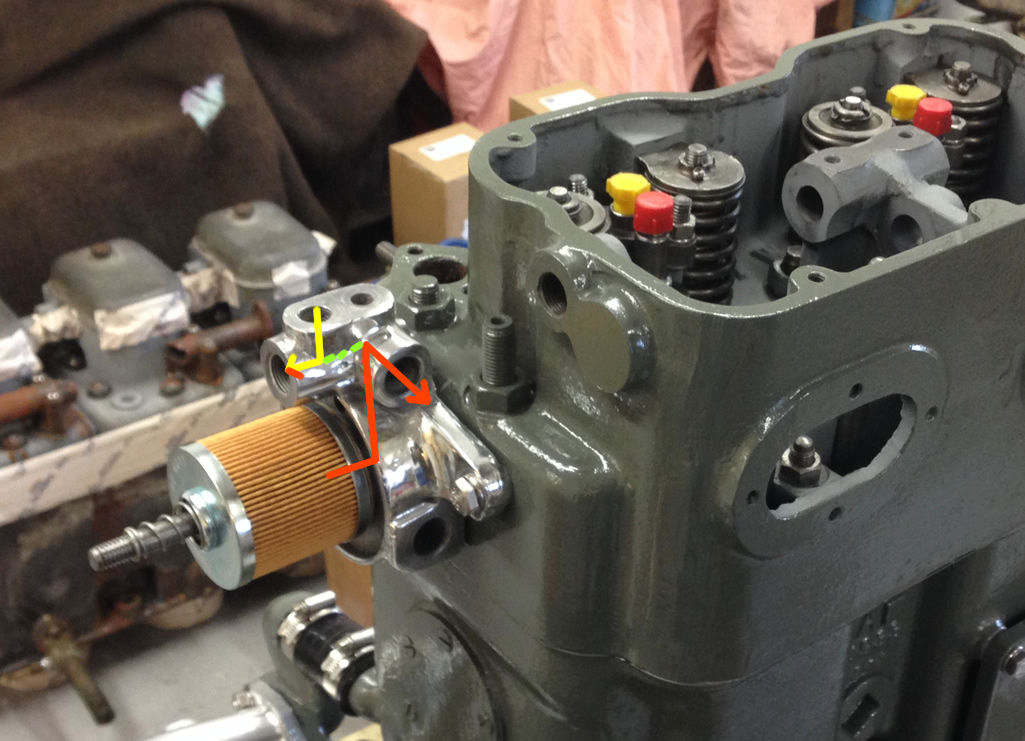
the hole is at the bottom of the hole in the centre under the yellow arrow. The bottom of the hole is conical left from when it was drilled and at the centre point is the tiny hole (if you have one). It connects the yellow return drilling to the red filter to injector pump side drilling and essential maintains the fuel pressure at what it should be. This is only relevant if you have a lift pump, if you engine is gravity feed it doesn't need it.
-
If it was running fine and now isn't its unlikely to be the hole i previously mentioned unless some crap has blocked it, It sounds to me like its probably not running on a cylinder properly. if one cylinder isn't bled and is airlocked the engine will run rough with no smoke as its not injecting at all. I would suggest first with the engine stopped but in the cold start position on the injection pump pulling the priming levers one by one until it goes firm and a squeak is heard from the injector, you may have to turn the engine over a bit by hand to be able to do this to all the cylinders (if the pump is already at the top moving the lever does nothing..) Alternatively if you struggle to hear the squeak or your not sure if you can or not, you can remove the rocker cover and slacken the injector pipe nut a turn or two and pull the levers as before, when you see fuel coming out around the nut re tighten it and do on the rest. when finished clean up an fuel and refit the cover. Then give it a go and hopefully all is well, if not pull the levers hard one by one with the engine running and hold it firmly down, with each one you should hear a noticeable change in engine note and if setup properly this should be balanced across all the cylinders. if one make a lot more difference than the others, or one doesnt seem to make hardly any difference at all then its not setup properly. Hope this helps and isnt too confusing.
-
Size of pulley on the crank will depend on the size of the pulley on the alternator or vice versa (Depending on which you already have) to get the best speed match, not to slow, but equally doesnt overspeed the alternator at higher engine speeds. So to do the job properly first you need the output curve for your alternator model which will give you the max speed and the speed it excites. We normally gear them so you are just short of max speed with the engine flat out which gives you the best possible output at tickover.
-
This post cannot be displayed because it is in a forum which requires at least 10 posts to view.
-
No difference in height, the change from 3:1 to 2:1 is just a change in ratio of the gear. I have in the past converted a 3:1 box to 2:1 with some custom gears. Some come off easy (pull off with your hand) other are like they are welded on. The gearbox output gear/reduction input are different between 2:1 and 3:1 (Number of teeth) Good practice would be that you do not mix gears that have been used/worn. as much as they will work they will have bedded into the gear they were originally mated to and in most cases are noisy if swapped around.