


RS_Pete
-
Posts
30 -
Joined
-
Last visited
Content Type
Profiles
Forums
Events
Gallery
Blogs
Store
Posts posted by RS_Pete
-
-
42 minutes ago, IanM said:
With a lot of drawings that Laurence Hogg sold on his website, they'd been traced/re-drawn so the clarity wasn't an issue. Certainly the Large Northwich drawings I have were however I think that the small Woolwich drawings he sent were just copies of poor quality originals.
To be honest I would be happy with anything if it showed something...
Methods of copying have changed dramatically over the years and often something got lost.
Digitization is not without issues either going by the number of DVD, CD's, files, photos etc I have that no longer seem accessible.
Re-drawing would have been the only option originally I suspect and certainly one of the best for refreshing fading and decaying documents.
It is shame that with his passing Canal history seems to have lost a great archivist.
While it is a shame that the small Woolwich drawings were not it would still be great to see a copy if available anywhere...
-
30 minutes ago, spud said:
is your boat vela and if it is how is it coming on. i think somebody called sarah was on here a couple of years ago saying she was doing it up
Yes it is, bloody slowly, too slowly!🤣 That was Sara my wife. We'll get there hopefully.
-
If you are able to scan them Id love to get hold of a set as our boat was once a Star Class butty. Considering how old the original drawings would be I cant say I'm surprised that they would be poor quality, especially if they have been copied several times already!
I was intrigued that there was something in one of the early CAD? packages being used by schools that the thread seemed to think was based on the originals.
If you do find them and are willing to scan do let me know Id really love to see them and maybe purchase a copy?
Many thanks
-
A great shame to have come across this thread so late.
Do any of the drawings of the H&W "Star Class" exist anywhere?
I would have loved to see the CAD drawings but anything really showing layout and detail would have been of interest.Intrigued that the drawings were part of a School CAD software package....
Anyway if anyone has anything or could point me towards I would appreciate it if only to see how mine may have looked once upon a time! -
Looking for some advice regarding the rudder stock support / bearing on my narrowboat.
This has never felt smooth since we brought her and I felt I should investigate further.
The boat, or at least the rear was built sometime in the 60’s.
Looking at this it appears different from others I have seen that have a bearing block mounted on the rear supporting the top of the rudderstock.
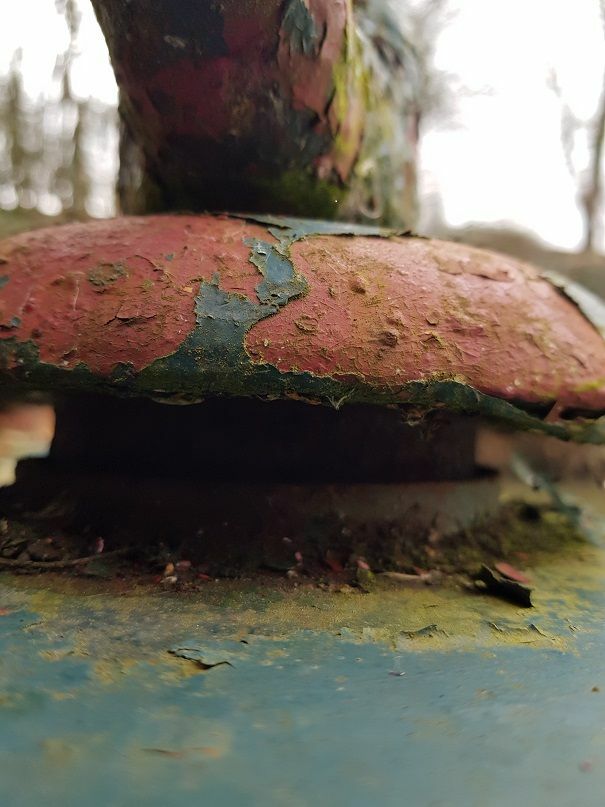
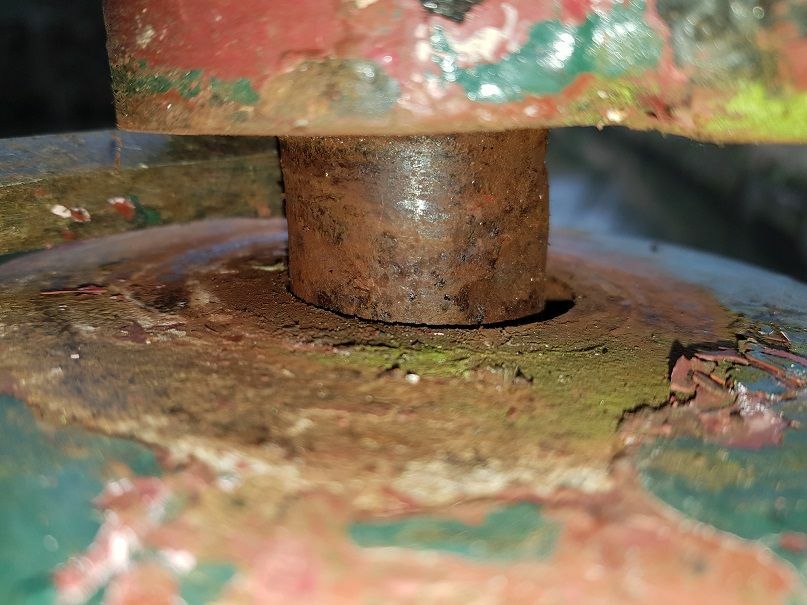
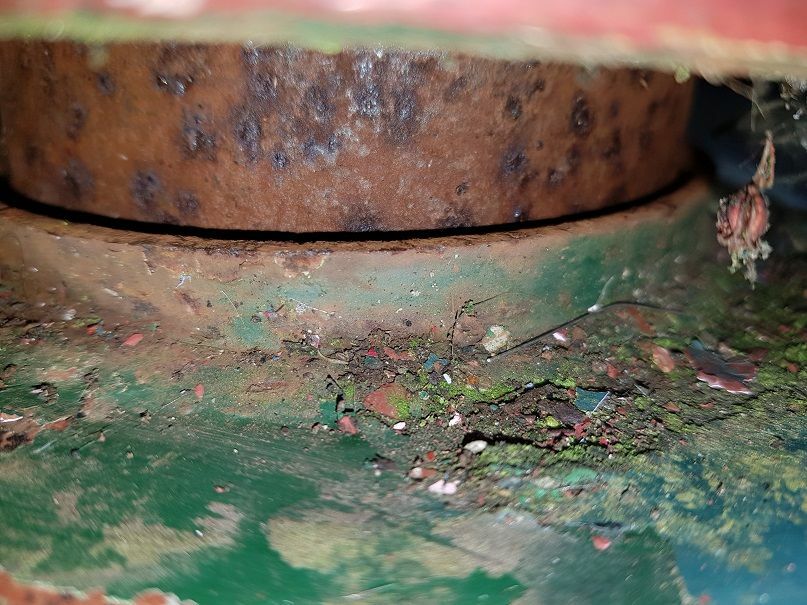
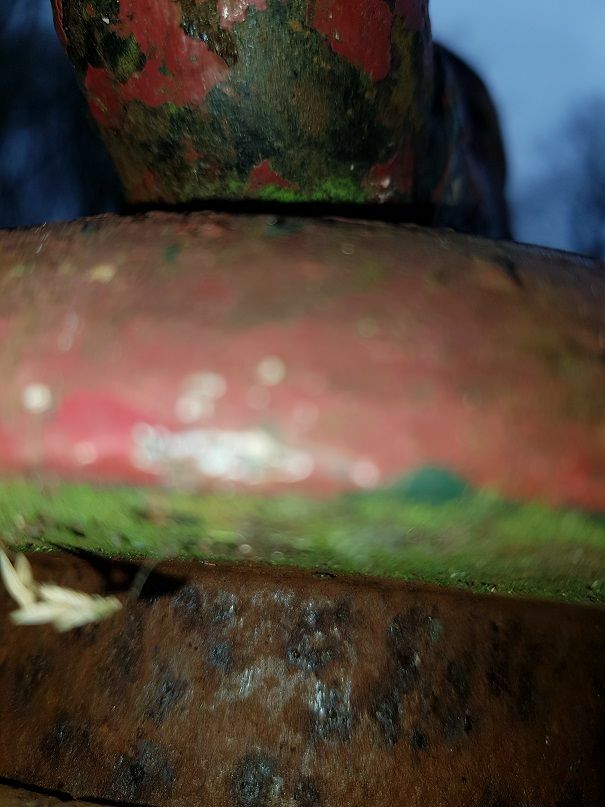
I had thought originally that the “mushroom” cap was a simple pressed or spun steel cover for weatherproofing sitting over a bearing (and that may well be its purpose.)
However, this is a solid steel machined piece with a parallel steel section below it sitting in the top of the rudderstock tube.
The fit of the parallel section in the rudderstock tube is loose or sloppy, allowing movement at the tiller end radially in all directions of approximately 6mm
With a pry bar the whole lot can be lifted at least 25mm (1”) and the parallel bar slides up and down in the tube freely. The tiller and rudderstock can be, with a pry bar again, be lifted through the mushroom and parallel section by a similar amount.
Can anyone throw any light on how this is supposed to work?
I am wary of trying to dismantle at present without a greater understanding as I am concerned as to how willing the parts will be to separate. I don’t want to end up in a situation where it can’t be reassembled easily… However, it will need addressing at some point in the not too distant future.

-
Thanks Jim, I'd love to see a picture of this if one is available.
I love some of the ingenuity that can be found out there, not just in the boating community, and often find myself disappearing down an internet rabbit hole for hours when looking at what can be done.
The small home movement have a lot to answer for!
-
59 minutes ago, Bee said:
Hard to know without actually poking around with a sharp thing. Many boats were made with pine floorboards or similar screwed to 3" x "2 framing and then clad with ply or oil tempered hardboard - all just an example. These are repairable by just taking off the outer skin, replacing any rotten bits and re skinning with something better or rotproof. Aluminium would be good, even perspex or plastic sheet of some sort would be good, whatever is not hugely expensive. Might need some cheap board under it to give some insulation to the thing. As ever its the edges that are going to be a problem.
Oh I've been poking with a sharp thing.....?I have stripped the inner cladding back to gain access to the first 6 metres or so.
Due to the over cladding with metal on the outside access is difficult there though the cladding doesn't appear to have been the full length and is only on the vertical surfaces where applied. Definitely worse where clad though that may mean its older....
The starboard side is, oddly, in far worse condition than the port side, both appearing to be constructed at the same time using the same materials.
The roof is worse at the bow and the stern leading me to think that it has been subject to patchwork repairs before. I also don't think there is sufficient framing giving support to the roof and sides...
So I will tackle the first 5metres and then the next and then the next and presumably return to the beginning to fix anything I got wrong the first time.....
And repeat?
-
1 hour ago, David Mack said:
And that is going to be hard with a solution with numerous screw holes and long lengths of sealed seams.
Indeed.
And truthfully I don't see an easy or economic option open to me.
At least with a "repair and make good" option it can be done piecemeal... unlike a steel top which will be done all at once as a one off but at unknown cost.. assuming there is anyone out there willing to do it.
I have the skill sets to do either myself, though experienced guidance is always a bonus. I just lack facilities and £££'s currently. So it looks like timber/ ply replacement and repairs.
All advice most welcome though?
-
Part of the problem I have is, I think, caused by the previous owners attempts to protect the roof actually acting as a catchtank for water trapping it under poorly fitted tarps.
Properly fitted as that centre section appears to be in the photo on Bargus may be the way forward while repairs are ongoing.
Looks like replacement of outer panels and any other rotten wood with marine ply sealed with two pack epoxy will be the starting point.
Fingers crossed
-
5 minutes ago, blackrose said:
I think if I was re-skinning a wooden top I might use aluminium sheet, PU sealant and screws rather than steel. Lighter and less likely to affect stability than steel and easier to DIY. Plus it's corrosion free so if you liked the look no need to paint it, or paint with an etch primer and nobody will know it's not steel.
The current top appears to have this done, at least in part. The existing construction, which is 18mm plywood has been repaired previously and is faced with sheet metal and then covered in a cloth painted with a bitumen paint (and yes that looks as bad as it sounds…), is somewhat sad and tired with sections needing replacing.
Unfortunately I have no idea when it was done and it may have been applied over existing damaged wood, or has actually trapped moisture in as the current panelling is pretty rotten in places.
-
Just now, Tracy D'arth said:
True but 800 feet of welding is a daunting task!
Especially as it's a few years since I did any....?
-
Well I have had a reply from Martin.
Unfortunately due to Covid and its restrictions he needs to focus on his current business orders and is unable to help with this.
I suspect his will not be the only boatyard in this position at present so it may be the repair option is the only option.....
(Of course there's always that cheap welder and some tinsnips on FB marketplace....?)
1 minute ago, Bee said:If it wasn't for the bottom edges I wonder if that stuff that lorry trailer sides are made of (No, not curtainsiders!) would be the answer to old wooden tops. Mind you I suppose putting a 40` length on the car roof to bring it home could be awkward. Somebody must have done it.
Hmmm....3 sheets approx 1.5 metres by 15 metres on the BMW might prove interesting....
-
1 minute ago, David Mack said:
If you completely replace the wooden cabin with a new steel cabin a substantial part of the work will be the stripping out of the existing and refitting of the new. If your fitout is generally in good condition I would go with Tracy's suggestion.
I think the Sotham boatbuikder mentioned is Martin Kedian of kedianengineering.co.uk.
That stripout shouldn't take too long! The boat was effectively a blank canvas so fitout is effectively a little way off at the moment. Really need to decide where the rapidly diminishing budget is best spent and order of attack. My preference is for steel for the longevity and maintenance point of view, though I have to admit a perverse fondness for the wooden top...
1 minute ago, Tracy D'arth said:That's the guy of course, Martin.
The cabin was all welded, the existing windows refitted I think. Front and back bulkheads all fitted with doors and hatches. It looked like any other steel top when done.
I think Martin has automated welders which makes welding cabin sides a lot easier and quicker.
I have sent an enquiry to Martin. I expect it'll be a few days before I hear back with it being a holiday weekend however when I do will report back on here. Just have to figure out the best course of action...and route to Southam from the west end of the K&A...
-
Hi Tracy, Thanks for the fast response!
Do you remember if this was a welded construction or was it steel panels screwed to the existing structure?
I suspect if it was Southam it may have been Kedian Engineering?
-
I have a 63ft narrowboat with approximately 50foot of superstructure all in wood.
Obviously, otherwise why would I be here, this needs repairs and replacement...
Looking through all the comments available with Google search most say don't repair, replace with steel it'll be cheaper.
I'll be honest I would replace if I could afford it however I can't. At least I assume I can't.
I was hoping to find some guide prices however haven't really done so.
If anyone could help here with rough estimates and recommendations of boatyards who can and will do this I would be grateful.
I'm on the Kennet and Avon.
Otherwise it is going to have to be a repair and replace with epoxied marine ply.
Many thanks
-
57 minutes ago, AndrewIC said:
Did you ever find a copy of this online? I discovered on the boat today a paper photocopy of the C2/C3/C4 installation manual that I didn’t know I had. If you still need it I can scan and email it.
Hi, yes I did. Many thanks for your kind offer though. I should have posted I had, so do apologise.
I have however decided to go the composting route so will have a C2 for sale shortly!
-
4 hours ago, LadyG said:
Is this the wooden deckhead (ceiling) or does the boat have a wooden roof?
PS the greinies and their accolites are 'like' button equivalents.
Hi,
It has a wooden roof. A lot of wooden roof........
Replacing the roof with steel isn't an option so I have to repair and make do for now. (Besides I kind of like the perversity of it)
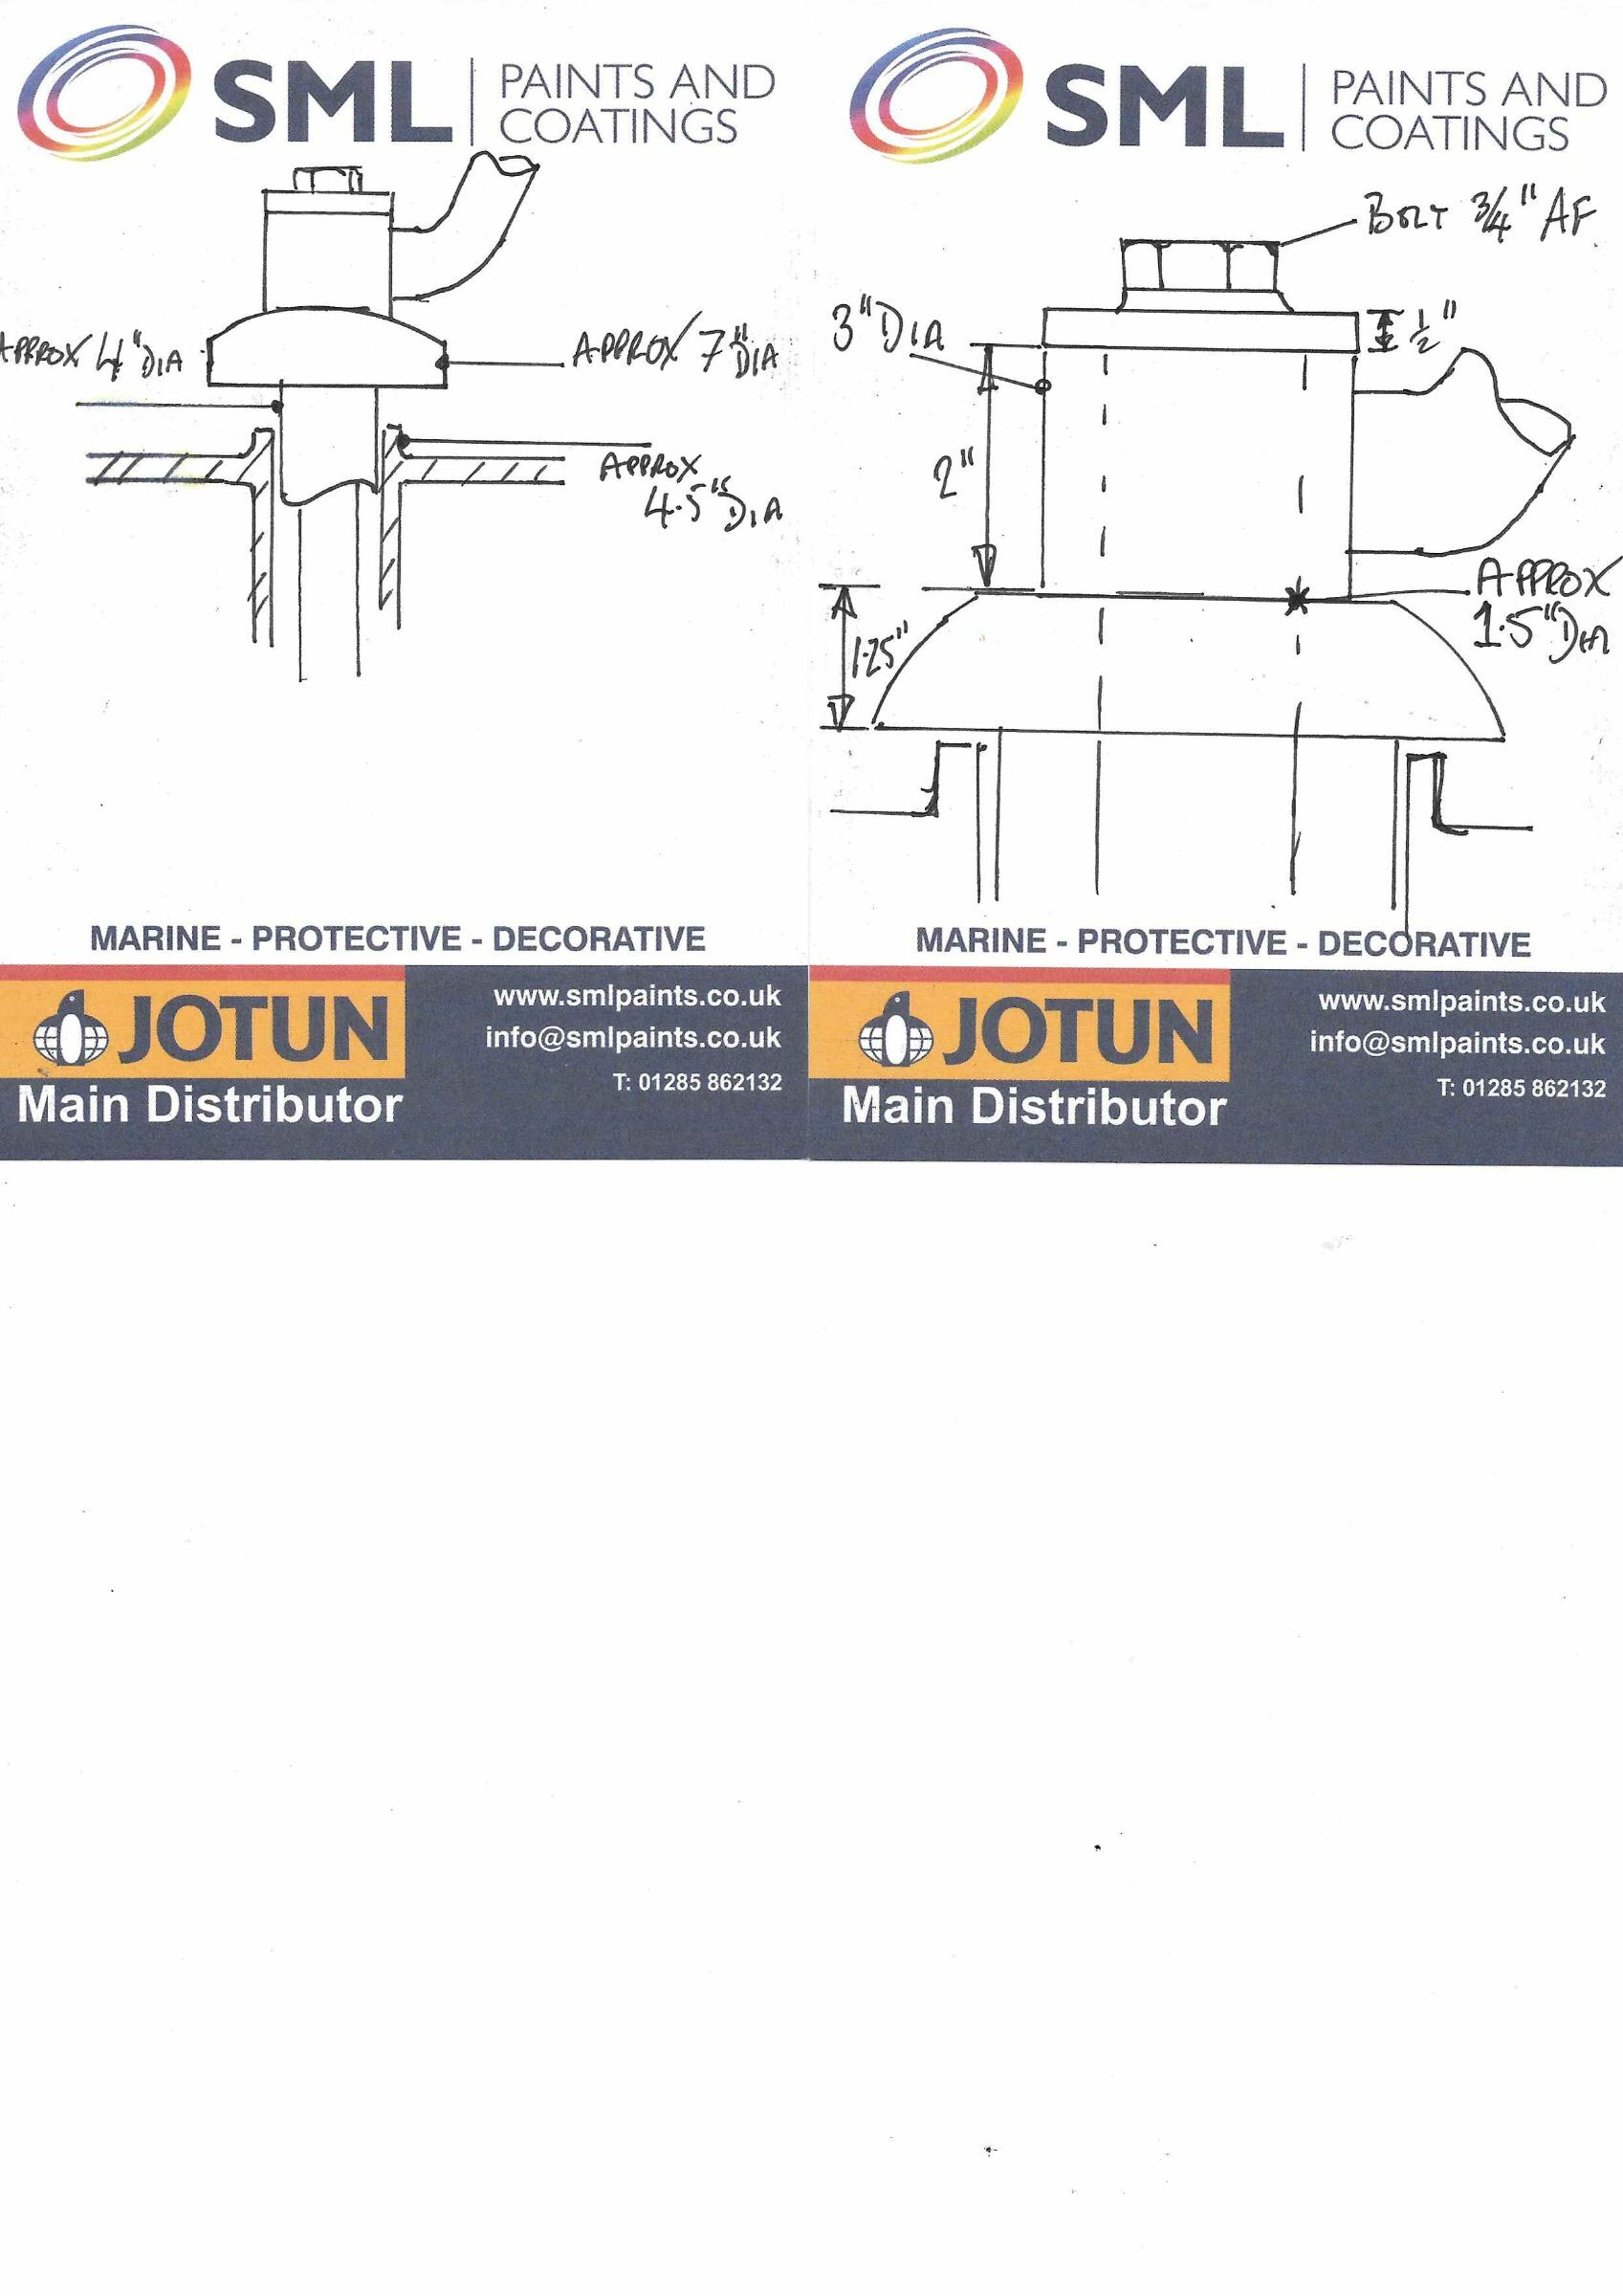
I have a stove with a 125mm (5" ) flue. The old stove was a 4" flue which in hindsight might have been sensible to source another the same.....
On the roof there is a 4" cast Chimney collar (approx 4.75" internal diameter) and buried in the engine room I found another with a larger ID that looks like it might just take a 5" flue.
Just.
So how much clearance between flue and collar should I be looking for? Obviously with this it can only be single skinned....I think.
Or do I need to get something fabricated?
(Thanks for the tip on the greinies?!)
-
37 minutes ago, Sea Dog said:
If you look at @bizzard post you quoted, you'll see a little green arrow has appeared at the bottom over to the right. This is a "greenie", basically a "like", which I have just placed there on your behalf - and also because he comes out with good stuff and surreal stuff in roughly equal measure, so he deserves them sometimes!

At the extreme bottom right of this post, you'll see a grey disc with a white arrow. Clicking on that will bring up a menu to choose a response from - I clicked the greenie for you, but you can chose just one from that list. Hope that helps!
Thanks, still learning my way !
-
5 hours ago, bizzard said:
Exactly. I've mentioned the silicone heat thing on here a few times, I get no response. I presume folk carry on buying the expensive rip off special? heat proof stuff.
When I'm in a scientific mood I carry out simple experiments, The silicone one I think is in this thread, no need for loads of googling like most seem to do on here. Just think scientifically.
")

There needs to be a like button on these forums?
Now, how do I get a 5" flue through a wooden roof...? (Or should I start a separate thread..?)
-
On 10/10/2020 at 09:32, bizzard said:
The half inch gap will be ok, just pack it with the thick inch thick fire rope, first ring smother with heat proof silicone and poke down, this first ring will stick, then a couple more rings on top, finishing with more silicone. To be honest I just use cheap silicone, it's all fire proof, but I of course must recomend the expensive fire proof type.
My collar and flue pipe have a half inch gap too because I fitted a smaller stove, don't like it too hot, and kept the same collar, no problem at all, no leaks.
In the distant past I built some turbocharged performance engines for a car being raced at Le Mans. This used Wills rings, a sort metal sort of "O" ring as head gasket between liner and head, which required a groove machining in the cylinder head face.
We used to locate these with a dab of clear silicone sealant purely for assembly purposes. Nothing special, just basic clear silicone sealant.
Upon stripping the engines where any sealant had squeezed into the combustion chamber space there was no sign of any degradation of the sealant. It certainly didn't seem to suffer as a result of the heat. (On the whole we didn't want any sealant in there!) Combustion temps in engines are high. Very high.
I would be more than happy with ordinary silicone, once cured, being able to take the heat. Though there may be other reasons as to why one that is recommended is more suitable.
-
 1
1
-
-
1 hour ago, Wanderer Vagabond said:
Isn't refitting one just the reverse of removing it?

I hope the statement at the bottom is aimed at me!? (Though perhaps apt!)
Yes, it should be.
Was rather hoping to get a manual to check but as said above I am sure I can manage without.
5 minutes ago, Murflynn said:I installed a C2 many years ago and didn't find I needed a manual. You have the measurements to check if it will fit and to cut the hole in the bulkhead on one side or t'other. What else do you need to Know?
I am sure I will be able to refit without. Just thought it would be nice to check against especially if there is time between removal and refitting.
But if its not available it won't be the end of the world.
-
41 minutes ago, Ray T said:
Thanks however unfortunately a different model.
2 hours ago, matty40s said:Do you have an email address, I have the C260 installation pdf. PM me.
Thanks, very kind however that is for a different model.
I can also download this from the Thetford site so may end up using it for basic guidance,,,,,
-
1 hour ago, Athy said:
Yes: type "Thetford C2 Instruction Manual" into your search engine, and it'll be the first one that comes up. Well, it was for me anyway (I just checked again). The seller is "amc240".
Thank you!
Found it! But only by doing a seller search....?♂️ No idea why it didn't come up otherwise, never will understand how ebay works differently for different people!
Unfortunately its an instruction for use rather than the installation manual I am after.
-
56 minutes ago, Athy said:
There's one on eBay at the moment: bloke in Leicester selling it for £3.50 + postage.
Thank you,
Had a look on there but couldn't see it. Do you have a link?

Narrow Boat Plan
in History & Heritage
Posted
Should they ever surface I would love to see them for the same reason. (if your storage is anything like ours!.....😬)
That would be fantastic, thanks.