


RickS
-
Posts
332 -
Joined
-
Last visited
Content Type
Profiles
Forums
Events
Gallery
Blogs
Store
Posts posted by RickS
-
-
Again, thanks for all the advice and wit - appreciated and enjoyed in equal measure.
In the end, I bought some 14" bolt cutters and they came off easily enough - a couple at considerable speed!
Thanks again
-
 1
1
-
-
Thanks all for the usual helpful advice. It would seem that physical removal is the way forward rather than trying to chemically ease the rust, which is extensive. Bit cold today so didn't give any a try (I know!) but will give the dremmel and boltcutters a go. Not averse to using the angle grinder it's just that it's difficult to balance and use both hands to control the grinder.
Thanks again
-
Thanks all. No plan to put them back on, I will be replacing them with stainless steel. It's getting them off without using an angle grinder (ideally) that is the issue.
I suspect they are too big to break with mole grips but I'm having a go at that in the morning!
-
I am trying to remove the front and rear fenders and they are held on with D shackles which are just solid rust and the screw-in bit isn't shifting.
I don't really want to get he angle grinder out so wondering if there is any wonder chemical that will shift the rust enough to be able to get the shackle off.
I know vinegar is supposed to work (?) but leaving it on is a problem.
Thanks
-
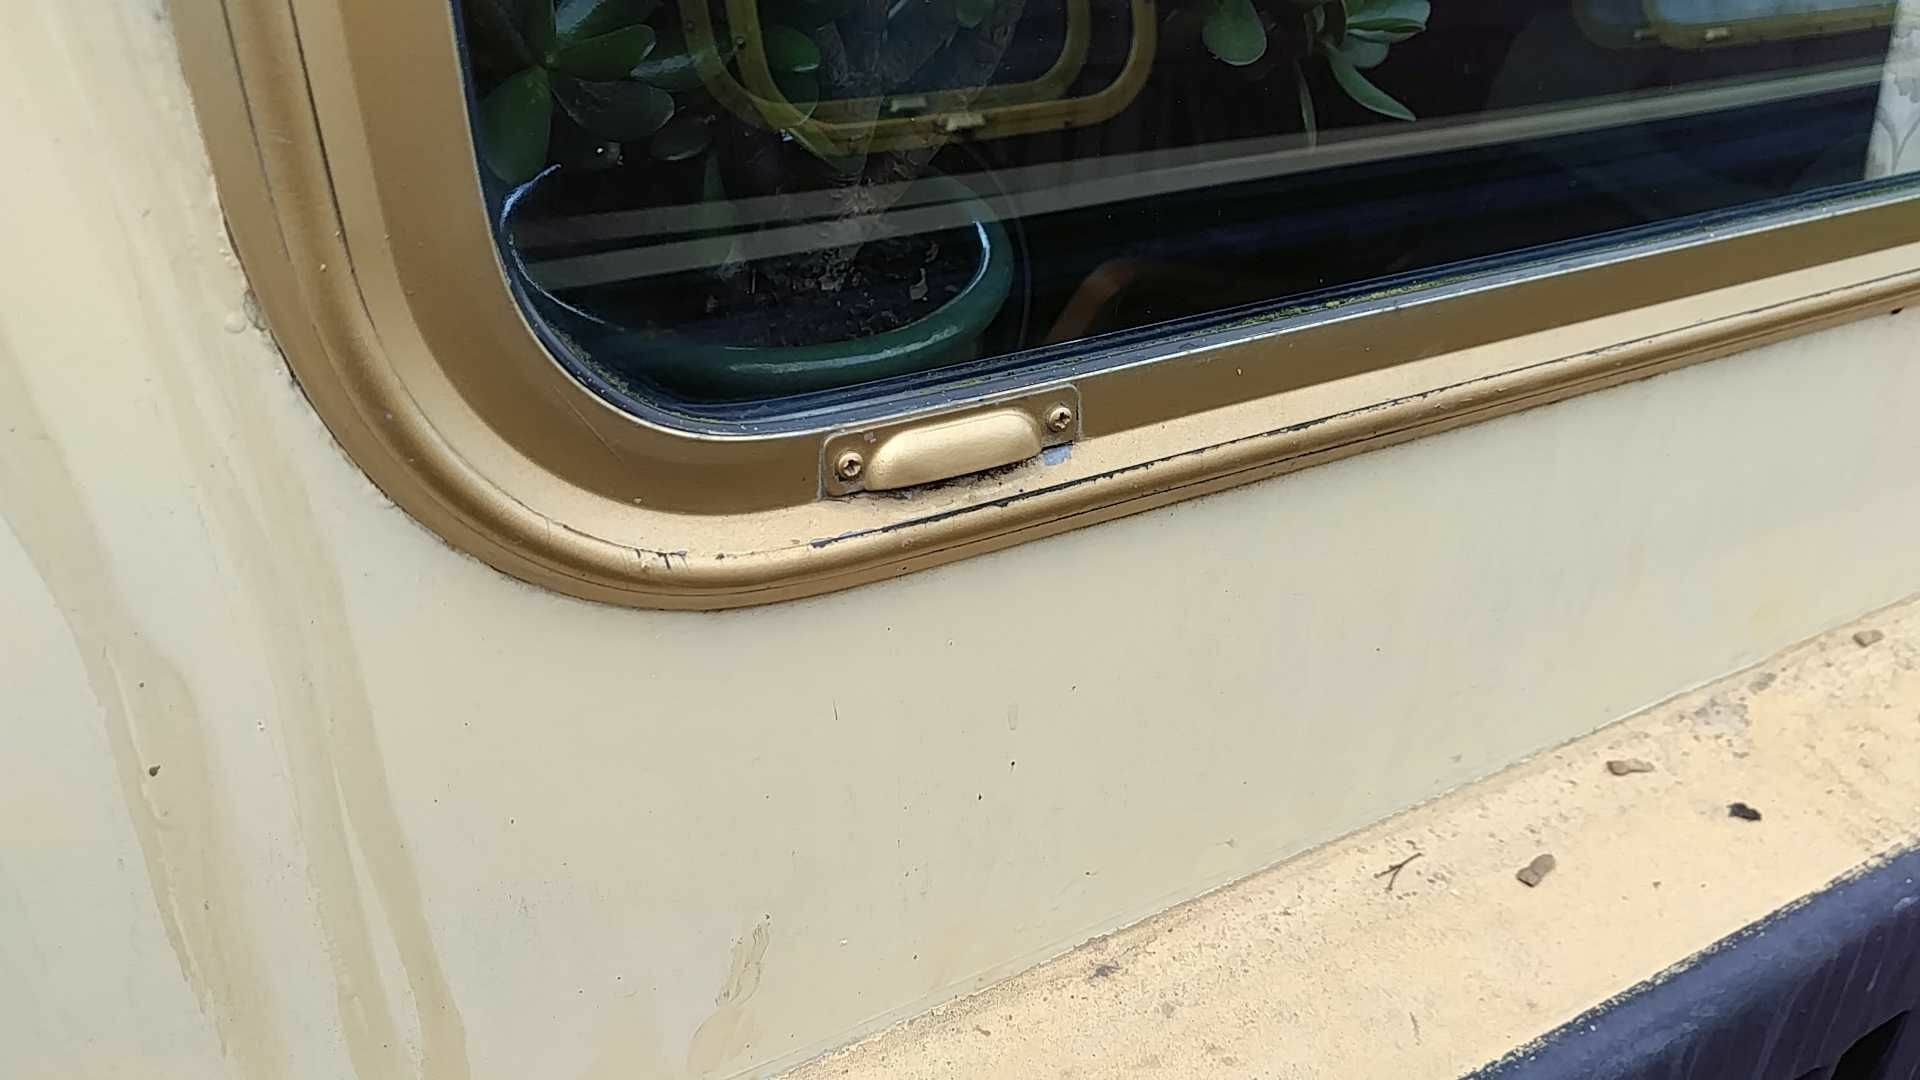
As a postscript to this thread, I took this picture of the outside of my windows. I assume this is a cover for the drainage holes (2 per window).
In which case, it does seem daft to block them on the inside with foam - not sure why that was put in. Easy though when it is pointed out. I like the idea of the cable tie as a flexible cleaner, thanks PeterF
Thanks all

-
Good advice both, thankyou.
And thanks BEngo for your post, I forgot to thank you
-
Thank you Tony and Sea Dog
I will check on the outside for any drain holes, but certainly won't try to drill any if they are not there.
I think, the general consensus being that this foam isn't needed, i will just take all the remaining stuff from the channels and leave it at that. One less thing I have to replace!
Thanks again
-
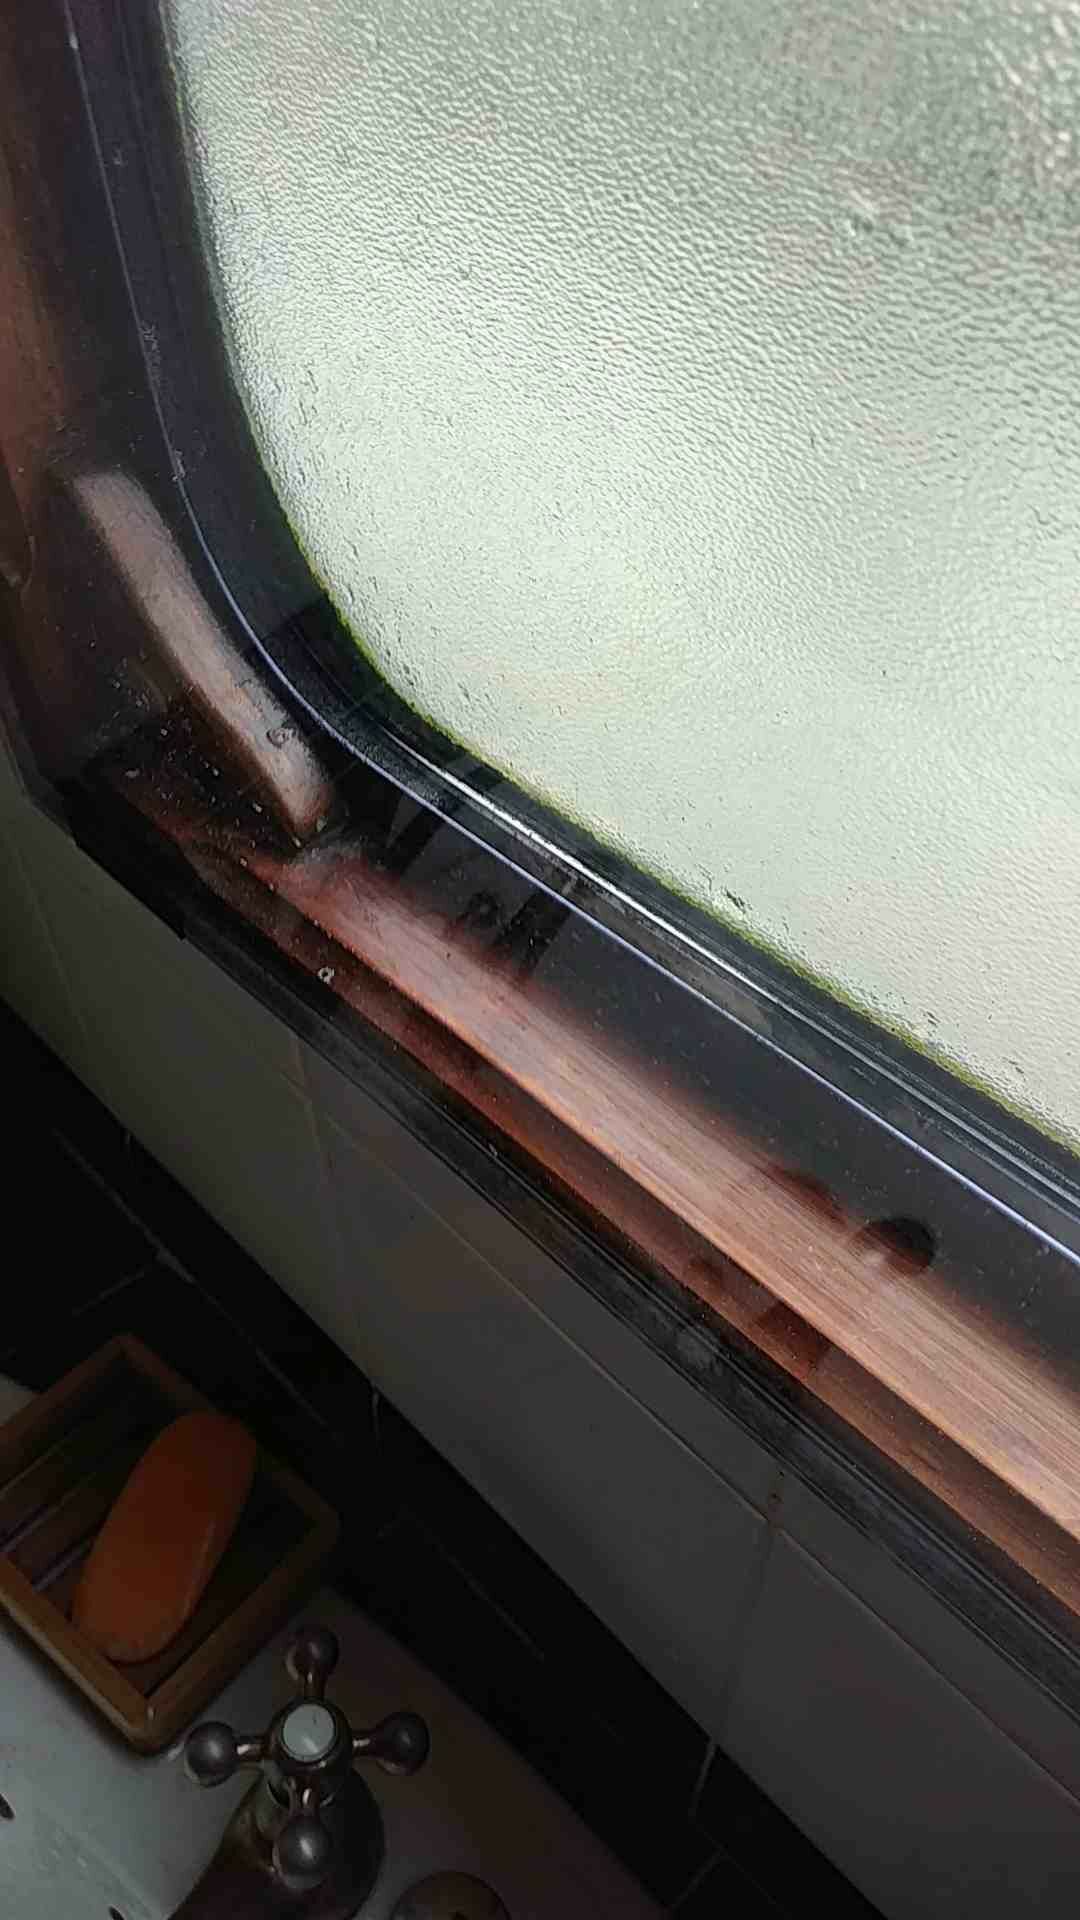
Yes I should have thought of a more informative photo 🙂
Hopefully this gives a better idea of what I'm talking about. This is the bathroom window and I dug some of the horrible stuff out of the channel you can see. It goes up the curved sides a way as well. The strange reflections are from the sheet of acrylic in front of the window
-
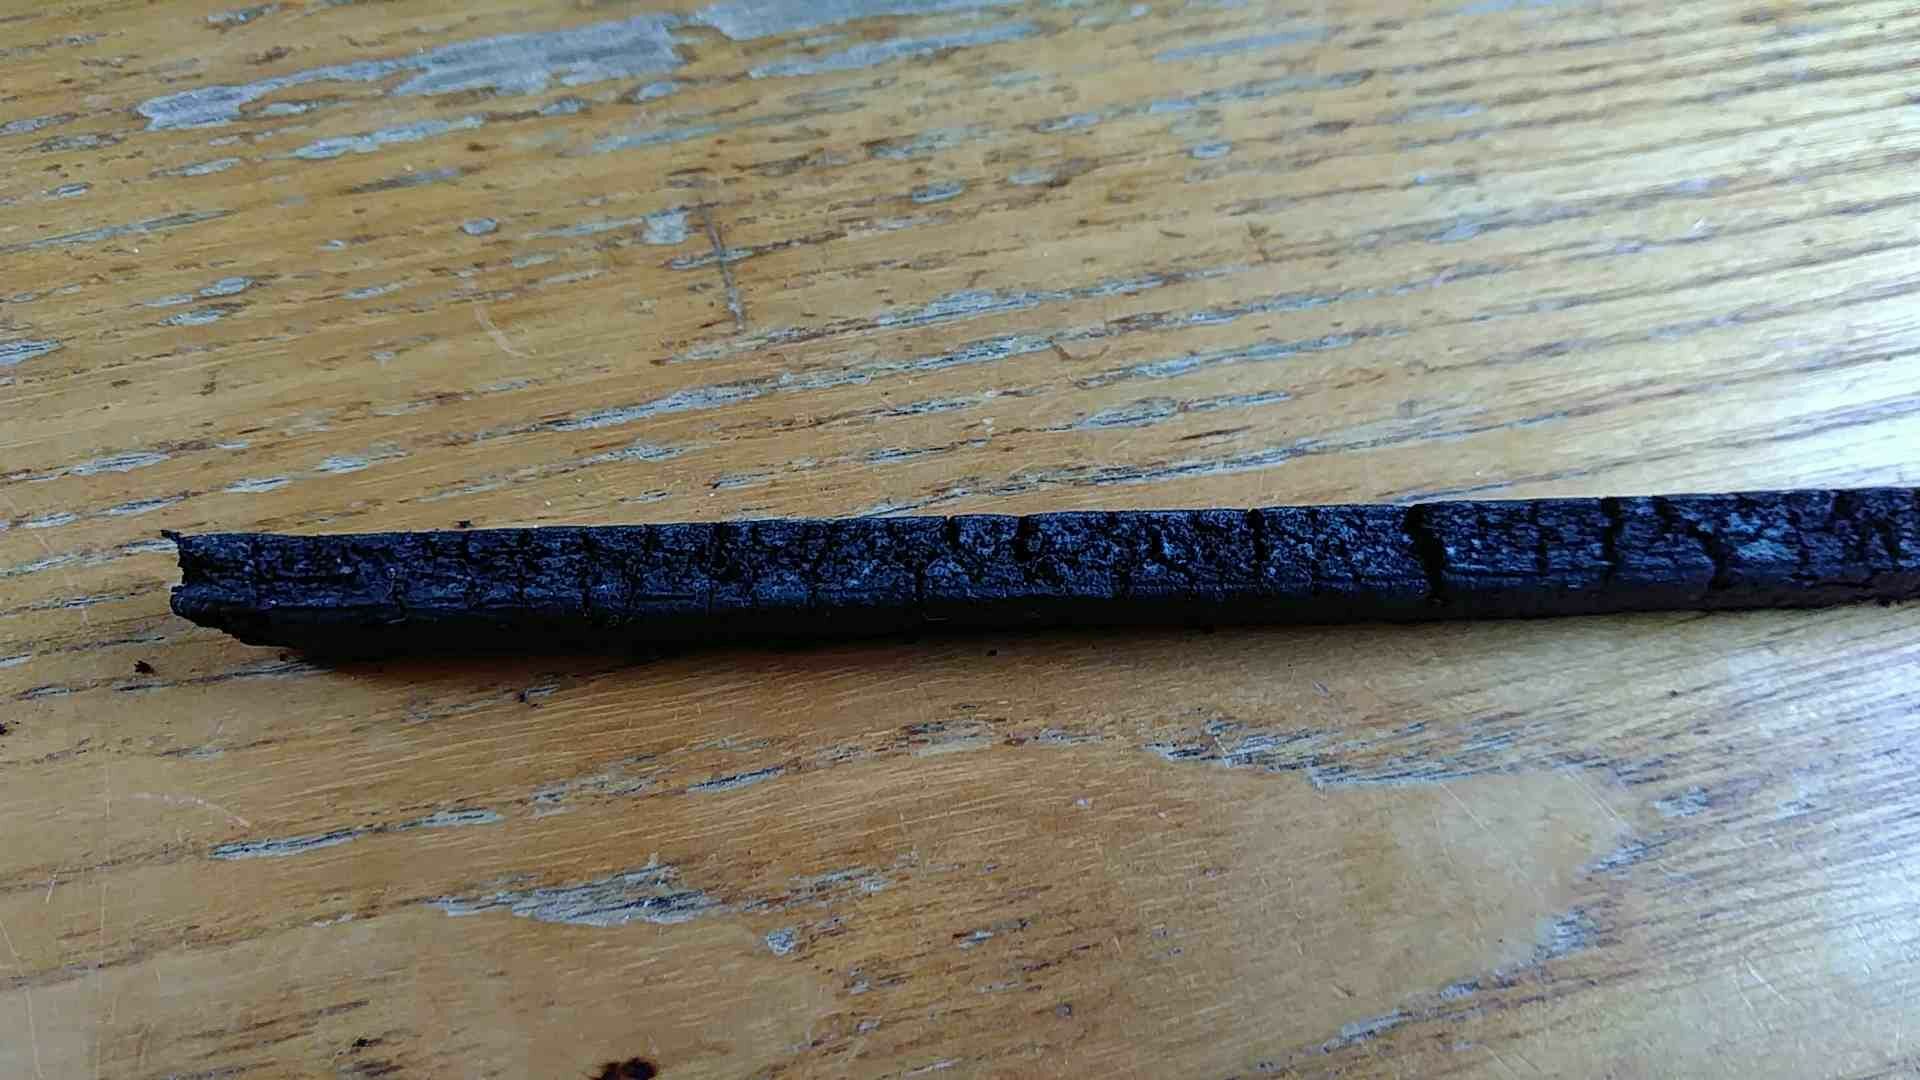
Here is a photo of the foam concerned Tony. It's a bit perished and was covered in all sorts of nastiness. It's about 8mm square with a sort of lip on one face.
I know the foam you are speaking of Sea Dog and i have neoprene to replace bits of that when they wear out - as a few have.
That's interesting blackrose. I just assumed because it was there, then it should be there. Makes sense to keep the channels clear.
-
Thanks Ex Brummie. Not 100% sure what you mean when you say they don't list it - they don't make it any more?
I am happy not to fit more if not necessary so thanks again for that
-
Afternoon
My Channel Glaze windows need some new foam/sponge in the channel used, I assume, to catch condensation. My question is whether I have to use stuff from Channel Glaze, or is there any other product I can put in this channel - weather strip etc. The old stuff seems more like sponge - it may be age - so I don't want to put the wrong stuff in only to replace it later.
Thanks, as always, for any and all advice
-
Thanks all. I put in 1 litre of X400 (from Screwfix) and ran the heating for three hours. My plan is to leave it for a week or so and then flush it through before refilling and adding anti-freeze.
-
Makes sense now Tracy, thanks. I wrongly assumed your reply was to my first question and not the second. Obvious when it's pointed out 🙂
Up very early - need nap!
-
I have read the data sheet for the Sentinel X400 and it says it can be introduced into the header tank (F&E cistern in their terminology), so I am slightly puzzled by the frst part of your reply Tracy. Am I missing something or do I have my humour bypass switched on? ☺️
-
cuthound, Tracy, thanks for the suggestions, they sound exactly what is called for.
I assume I can introduce the liquid into the system via the header tank? Would it be alright to leave the in for a couple of weeks before flushing through?
I know, RTFM 🙂 but thought I'd ask the people who have used them.
thanks again
-
If you are ever in my neck of the woods (Norton Junction-ish), then the drinks are definitely on me!
-
Thanks to everyone who responded with help and advice. I put a hose on the flow pipe and put an extra bit of hose on the return and put it over the side. After a few hiccups, and a lot of crap in the flow, it seemed to come through nicely and I was able to get the radiators working as they should (one at first then the other three). I think getting one clear meant the hot water was able to loosen the gunk that was in the system.
So whomever (and i think it was more than one of you) suggested that just replacing the radiators wouldn't necessarily solve the problem was spot on. To be fair that wasn't the idea initially, it was to get the boatyard to replace the rads and in doing so would have to get the system working. Glad i took your advice and didn't do that.
Plan is now to flush it through again in the next few days now that everything seems loose. I can replace radiators then at my own pace and do it myself.
Thanks again.
-
I have just bled the radiators again - although they didn't need it as water seeped out immediately. Also checked the air bleed valve (?) in the engine bay. All good.
I have noticed that although there are two feeds from the header tank, only one is plumbed in, the other one is blanked off. Reading on the internet (possibly dangerous, a little knowledge etc) seems to suggest that both pipes should be connected to the system to avoid air blocks. As I said, I have checked for air in the rads and there isn't any so not sure if any of this is relevant. does this make a difference to how you see the problem.
Thanks all for helpful advice
-
Header level didn't change noticeably whilst I bled the rads, but did go down a bit (not past minimum level) slowly over the summer.
I will bleed them again tomorrow and see if I can identify any high points.
Just trying to get my head around how this all works, is it reasonable to say that if the first radiator in the chain does not get warm at all, then any block will be between that radiator and the diesel heater?
Thanks Tracy for your time and advice
-
When I bled the rads, water came out almost immediately on three out of the four, the other one a small amount of air came out first.
Not a particularly heavy flow though, more just dribbling down the side of the radiator. Didn't realise water was coming out at first, and the aur wasn't strong either. I assume because it isn't pressurised as in a house?
-
David Mack - There isn't a separate valve on the pipe leading to the radiators. The radiators are pretty old - about 25 years plus - so prepared to accept that there may well be a lot of gunge in the system. I accept that even if the gunge came from the rads, changing them won't be enough on its own, so the pipes will need flushing, which I suppose would happen when new rads are fitted. Thinking through the problem other than that is fine if you have better plumbing knowledge than me - so it may not occur to me to try other options.
Rob-M - the pipes to the rads go underneath some fitted cupboards so it is quite difficult to tell - certainly not getting warm at the first rad valve pipework.
Tracy - good point. The only reason I think the valve is good is that when I close it down fully to the calorifier, the pipe between the valve and the calorifier does not get warm and the diesel heater closes down farly sharpish when it gets too hot. when the system is drained it sounds like a good idea to change it anyway as it has been there a while I assume
-
It is, yes. It is attached to the pipe going to the calorifier coil.
-
Header tank level is fine (between min and max) and I bled the radiators and checked the system air bleed valve. Nothing in the rads and only a tiny amount of air in the system in general.
Was advised to try adjusting the balancing valve (?) on the hot water feed to the calorifier to force the hot water into the radiator part of the system but nada. Pipes that side of the valve not even warm. Does that mean that any block is right at the start of the system as it were?
Wasn't at the boat for quite a lot of the warmer weather this year and hot water was provided by the immersion for short periods (I know!). Now that it is going to get cooler soon, I thought I would check that the radiators worked as they did last year - and that's how I found them to be not working
-
Had a new Eberspacher fitted last September and hot water and rads worked OK. For some reason, the rads now no longer heat up but the hot water is fine.
Rusty shackle
in Boat Building & Maintenance
Posted
There was an awful lot of advice and digressions I agree, but good that people are happy to help and the diversions were . . . well, diverting.
Maybe a thermic lance for next time - or a light sabre ?