


p6rob
Patron-
Posts
671 -
Joined
-
Last visited
Content Type
Profiles
Forums
Events
Gallery
Blogs
Store
Posts posted by p6rob
-
-
I'd like to come along. It's too long since I've seen any boaty people irl.
Will check the travelodge has a room available.
Rob
-
 2
2
-
-
On 06/06/2022 at 08:08, Tony Brooks said:
Well, that one only reads to 300 psi, I think that you may need in excess of 400 psi. The £26.95 one looks far more suitable, 1000 psi and what look like some diesel adaptors.
It's difficult to tell if that set has the right adaptor for the BMC 1.8 glow plug holes, which according to Calcutt's website are M12x1.25mm.
The set doesn't list that size glow plug adaptor in the description but there are a couple of non specified silver adapters in the picture that might convert one of the M10 glow plug adapters to M12.
Good luck. It'll be interesting to find out how you get on.
Rob
-
On 17/09/2021 at 08:02, noether said:
I don't want to buy any expensive equipment to check on these problems
I was in Aldi last week and they were selling multimeters for, I think, 9.99. Not sure if they're still available but worth keeping one handy at that price.
-
Thanks for the week wishes and messages.
The latest news is the op is scheduled for Wednesday, so I'm still in hospital, being very well looked after but starting to feel incredibly fed up to be honest.
Rob
-
About 9 years ago, I had a pretty bad mountaineering accident. Snapped both bones in my left lower leg and spent 7 weeks in various hospitals waiting for a surgeon willing to operate. It was during those 7 weeks I decided that, if I managed to keep the leg, I'd buy a narrowboat to live on.
Fast forward to last weekend and while cycling, I tripped fell off the bike and managed to snap both tibia and fibula in the right leg. A very annoying freak accident.
Unfortunately because the skin is damaged they haven't as yet been able to insert the rod which will hold it all together. Instead I have a mecano type frame bolted to my leg holding, it together. The final op was planned for today but unfortunately the skin has deteriorated, so will need a skin graft. Hopefully the two procedures will happen either Monday or Tuesday next week.
In the meantime, I've been in touch with C&RT, they're happy to let the boat stay where it is for another 4 weeks (I was due to move the day of the accident). Has anyone managed to rehabilitate on a boat? I won't be able to drive for a month or two. The boat is near Hockley Heath at the moment, so I'm thinking of either booking into Swallow Cruisers or Lyons Boatyard until I can manage doing locks again.

-
 1
1
-
 1
1
-
-
The top seal is a bugger to get in square. I had a similar issue the first time I changed my fuel filter, learnt lots of lessons about checking it was seated correctly but still struggled with leaks the next few times too. The only difference was knowing where the problem was likely to be.
I found it wasn't enough to feed the seal in by hand, instead, get a thin electrical screwdriver, or something similar AND PREFERABLY BLUNTER to make sure the seal is pushed fully up into the housing.
Rob
-
Deepest condolences to his family. Peter crewed with me on the 2018 BCN. A really nice, easy going guy.
-
1
-
-
10 hours ago, David Mack said:
And which 3D printer?
3D printing looks like it could help me on a couple of projects, but its something I haven't attempted yet. My CAD capability is limited to an ancient 2D copy of TurboCAD, so it would all be a bit of a learning curve!
After looking at lots of reviews online I bought a Creality CR10S Pro. It has its issues though. Setup is not as straightforward as they make out, getting the Y axis parallel to the hotbed was extremely difficult. Extremal temperature affects sensors, so does hotbed and nozzle temperature, so it can take a lot of time to setup between prints, this might be more because of where my printer is located in a garage, which gets pretty cold. It took a lot of faffing to figure this out and necessitated replacing the hotbed when it got gouged by the nozzle.
I now set the bed and nozzle temperature up and let it settle for 10 minutes before starting a print.
Given the above I'm not sure I'd recommend it. It's the only printer I've used so can't recommend anything else. Once the issues are understood and it's setup right, the print quality seems pretty good.
-
6 minutes ago, Jen-in-Wellies said:
What a good idea. Will you be making the files available when you've finalised the design? Just the sort of thing that 3D printing is good for.
Jen
Potentially if there's enough interest. Happy to share but it's not quite ready for general use and I'm not sure how much further to go with fettling it at the moment.
-
14 minutes ago, Tony Brooks said:
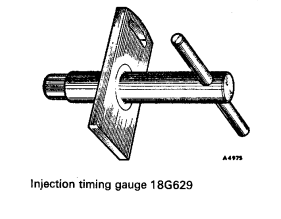
I think the disk is too small in that it will sit inside the studs that secure the pump. The gauges that look like this one seem to have an additional arm with a knife edge for scribing against so I wonder if it is used for scribing the datum line on the PUMP, not setting the pointer.
A significantly undersized disk will give ample opportunity for parallax error when setting the pointer that will probably be over 0.5" away from the adjustable pointer.
The one for setting the pointer looks like this:

The slot in the plate fits over the stud so the pointer and datum line on the gauge are very close. If @p6rob decides to increase the diameter of the teh disk it will need three slots, one for each stud.
Tony, I took on board your comments yesterday and can assure you that it fits over the studs and the notch is within about 2mm of the pointer.
Rob
-
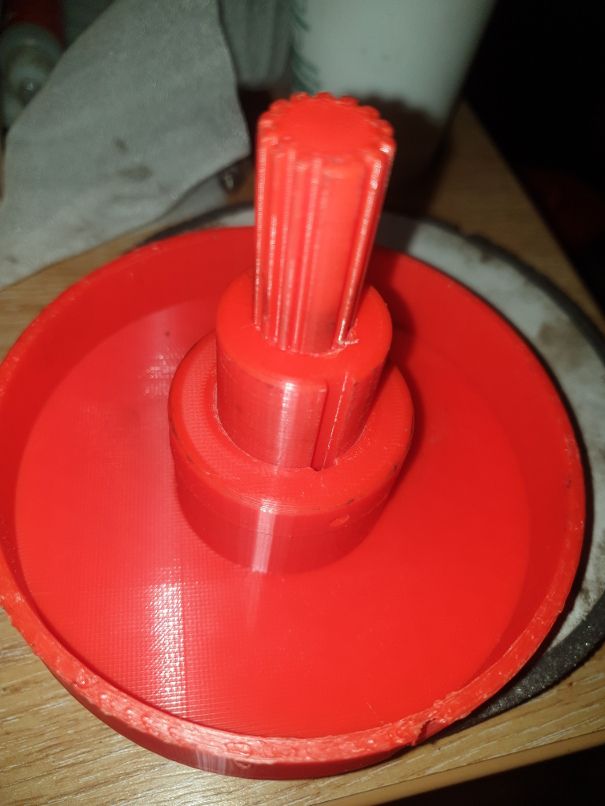
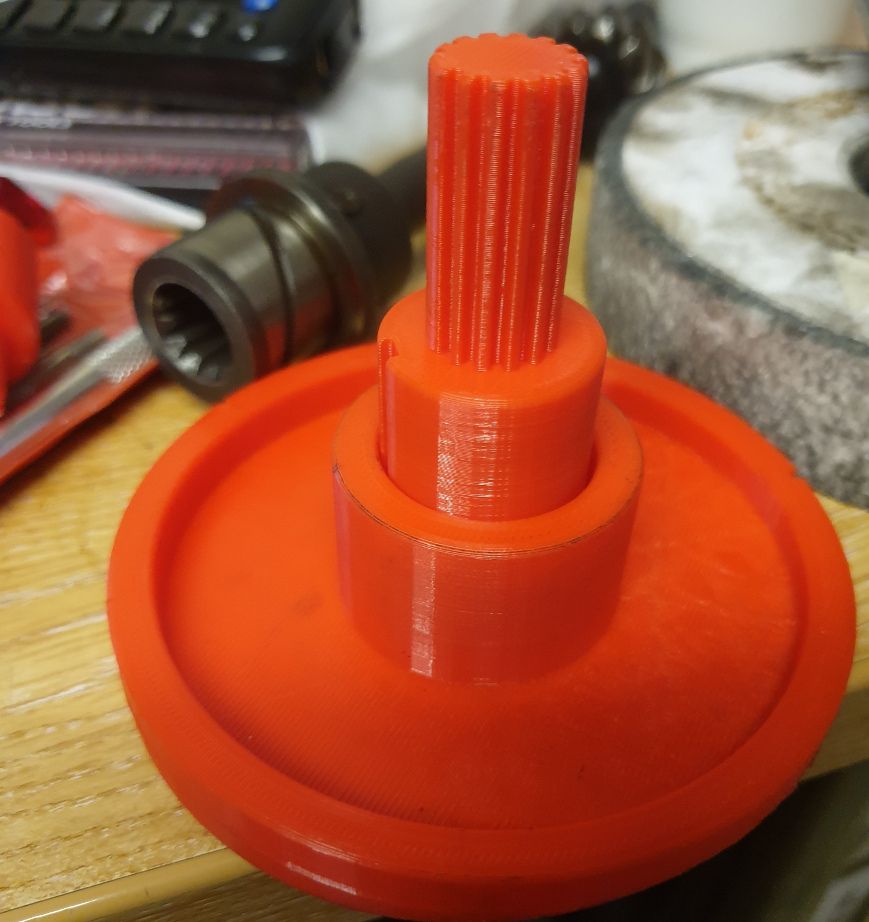
7 minutes ago, BEngo said:
That is very good.
Thanks.
7 minutes ago, BEngo said:Is the splined shaft hollow? If not taking the core out will make it a bit quicker to print, and save on material without affecting its usage. You could also add some lightening holes to the main disc if you can site them so as not to affect the function.
No it's not hollow on this version but I'll give that a go. The first trial was a bit of a tight fit and actually broke when I tried removing it from the drive gear, so was thinking of putting a cap head bolt down the centre.
7 minutes ago, BEngo said:Which CAD package did you use?
N
Freecad. No prior experience but have been watching lots of tutorials and although half the time I don't understand the terminology, I've so far managed to make a few parts for my pre war Armstrong Siddeley car and now this.
-
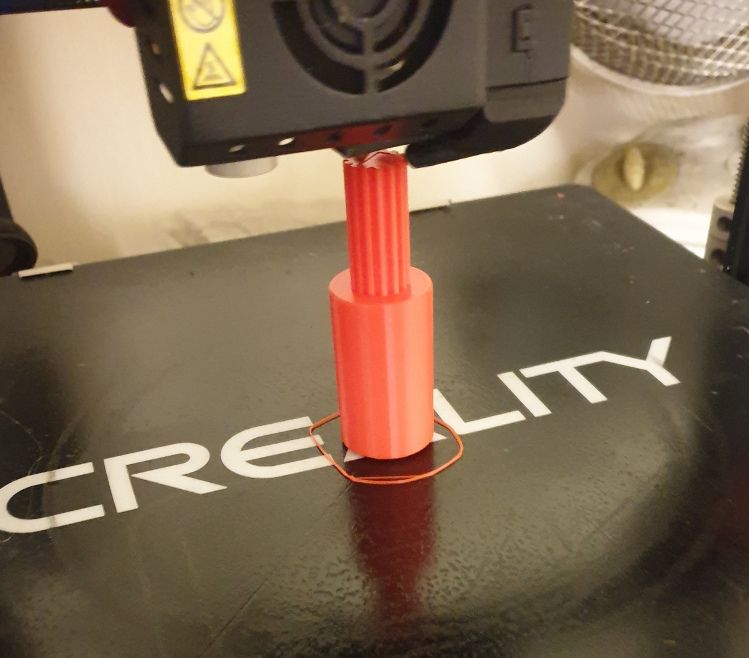
Still a work in progress but I have now got a usable printed timing tool for the 1500. To make it involved learning how to use CAD software which was an interesting lockdown distraction.
It took about 9 hours to print in total, I'm sure the printer settings can be tweaked a bit to reduce that, perhaps that'll be the next lockdown project.
-
2
-
-
45 minutes ago, Julian Xavier said:
I was lucky enough to borrow a genuine universal timing tool once. The zero degree mark is in the centre of the master spline. So, yes its 208 degrees from the centre of the master spline.
-
1
-
-
21 minutes ago, Tony Brooks said:
Wrong calculation for the compression pressure. You take no account of the increase in volume of the air caused by the heating effect of compression. To calculate the pressure you need to get into the Boil's and Charles's Gas laws. (Don't ask me how to do it, I was all too happy to forget those calculations when I left college and by the time I was teaching mechanics that sort of thing was no longer required.
Thank you, I did wonder but when I compared these figures to NA petrol engines that I have compression ratio and pressure data for they correlated, so there's some extra info needed for diesel engines?
21 minutes ago, Tony Brooks said:You calculated pressure is also absolute pressure, not gauge pressure so to convert to gauge ass 14.7 PSI.
I have a feeling the manual used to give about 435psi as test pressure but can't be sure and the on-line one most people use does not give a value that I have found.
Comments on your commendable effort for the gauge.
1. I can't see the master spline so without it will be possible to insert it into the drive in the wrong position.
There is a master spline and reference marks so it shouldn't be possible to get the timing in the wrong position.
21 minutes ago, Tony Brooks said:2. If you intend to scribe the datum line on the rim of the disc then either a pump fixing stud or studs will prevent it being inserted into the drive or, if the disc is small enough to clear your risk parallax errors when setting the pointer.
The outer is still a work in progress but thank you for pointing that out. I'll make the changes for the next iteration which I'm working on now. Your comment has made me notice the outer wall is also too thick, so needs a few more tweaks.
I'm almost fifty but every day is a school day. Your patience is appreciated.
Rob
-
I've been going through a similar process since my engine overheated when moored in a corner of a basin on a winter mooring, the shallow water and silt meant the skin tank wasn't effective, I changed the head gasket before Christmas but for many personal reasons it's taken until yesterday to actually get the engine to fire up albeit it was smoky, so I suspect more work is needed to get the timing right.
On your engine double check the compression figures. The BMC 1.5 is a 23:1 compression ratio engine, so, according to Google, you multiply atmospheric pressure (14.7 psi at seal level) by 23. Giving a cylinder pressure of 338 psi.
Edit to add: Following correction of my statement by Tony Brooks. Then account for Boyles Law, multiply the above by (according to Google 1.4 is a good number) to allow for heat from compression. So, 338*1.4. = 473. Without knowing exactly how to calculate Boyles Law. If you can measure over 420psi you're in the right ball park and if the readings are within 10% for all cylinders, the engine and head gasket are healthy.
I've got the original glow plugs, so finding a suitable compression tester adapter wasn't possible so I had to modify one.
My readings were 350, 350, 350, 300 I replaced the atomiser washer and injector copper seal on #4 as there was evidence of blow by. I'd also had a bit of an issue removing #4 glow plug and the thread no longer sealed properly. I then installed a Timesert insert and the readings are now all 350psi. Once bled, the engine fired up, it was smoky, probably due to the wd40 I'd used to clean some of the carbon from the top hat of #4. It was a bit too cold for my liking and threatening to snow, so I called it a day and will carry on adjusting the timing when I next get a chance.
If your injectors are good and the pump's good, it only really leaves timing.
I've also been working on a 3d printed timing tool. The splined part has literally just finished printing and there's still a bit of work to do on the outer ring but it's looking quite promising.
Rob
-
1 hour ago, Eeyore said:
P6rob, is there anything confusing about Alan de Enfields post that I am quoting above?
On a more practical note, you can save the premiums on your life insurance and funeral plan, they ain't going to pay out based on what you are telling us about the way you are using the generator. Just saying...
Thanks for the warning. It is duly noted.
Rob-
1
-
-
Just now, David Mack said:
So you are running it on the boat? How do you ensure no carbon monoxide can get into the boat's interior?
I ran it on the stern with the exhaust facing over board and facing the wind flow which heads downstream from the boat. I also have carbon monoxide alarms both with lcd displays one near the stern and another just over halfway to the bow; so far neither has registered any carbon monoxide.
The cheap generator was a waste of money. It lasted about 10 hours total running time over about a two weeks and now has no compression, so I've bought a Kipor suitcase generator to replace it.
-
If you can plug into mains, or take the batteries off the boat, a smart battery charger might breathe some life back into your batteries. I bought a 12amp Ring smart charger from Halfords which has a pretty good desulphation process. Takes about three days per battery though and there's no guarantee it'll work but I've had reasonable success so far.
Also, if they're not sealed, there's some magic pills, 'Granville bat-aid', which, with a good charging, might help your batteries last a few more months.
Rob
-
Just before Christmas I bought one of the generic German 3.5KW frame generators. It's rated as 96db, so not even close to silent. On the plus side, it has metal panels, so not a fully open frame and I've added some sound deadening, both rubber and foam which has quietened it down but added to the weight. I think the noise level is now less than my boat engine.
It was cheap, only 160.00 new from a facebook advertiser and delivered within two hours of enquiring about it.
It's needed some very specific positioning of the choke lever to get it to start and the exact position varies almost daily.
Checking and topping up the oil is awkward because of the panels
There's no way I could lift it on and off the boat from the bow, so have to carry it through the boat, which is awkward and in the process I've broken the fuel line. Luckily I had some better quality fuel hose on board, so only a few minutes to put right.
I would have preferred to get something better but it was needed in a rush. Engine head gasket blew, the boat is on a winter mooring in the corner of a silty basin (Cambrian Wharf) I think the skin tank wasn't performing very well because it's knee deep in the silt.
I want to see if I can make it quieter. To me it doesn't sound too bad now, from inside the boat it's less annoying than my boat engine partly because there's less vibration and the windows don't rattle but the other evening, there were two people sitting on a bench nearby, when I turned the generator off one of them said, "bloody hell that was loud, they should ban people running generators". The fact they had managed to sit within about 15meters, while it was running, makes me wonder if it really is that bad but that being said, I don't like generating noise at the best of times.
Rob
-
I'm terrible at reversing but manage most of the time and seem to have less mishaps than people who rely on the bow thruster, especially when they find they've drained the BT battery before completing their manoeuvre and then have no clue how to recover the situation.
One of the few places I need to wind and reverse is Cambrian Wharf. Sometimes things go really well and I seamlessly manage to wind the boat on a sixpence and reverse into one of the spaces without touching the sides, other boats or pontoon and step off, rope in hand like a pro. Other times the boat seems to curve all over the place, I miss the winding hole, have to fend off the boats and generally make a pigs ear of it.
I've been intending to do a boat handling course for the last 7 years, Maybe next year it'll actually happen.
Rob
-
If the batteries are fully charged, it sounds like voltage drop through too thin cables, or a high resistance connection. As a test, try running an extra pair of positive and negative cables from the battery to the heater. If it then runs, either make the new cables part of the install, with an inline fuse, or replace the existing ones with thicker cables.
Rob
-
1
-
-
As soon as I found out about them, I've only used goat chains or rings, except when we randomly tried tying up before the start of the 2018 BCN challenge somewhere with no rings or armco. I found my stakes, unused since 2011 but not the hammer which I hid sometime ago because my son had an annoying habit of hitting things with it. Peter X and I knocked the stakes in as best as possible with a 1" spanner iirc, so pretty badly, however they held all night with some passing traffic.
Would mud weights be of any extra benefit if you have to use stakes?
Rob
-
There's been a few boats moored for longer than overnight recently, just above the top lock. Don't think they came to any harm.
I moved from Birmingham to Knowle over the weekend.
The elsan was in a terrible state, mainly because it's been blocked up and seeping sewage into the bin area. Spent three hours on Saturday trying to clear it up, then reported it to CRT and they're getting in touch with the contractors to fix it.
Apart from that, it's quite a nice place. My work backs onto the canal about 600 yards up from the top lock.
-
Hi Stefan,
Not specific to matt black paint but generally speaking you should stick to the same manufacturer for the primer, undercoat and top coat.
I'm using Craftmaster rust treatment, primer, undercoat and top coat on my cabin bilge at the moment. Not sure if they sell matt black off the shelf but I had them mix me a small pot of a specific RAL colour in their signwriting paint for an old car I own, which arrived next day so presumably matt black wouldn't be an issue. They're very helpful both online using their contact form and over the phone.
craftmasterpaints.co.uk
Rob

Loughborough Banter this winter
in Banters and Social Events
Posted
Hi Jan,
Sounds good. What time are you thinking?
Rob